# Native App Co
> Full documentation content for Native App Co
---
# Product Pelican Docs
## How it works
### Product Stitching
**URL:** https://apps.nativeappco.com/product-stitching
## Automate related product links with Product Stitching
**Product Stitching** lets you automatically group related products and write those relationships into a product metafield. You can use it for alternate colour options, complementary products, and merchandising experiences like **Pair it With** or **Complete the set**.
In Product Pelican, stitching rules match products using either **SKU** or **Title**. Matching is driven by a **Regex pattern**, which extracts a shared value from each product so matching items can be grouped together.
Product Stitching sits in the left navigation under **Product Pelican** as **Stitching**, alongside **Dashboard**, **Product FAQ**, **AI Prompts**, **Settings**, and **Plans**.
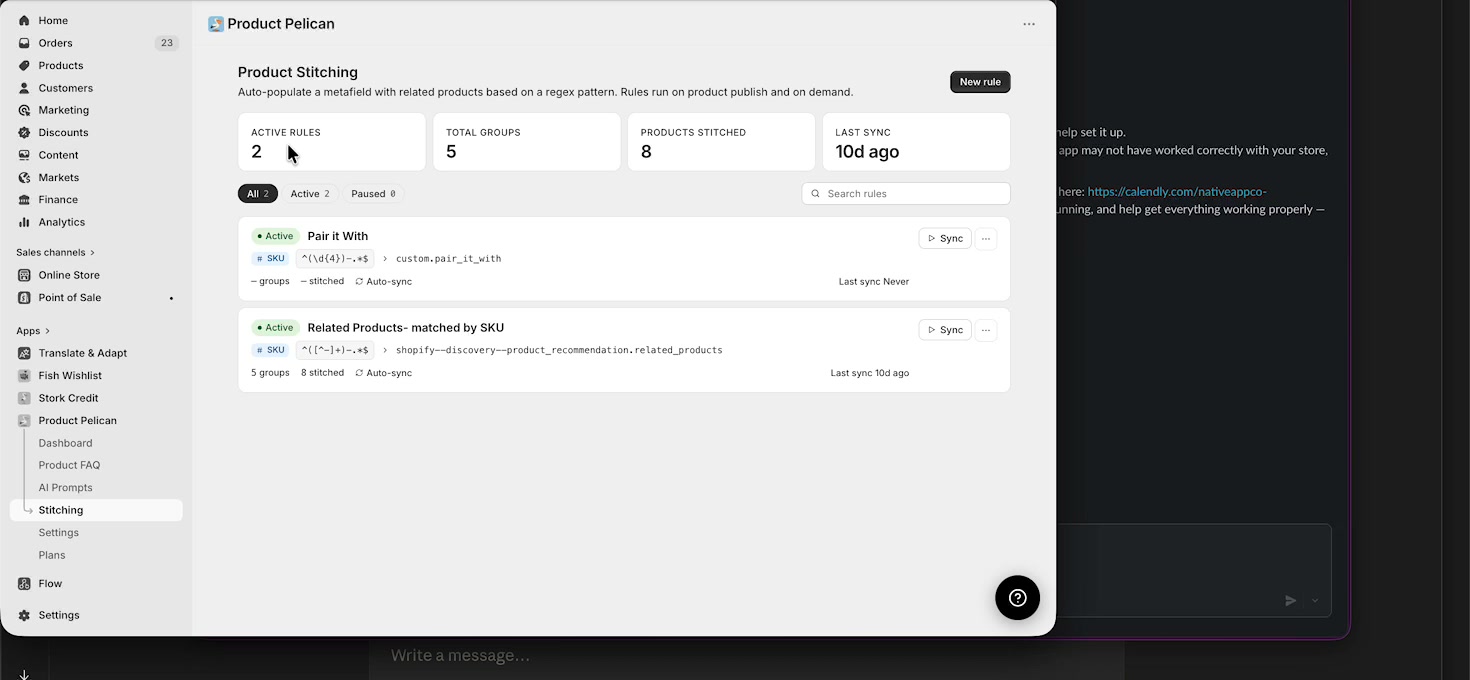
## Start on the Product Stitching dashboard
The main **Product Stitching** page gives you a quick view of how your rules are performing. At the top of the screen, the dashboard shows:
- **Active Rules**
- **Total Groups**
- **Products Stitched**
- **Last Sync**
Below the totals, you can filter the list using **All**, **Active**, and **Paused**, and narrow the list with **Search rules**.
Each rule card shows the rule name, its status such as **Active**, the match source such as **SKU**, the regex pattern, the target metafield, the group and stitched counts, whether **Auto-sync** is enabled, and a **Sync** action for running the rule.
If you plan to build several stitching rules, start by deciding which product relationship each target metafield should power. For example, keep alternate colours, complementary products, and set-building rules separate so each one writes to the right metafield. You can't create multiple stitching rules that right to the same metafield.
## Open a rule to review how it works
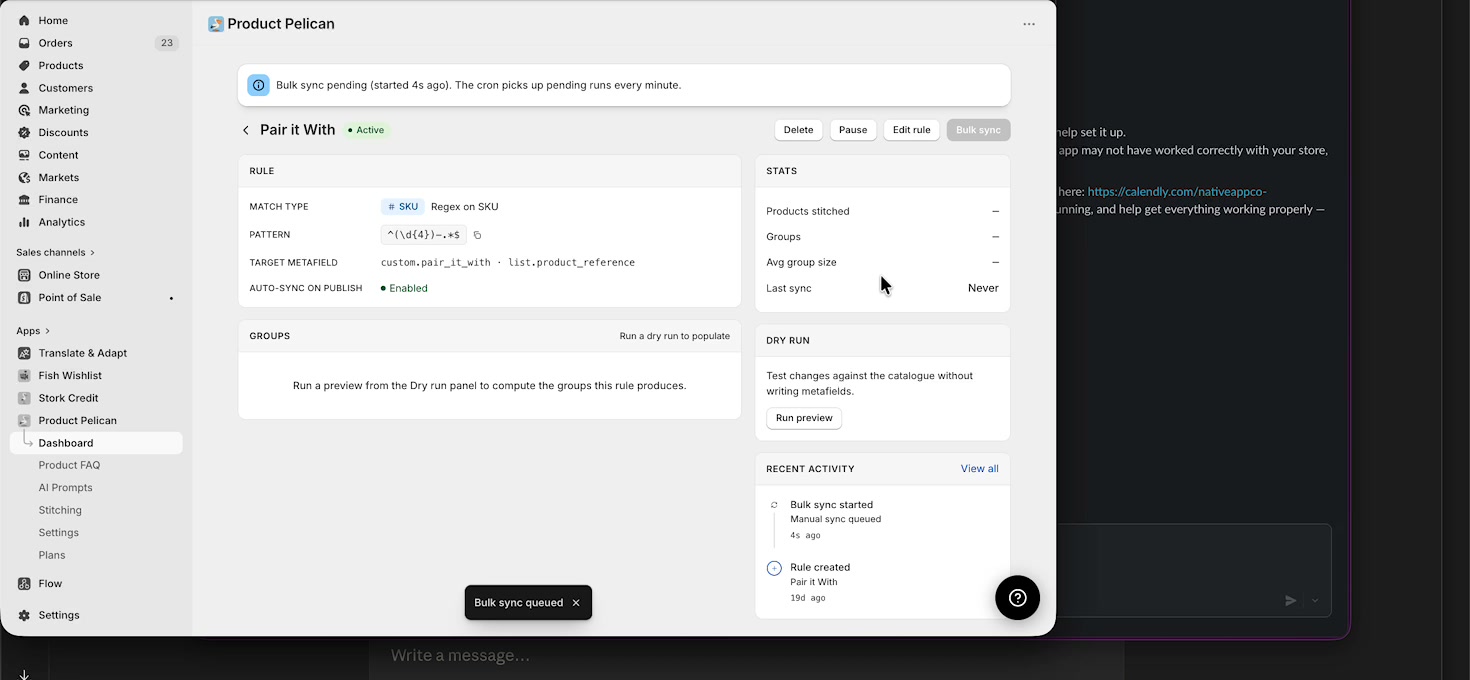
Select a rule to open its detail page. The walkthrough opens **Pair it With**, which shows the full setup and sync tools for that rule.
The rule page is split into clear sections:
- **RULE** for the current setup
- **STATS** for stitched counts and sync timing
- **GROUPS** for the matched product groups
- **DRY RUN** for testing the rule before writing metafields
- **RECENT ACTIVITY** for the latest events
At the top-right of the page, the available actions are **Delete**, **Pause**, **Edit rule**, and **Bulk sync**.
### What the rule page shows
In the **RULE** section, Product Pelican displays:
- **Match type**, such as **SKU** or **Regex on SKU**
- **Pattern**
- **Target metafield**
- **Auto-sync on publish**
The **STATS** panel shows values such as:
- **Products stitched**
- **Groups**
- **Avg group size**
- **Last sync**
The **DRY RUN** panel includes **Run preview**, which lets you test changes against the catalogue without writing metafields yet.
Use **Run preview** before a live sync whenever you change the regex pattern or swap the target metafield. It is the safest way to confirm which products will be grouped.
## Edit the rule settings
From the rule detail page, click **Edit rule** to update how the rule matches products and where it writes the result.
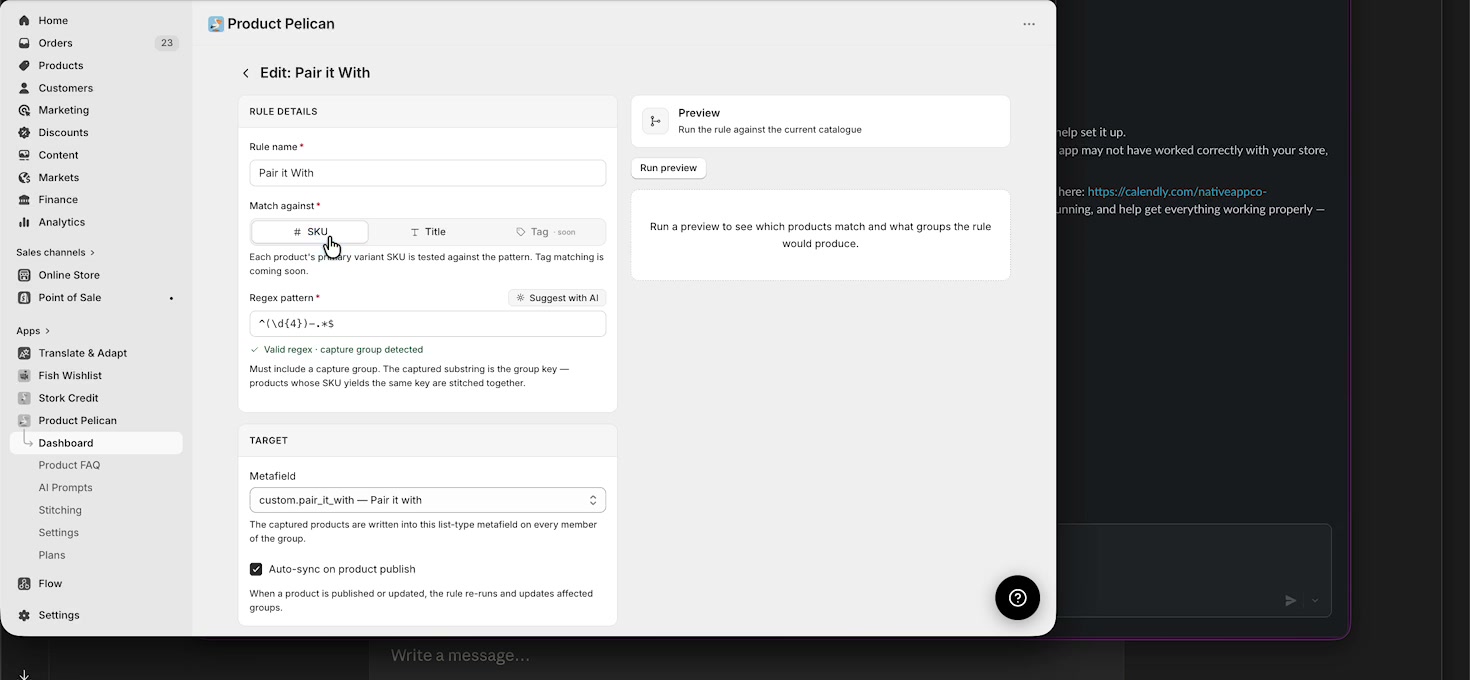
The edit screen includes two main sections: **RULE DETAILS** and **TARGET**.
### Rule Details
In **RULE DETAILS**, you can set:
- **Rule name**
- **Match against**
- **Regex pattern**
For **Match against**, the walkthrough shows these options:
- **SKU**
- **Title**
- **Tag** *soon*
When matching by SKU, Product Pelican tests each product's primary variant SKU against your regex. When matching by title, it uses the product title instead.
Next to **Regex pattern**, there is a **Suggest with AI** button. The screen also validates the pattern and shows confirmation such as **Valid regex - capture group detected**.
Your regex must include a capture group. Product Pelican uses the captured value as the group key, and products with the same key are stitched together.
### Target
In the **TARGET** section, use the **Metafield** dropdown to choose where the stitched product list should be written. The walkthrough shows targets including custom metafields and Shopify product recommendation metafields.
You can also enable **Auto-sync on product publish** so the rule reruns when a product is published or updated.
## Choosing a regex pattern
The right regex depends on how your catalogue is structured. A good pattern removes the part of the SKU or title that changes between related products and keeps the part they share.
Common examples include:
- Removing a colour name from product titles so different colour variants group together
- Matching products using the number that appears before the first hyphen in the SKU
- Extracting a shared style code from the start of the SKU
If you need help writing a regex, use an AI tool such as Gemini or ChatGPT and describe exactly what you want. For example: `remove the colour name from my product titles using regex` or `match products using the number that appears before the first hyphen in the SKU`.
## Save the updated rule
After choosing the correct target metafield and confirming the regex, click **Save changes**.
The walkthrough shows the rule being updated from a custom target to a Shopify recommendations target, then saved using **Save changes** at the bottom of the page.
If you do not want to keep the edits, use **Cancel**.
## Preview and sync the rule
Once the rule is saved, return to the rule detail page and test it. Product Pelican supports both a preview and a live sync:
- **Run preview** in the **DRY RUN** panel to see what the rule would produce
- **Bulk sync** to write the stitched relationships to the selected metafield
When a sync is queued, the page can show a status banner such as **Bulk sync pending**, explaining that the cron picks up pending runs every minute.
## Review the sync results
After the sync completes, the rule page updates with live stats and the generated groups.
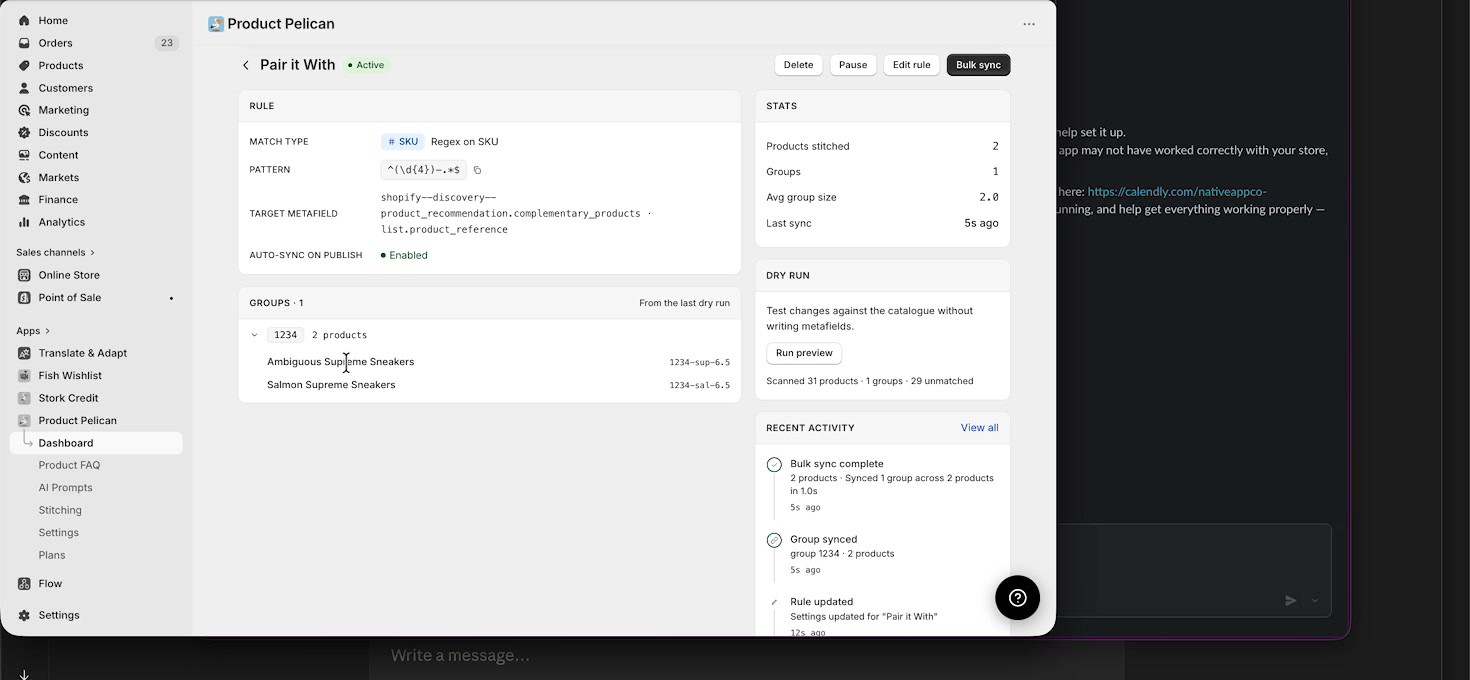
If the group looks too broad or too narrow, go back to **Edit rule**, adjust the **Regex pattern**, run another preview, and sync again.
## Check the rule logs
For a fuller event history, open the logs view for the rule. In the walkthrough, the page title is **Logs: Pair it With**.
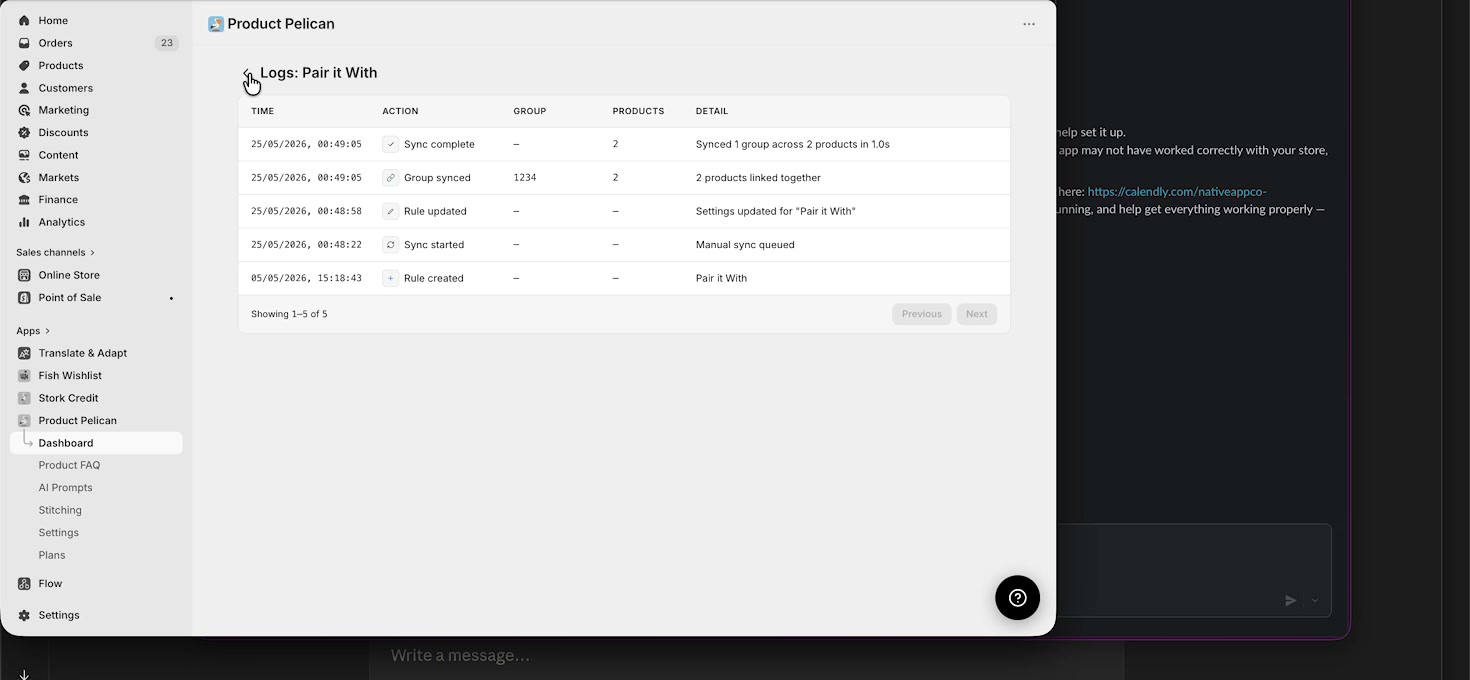
The logs table includes these columns:
- **TIME**
- **ACTION**
- **GROUP**
- **PRODUCTS**
- **DETAIL**
Typical events include:
- **Sync complete**
- **Group synced**
- **Rule updated**
- **Sync started**
- **Rule created**
Use this screen to confirm what happened during a run, when it happened, and how many products were affected.
## Typical Product Stitching workflow
In the Shopify admin, go to **Product Pelican** and select **Stitching**.
Use the **Product Stitching** dashboard to check **Active Rules**, **Total Groups**, **Products Stitched**, and **Last Sync**.
Select an existing rule such as **Pair it With**, or click **New rule** to create a new one.
Set **Match against** to **SKU** or **Title**, then enter a **Regex pattern** with a capture group.
In **TARGET**, pick the **Metafield** that should store the stitched product list.
Use **Run preview** in **DRY RUN** to confirm the groups the rule will create.
Click **Save changes**, then run **Bulk sync** or **Sync** to write the relationships.
Check **STATS**, inspect the **GROUPS** section, and review the **Logs** page for the full event history.
## Best practices for cleaner matches
- Use **SKU** matching when your catalogue has consistent SKU structure.
- Use **Title** matching when titles are more reliable than SKUs.
- Keep one rule focused on one relationship type, such as alternate colours or complementary products.
- Always test with **Run preview** before a live sync after changing the pattern.
- Review unmatched product counts after a dry run to spot gaps in your regex.
If you point a rule at the wrong target metafield, the stitched relationships may show in the wrong storefront feature. Double-check the **Metafield** before saving.
---
### Product Pelican
**URL:** https://apps.nativeappco.com/product-pelican
## What Product Pelican does
Product Pelican reviews the product data already in your Shopify store and highlights issues that can affect product quality, search visibility, and storefront completeness. There is no install setup inside the app flow shown here: once the app is added, it connects to your store data and runs a review automatically.
The app’s main workspace is **Product Health**, where you can see store-wide totals, open audit checks, and AI-powered suggestions you can apply directly from the app.
In the walkthrough, Product Pelican reviews product data using read access to store product information and then surfaces recommendations you can approve product by product or in bulk.
## Start on the Product Health dashboard
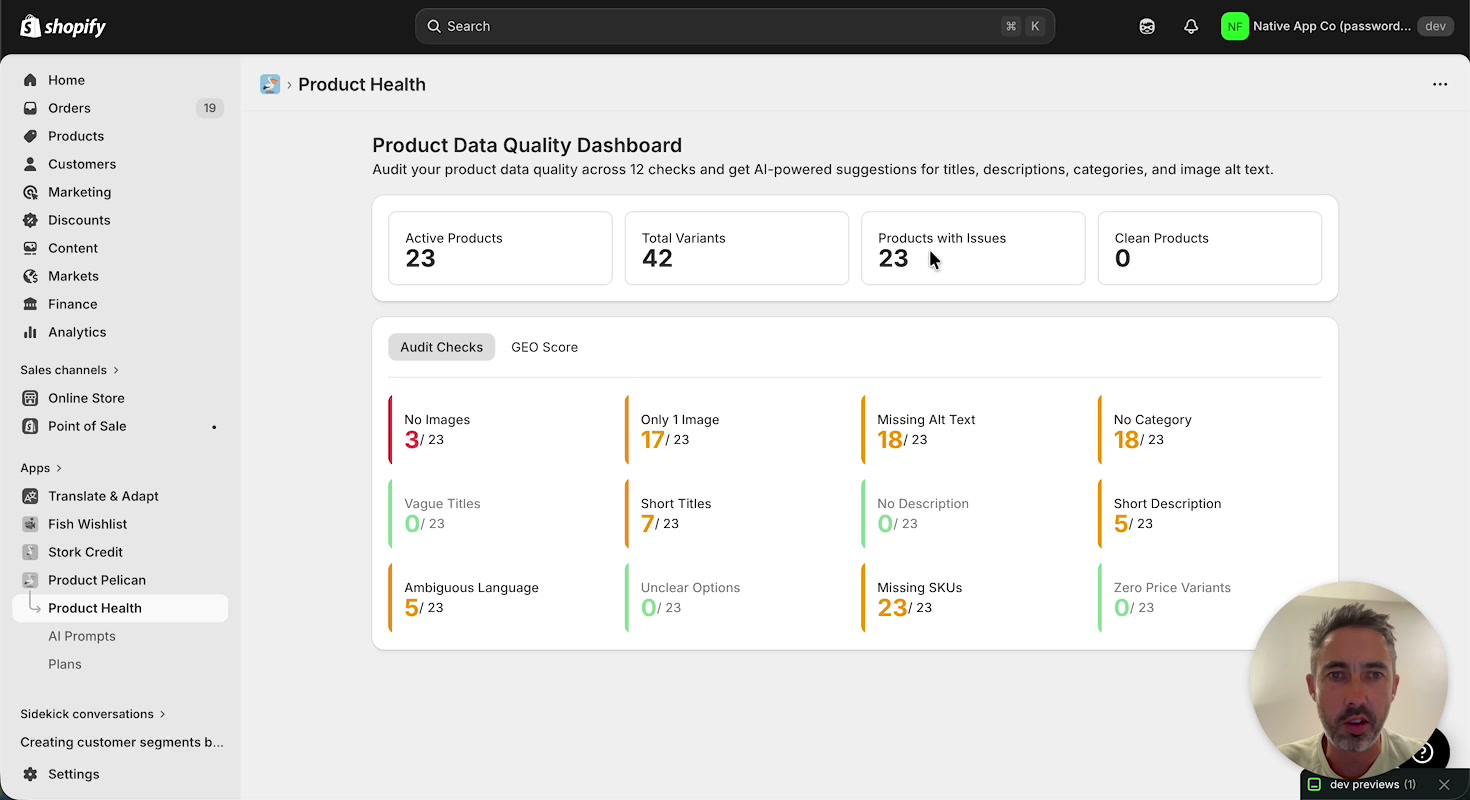
The **Product Data Quality Dashboard** gives you a quick view of overall catalog health. At the top of the page, summary cards show:
- **Active Products**
- **Total Variants**
- **Products with Issues**
- **Clean Products**
Below that, the **Audit Checks** tab groups issues into cards you can open. The walkthrough shows these checks:
- **No Images**
- **Only 1 Image**
- **Missing Alt Text**
- **No Category**
- **Vague Titles**
- **Short Titles**
- **No Description**
- **Short Description**
- **Ambiguous Language**
- **Unclear Options**
- **Missing SKUs**
- **Zero Price Variants**
You can also switch from **Audit Checks** to **GEO Score** from the same section.
Use the dashboard counts to decide where to start. Checks with the highest counts usually offer the fastest improvement opportunities across your catalog.
## Review image-related issues
### No Images and Only 1 Image
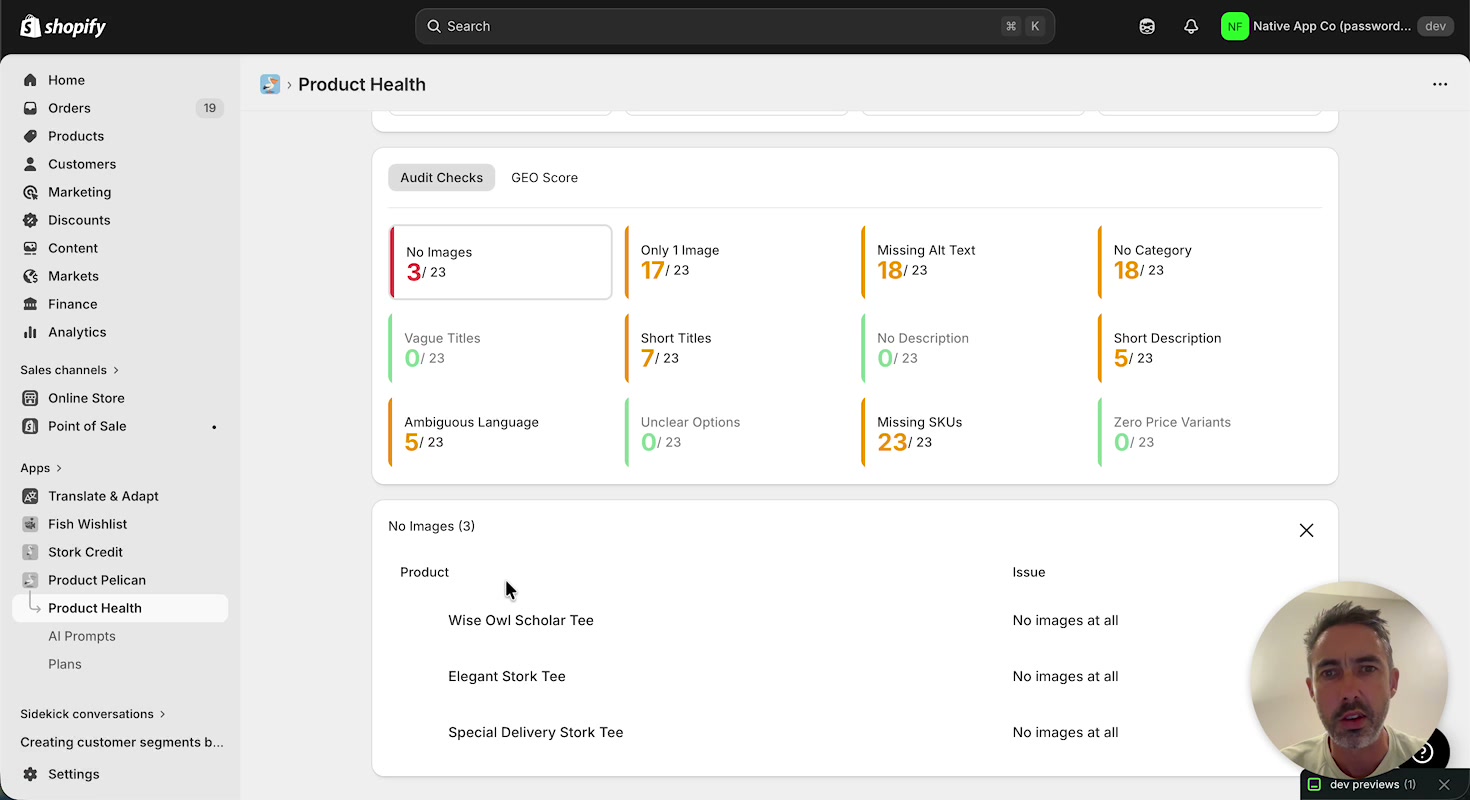
When you open **No Images**, Product Pelican expands a list of affected products and shows the issue for each one. In the walkthrough, products without images are listed with the issue **No images at all**.
These checks help you quickly find products that need manual media updates in Shopify.
### Missing Alt Text
The **Missing Alt Text** check is one of the most hands-on workflows in the app. When expanded, it shows image cards with:
- The product name
- The image filename
- The current issue, such as **No alt text**
- A generated alt text suggestion
- A character count check
- Actions including **Apply**, **Regen**, and **Copy**
At the top of the section, you can switch between **Missing / Poor** and **All Images**. You can also use **Generate All** to create suggestions in bulk and **Save All** to save multiple approved changes.
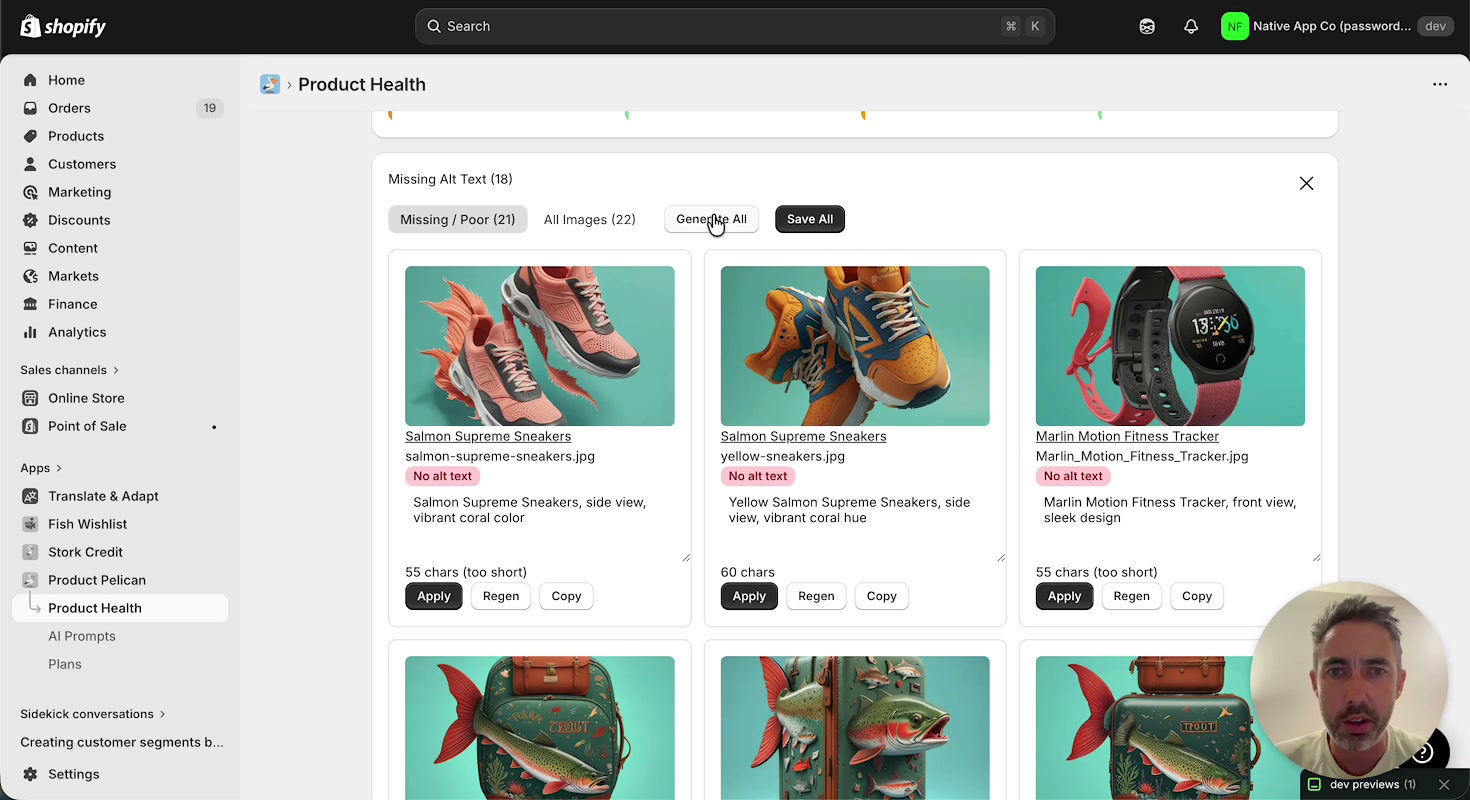
From **Product Health**, select the **Missing Alt Text** audit card. Use **Generate All** for bulk suggestions, or review each image card individually. Adjust the suggested alt text directly in the text field before saving. Select **Apply** on an individual image, or use **Save All** after reviewing multiple items.
## Suggest missing Shopify categories
The **No Category** audit helps you fill the Shopify category field for products that do not yet have a category assigned. When you expand the check, Product Pelican displays a table with columns for:
- **Product**
- **Issue**
- **Suggested Category**
- **Actions**
You can run **Suggest All** to generate recommendations for the full list. The walkthrough also shows category suggestions with different confidence levels, such as **High** and **Medium**, so you can review the best fit before applying it.
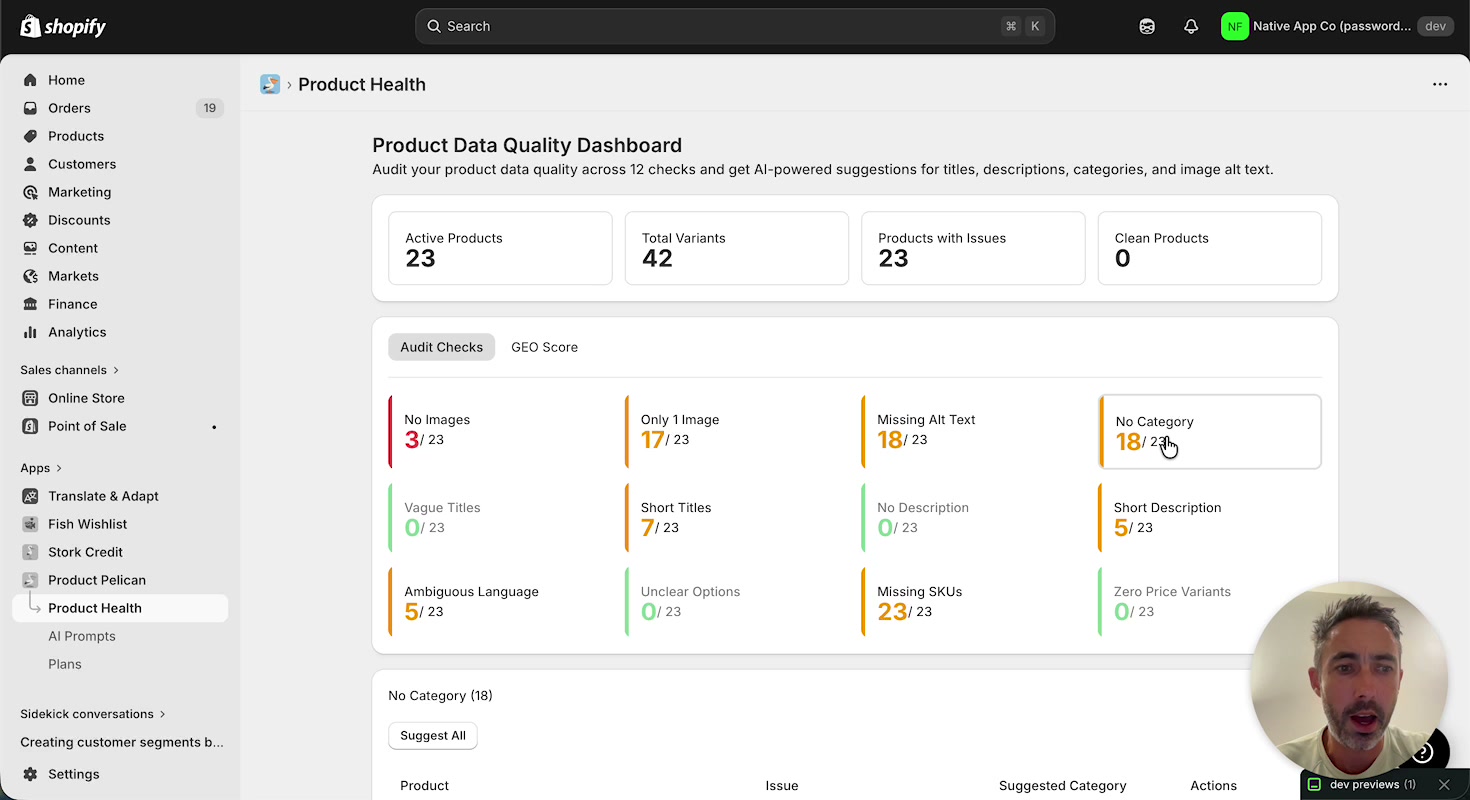
Category suggestions are especially useful if you need to update many products at once and want help matching items to Shopify taxonomy options.
## Improve short product titles
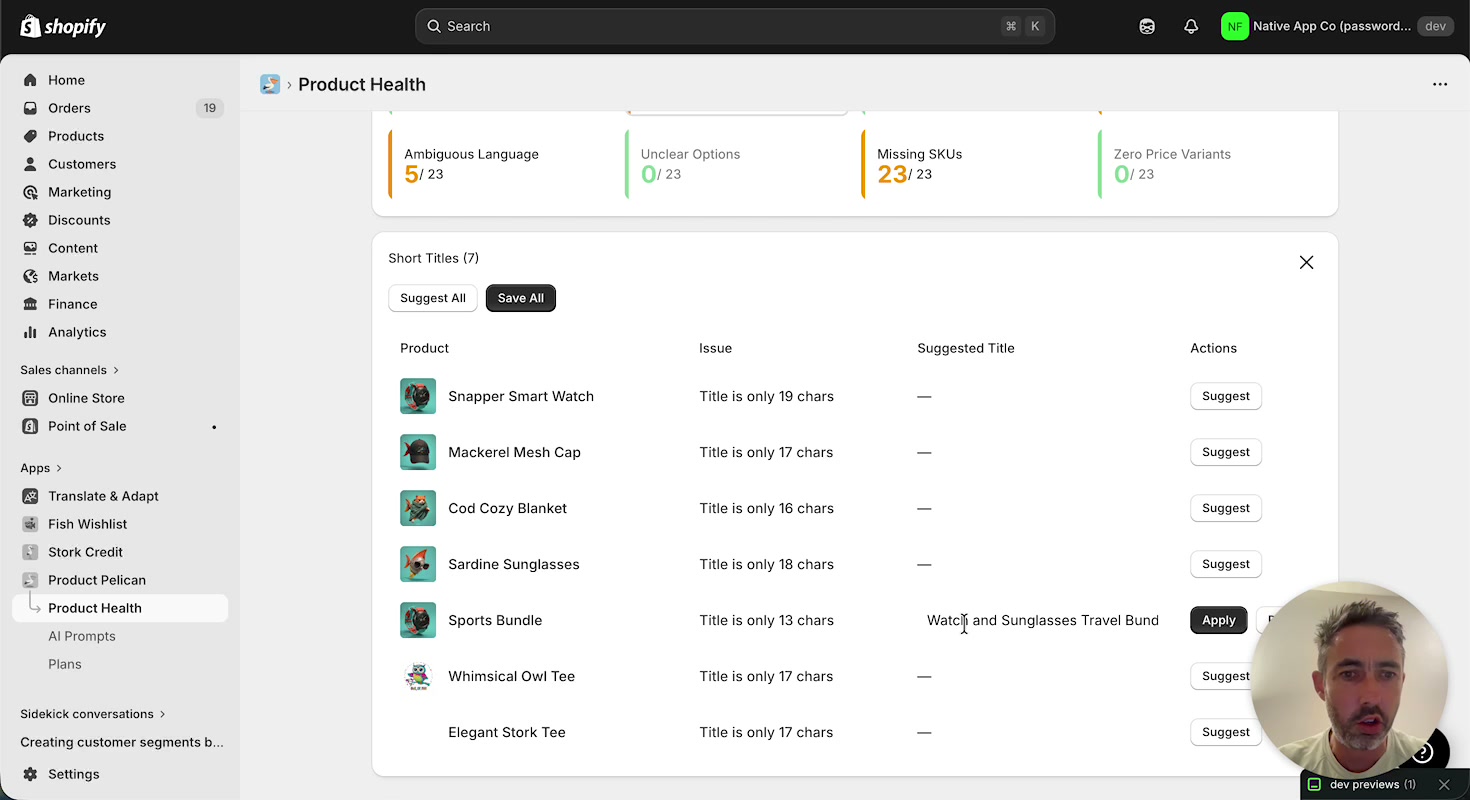
The **Short Titles** audit identifies titles that do not include enough detail. Each row shows the product, the issue, a **Suggested Title** column, and available actions.
In the walkthrough, Product Pelican expands a short title like **Sports Bundle** into a more descriptive replacement based on product details. This makes titles clearer for shoppers and gives you a faster way to standardize product naming.
Use **Suggest** to generate a title for one product, **Apply** to accept it, or **Suggest All** and **Save All** for bulk updates.
## Generate longer product descriptions
The **Short Description** and **No Description** audits help you add more complete product copy. When opened, the section lists products, shows the issue, and provides a **Suggested Description** area once content has been generated.
For short descriptions, the walkthrough shows a **Write All** option for bulk generation, plus individual row actions such as **Write**, **Apply**, and **Redo**. This lets you generate text in bulk, review it product by product, and then save the updates you want.
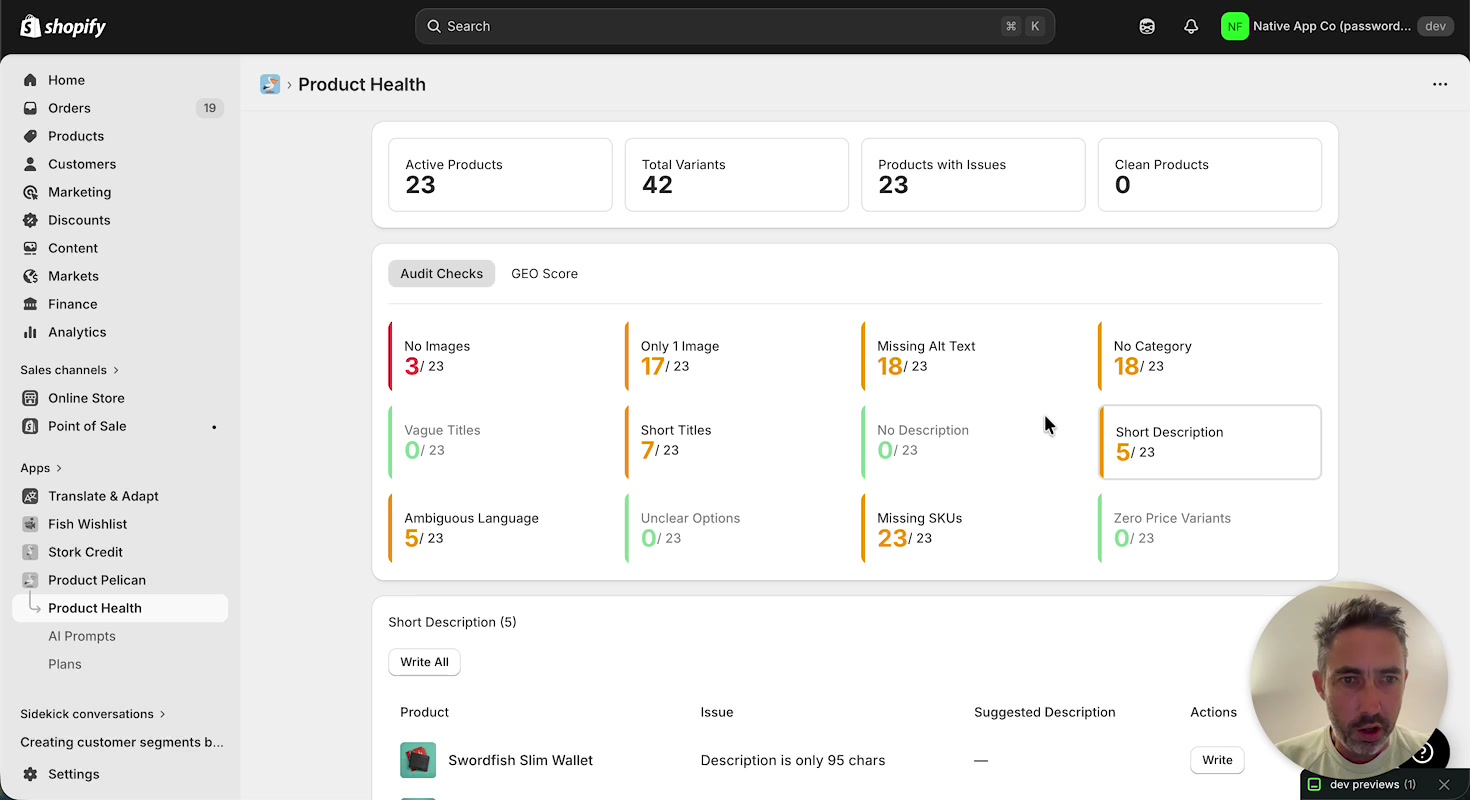
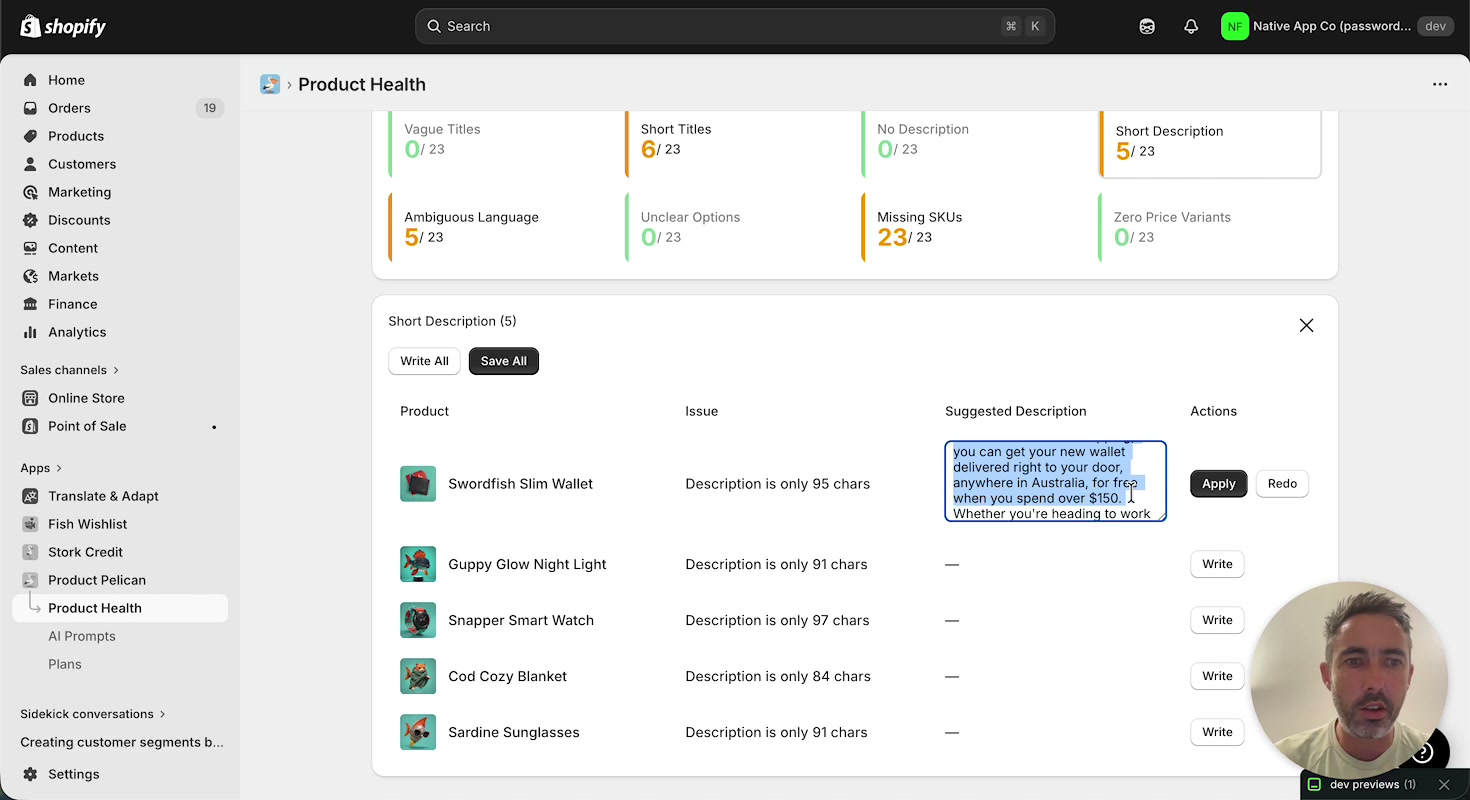
From **Product Health**, open **Short Description** or **No Description**. Select **Write** for one product or **Write All** for the whole list. Read the generated copy in the **Suggested Description** column and make sure it matches your brand and product details. Choose **Apply** to update the product, or **Redo** if you want a new version.
## Customize AI Prompts
The **AI Prompts** page lets you control how Product Pelican writes suggestions for your store. In the app navigation shown in the walkthrough, this page appears directly under **Product Health**.
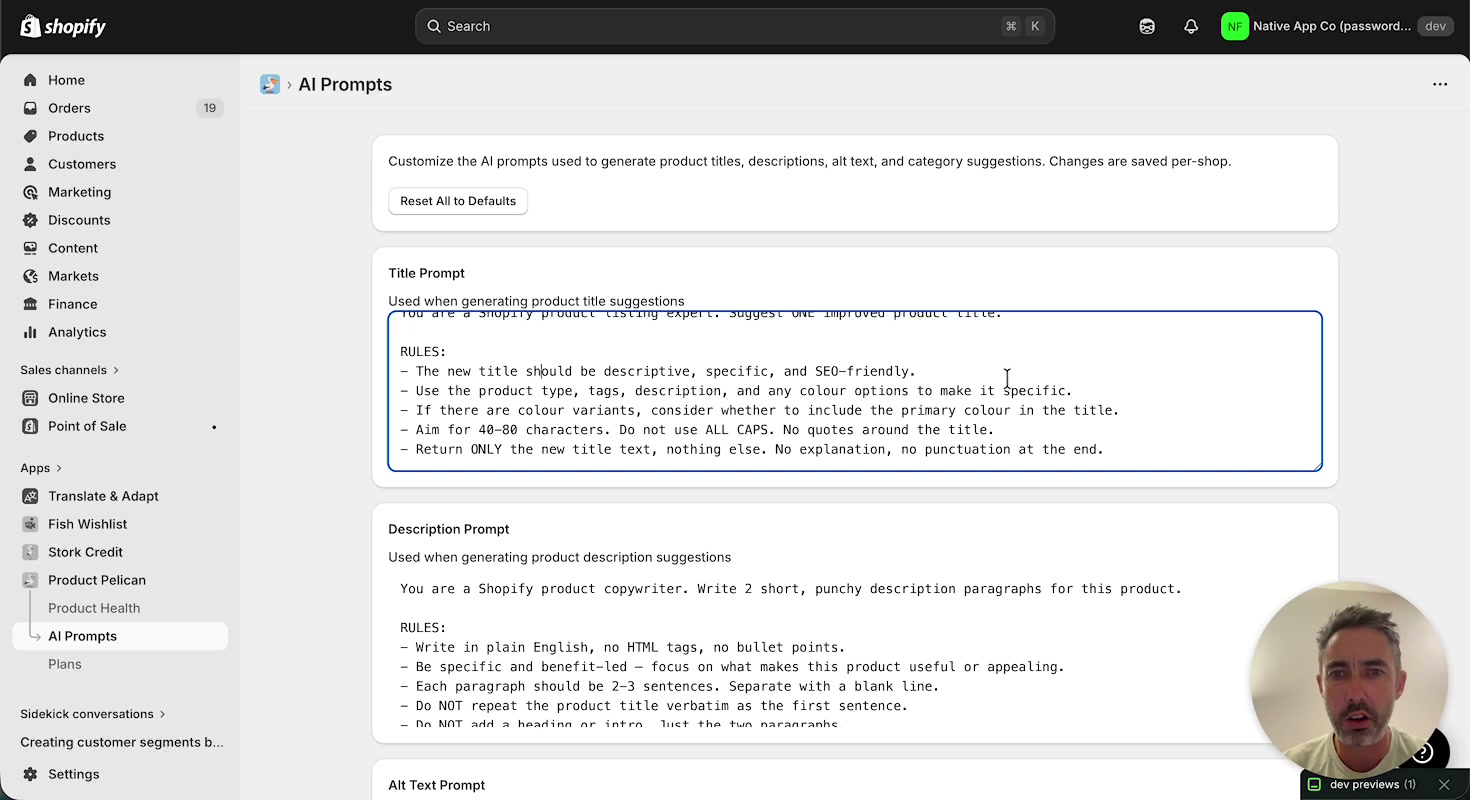
The page includes editable prompt sections for:
- **Title Prompt**
- **Description Prompt**
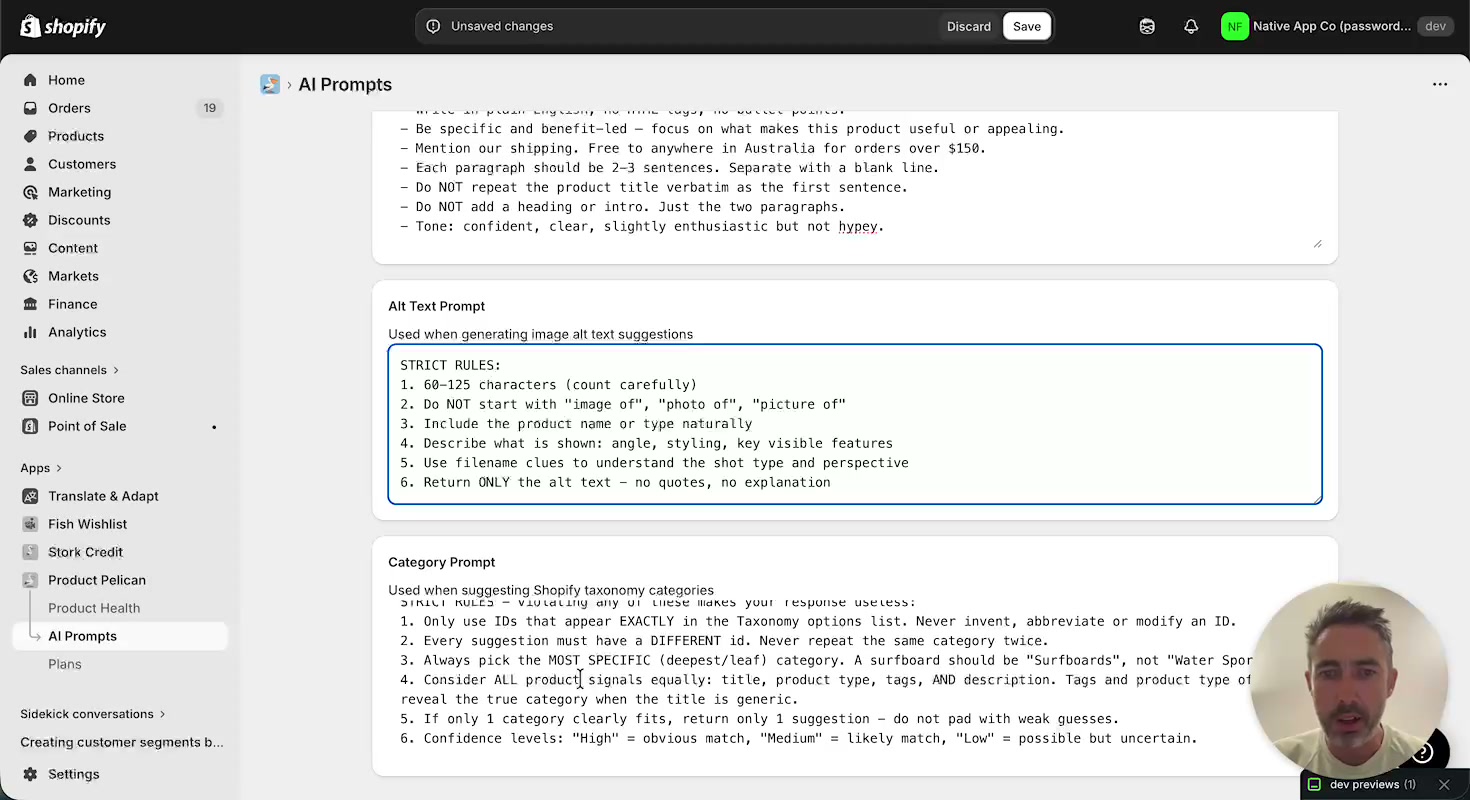
- **Alt Text Prompt**
- **Category Prompt**
There is also a **Reset All to Defaults** button if you want to remove custom instructions and go back to the default prompt set.
### How prompt customization affects results
The walkthrough shows that you can add store-specific instructions, then return to an audit and generate new suggestions that follow those rules. For example, the description prompt is updated to mention free shipping in Australia for orders over $150, and the next generated product description includes that shipping message automatically.
This makes **AI Prompts** useful for keeping generated titles, descriptions, alt text, and categories aligned with your brand standards and merchandising rules.
If you want more consistent AI output, add clear store rules to each prompt. Good examples include tone of voice, shipping messaging, whether to include vendor names, and category restrictions for your catalog. Prompt changes affect future suggestions, not text you have already applied. If you update a prompt, generate fresh suggestions in the related audit to use the new instructions.
## Other checks on the dashboard
In addition to images, categories, titles, and descriptions, the walkthrough also shows audits for:
- **Ambiguous Language** for wording that may be unclear or unhelpful
- **Unclear Options** for confusing product option values
- **Missing SKUs** to help identify products missing SKU data
- **Zero Price Variants** for variants that do not have a price
These checks give you a single place to review both content quality and core merchandising data issues.
## Typical workflow in Product Pelican
Open **Product Health** and check the summary cards and audit counts. Select a card such as **Missing Alt Text**, **No Category**, **Short Titles**, or **Short Description**. Use row-level actions like **Suggest** or **Write**, or bulk actions like **Suggest All**, **Generate All**, or **Write All**. Check the suggested output, edit where needed, and apply only the recommendations you want. If suggestions need to be more tailored, update the instructions on the **AI Prompts** page and generate again.
## Why merchants use Product Pelican
Product Pelican is designed to help you find missing or weak product data quickly, improve listings in bulk, and keep suggestions aligned with your store’s rules. Instead of reviewing every product manually, you can work from the dashboard, open a specific audit, and apply improvements where they matter most.
---
### Product Pelican walkthrough
**URL:** https://apps.nativeappco.com/product-pelican-walkthrough-1
## What Product Pelican helps you do
Product Pelican is built to help you review product data, fix common catalog issues in bulk, and use AI suggestions without leaving the app. In the Shopify admin, the main workspace appears under **Product Pelican** with pages including **Product Health**, **AI Prompts**, and **Plans**.
## Feature summary
- **Product Health dashboard:** shows catalog totals and the full set of audit checks in one place.
- **Audit Checks tab:** organizes issues like missing images, missing alt text, no category, short titles, short descriptions, missing SKUs, and zero price variants.
- **GEO Score tab:** helps you prioritize products by quality band and score.
- **Bulk image fixes:** lets you upload missing images and generate alt text without opening each product separately.
- **Category suggestions:** recommends Shopify taxonomy categories and shows confidence indicators.
- **AI title suggestions:** expands short titles into clearer, more descriptive product names.
- **AI description writing:** creates longer product descriptions with row-level and bulk actions.
- **AI Prompts:** gives you direct control over how future AI suggestions are generated.
This walkthrough shows all the features of Product Pelican: starting from the **Product Data Quality Dashboard**, opening key audits, and finishing with prompt tuning on the **AI Prompts** page.
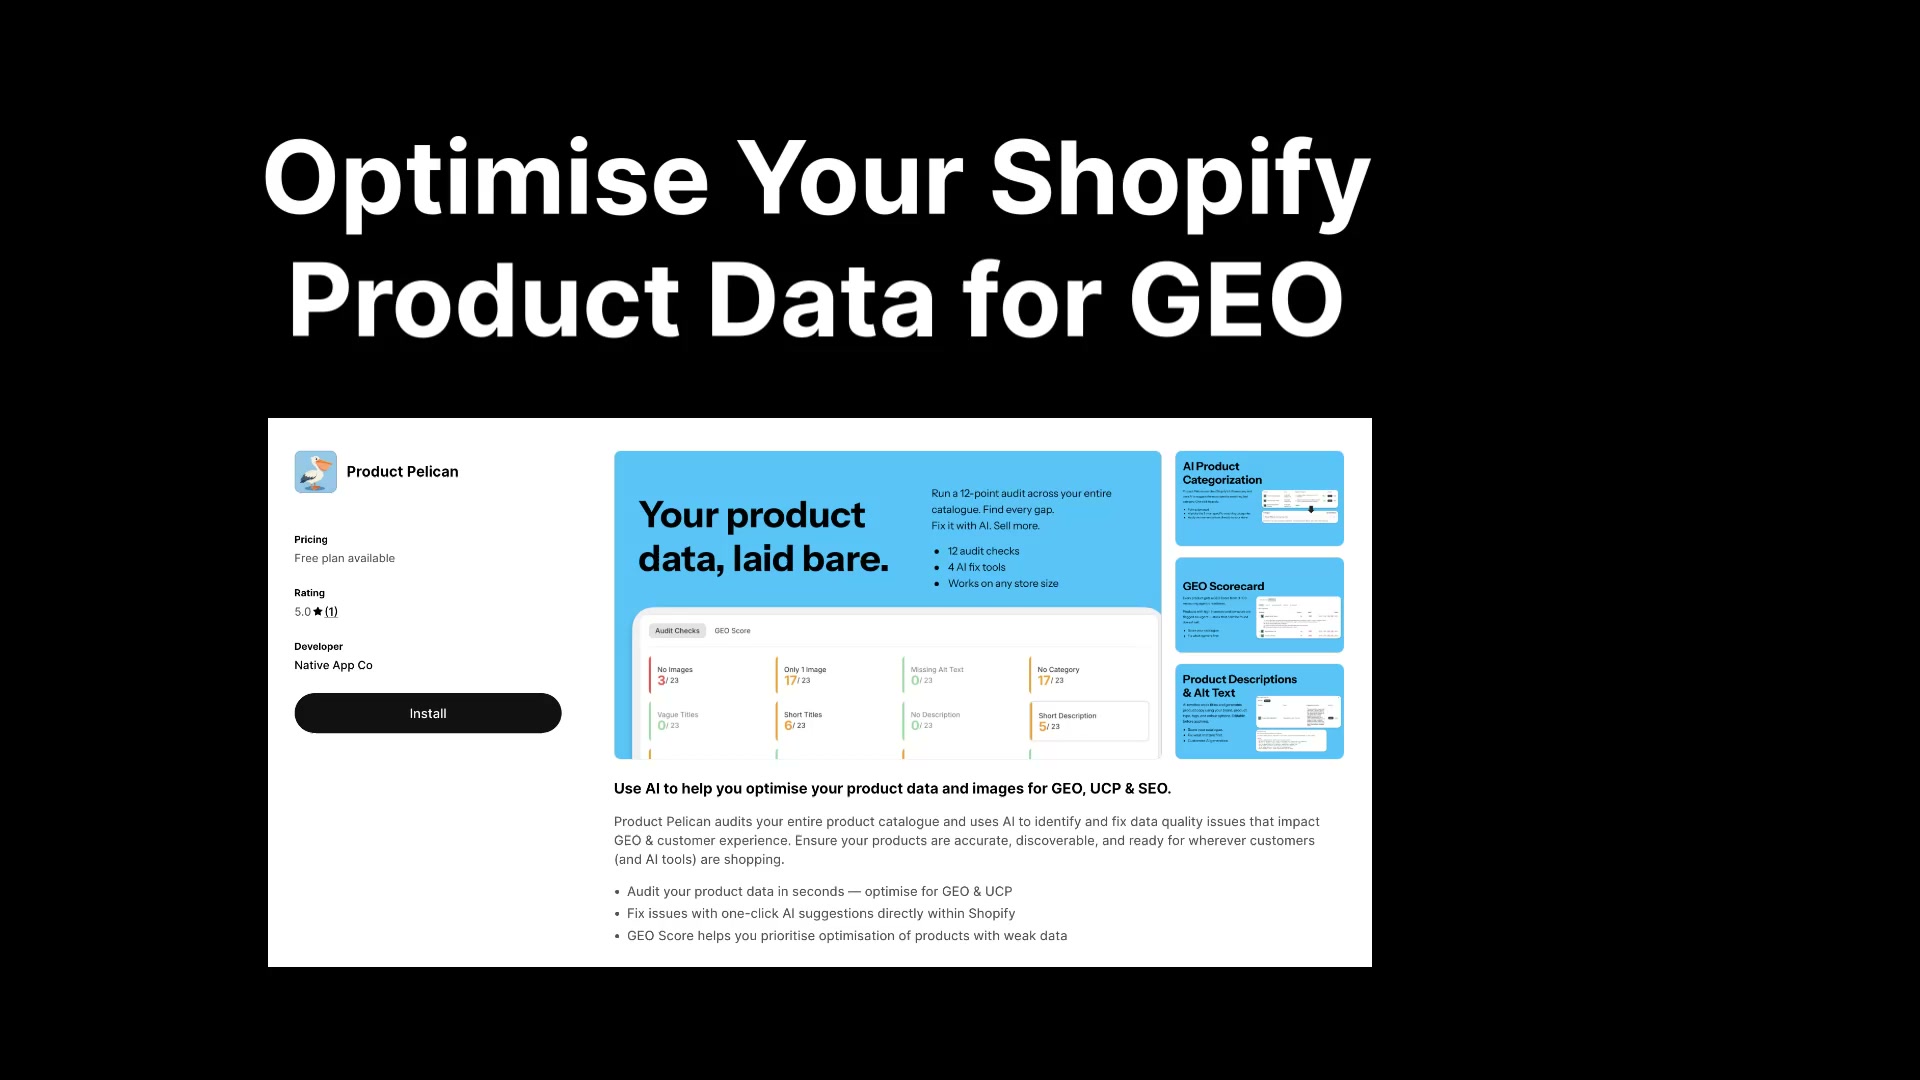
Product Pelican audits your catalog across 12 checks and surfaces AI-powered suggestions for titles, descriptions, categories, and image alt text.
## Start on Product Health
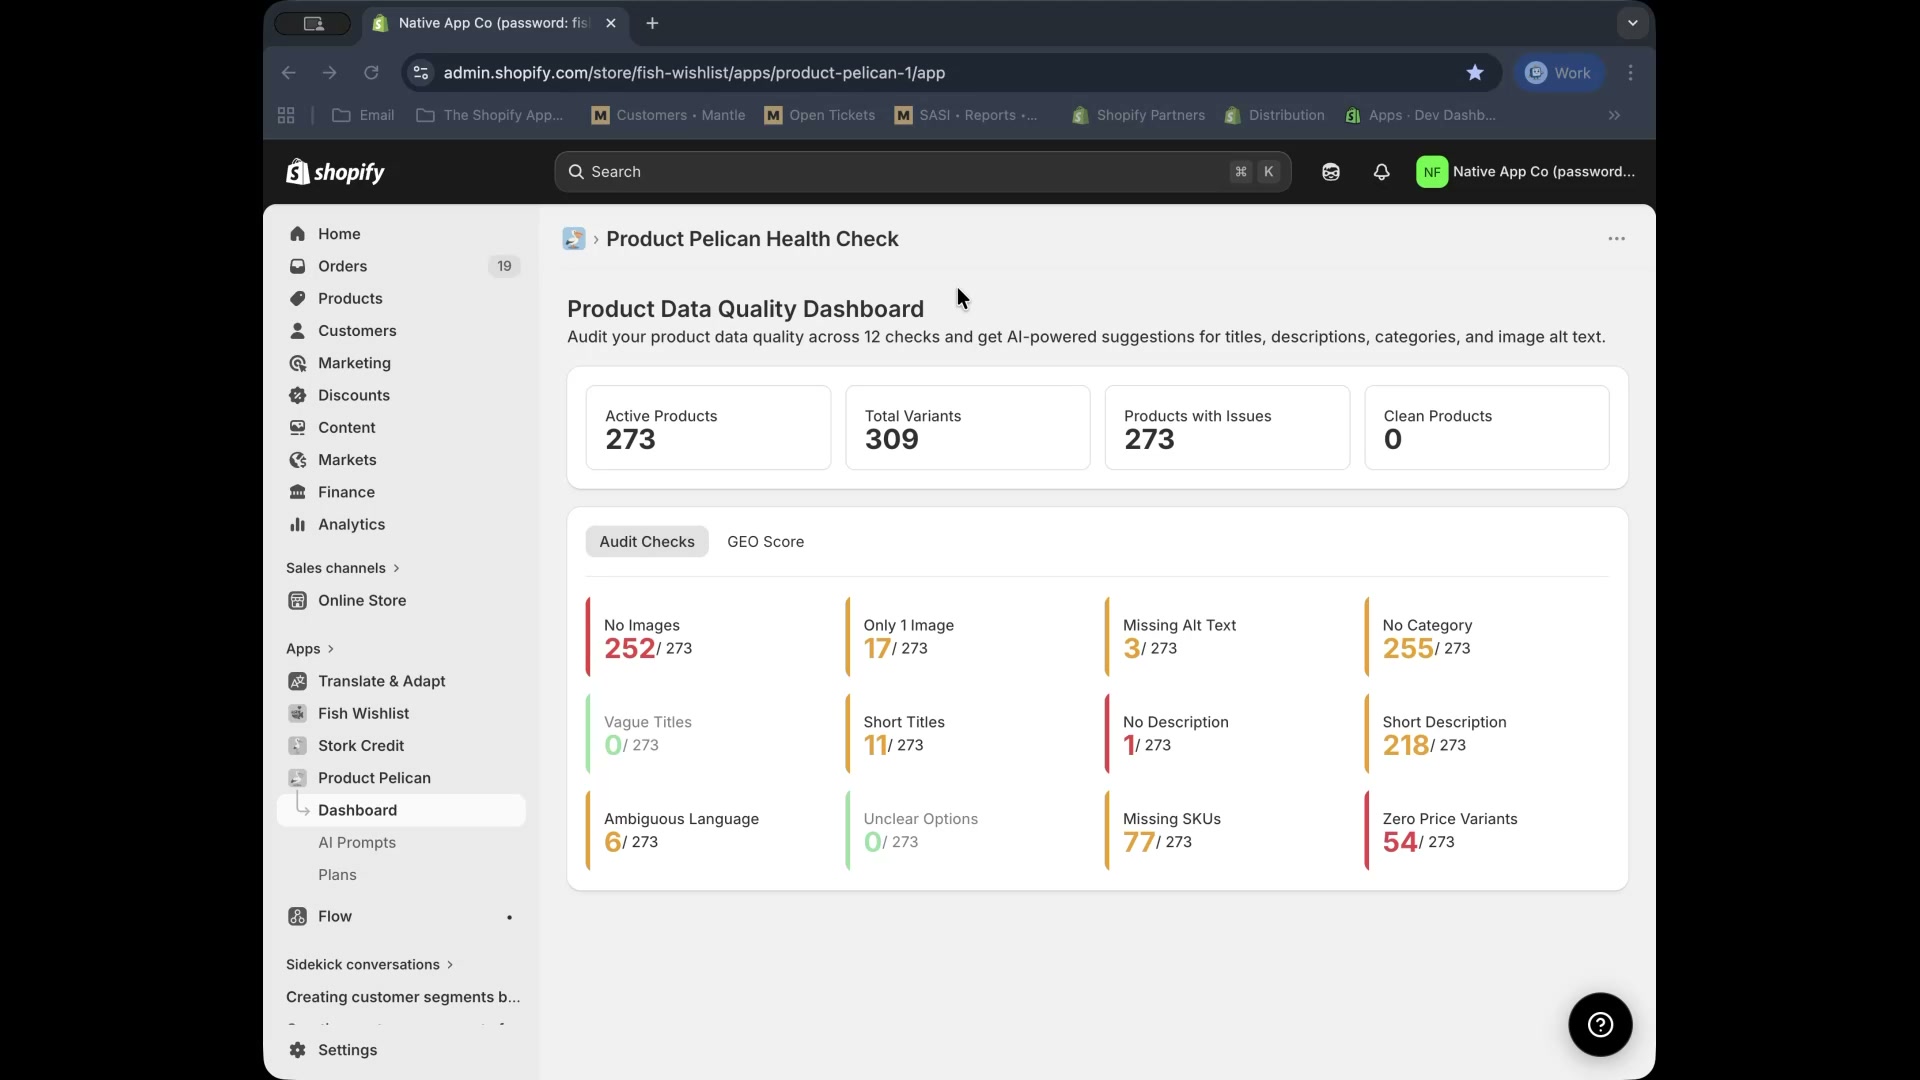
When you open the app, you land on **Product Health**. The page heading is **Product Data Quality Dashboard**, and it gives you a quick snapshot of overall catalog quality.
At the top of the dashboard, Product Pelican shows summary cards for:
- **Active Products**
- **Total Variants**
- **Products with Issues**
- **Clean Products**
Below the summary, the dashboard is split into two tabs:
- **Audit Checks**
- **GEO Score**
The **Audit Checks** tab shows 12 issue cards, including **No Images**, **Only 1 Image**, **Missing Alt Text**, **No Category**, **Short Titles**, **No Description**, **Short Description**, **Missing SKUs**, and **Zero Price Variants**.
Start with the issue cards showing the highest counts. That is usually the fastest way to improve the largest number of products.
## Use GEO Score to prioritize products
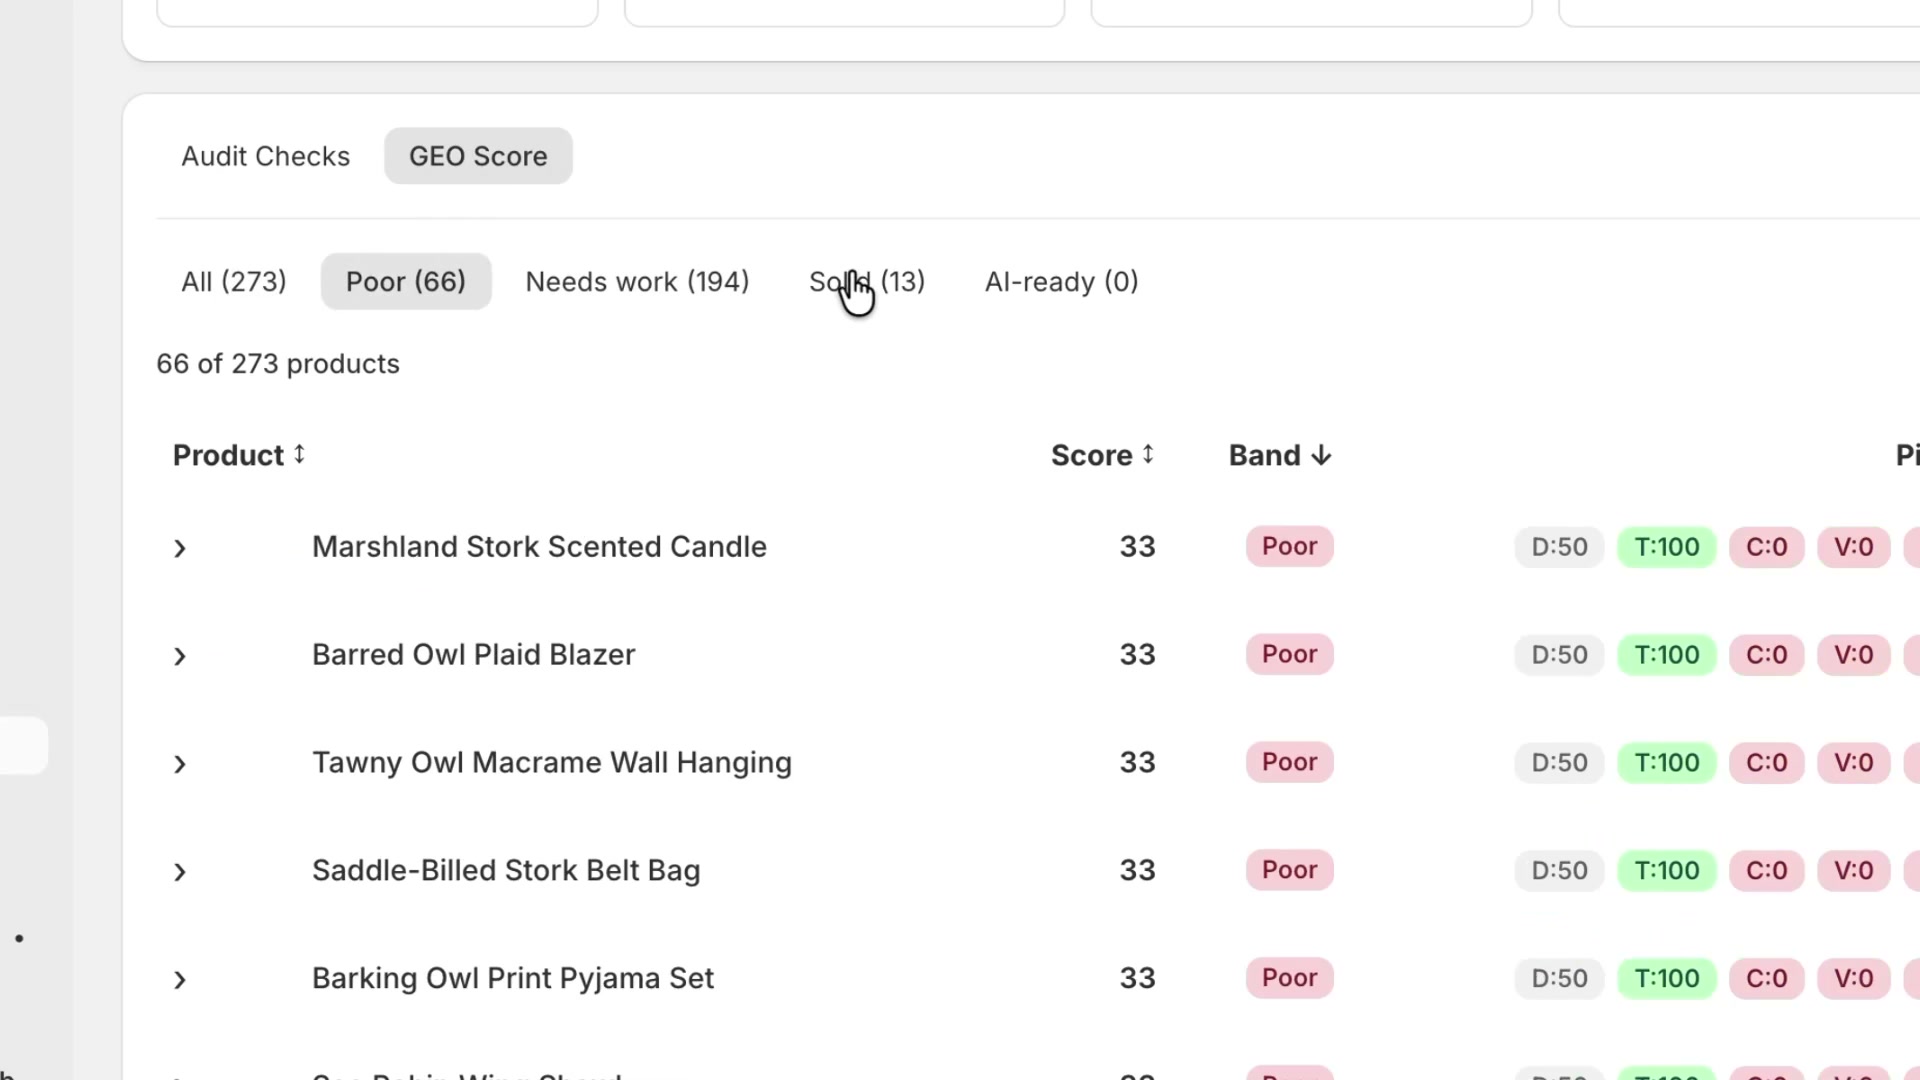
The **GEO Score** tab helps you review products by quality band instead of by issue type. In the walkthrough, products are grouped into:
- **All**
- **Poor**
- **Needs work**
- **Solid**
- **AI-ready**
The table also shows sortable columns such as **Product**, **Score**, and **Band**, along with metric chips for each product. This makes it easier to sort, filter, and focus on the products most in need of improvement.
## Fix image issues from the dashboard
### No Images
Opening the **No Images** card expands a list of affected products directly on the dashboard. In the walkthrough, each row includes the product name and an **Add Images** area with an **Add files** button.
This workflow is designed for fast fixes. Instead of opening each product in Shopify, you can upload images directly from the audit panel.
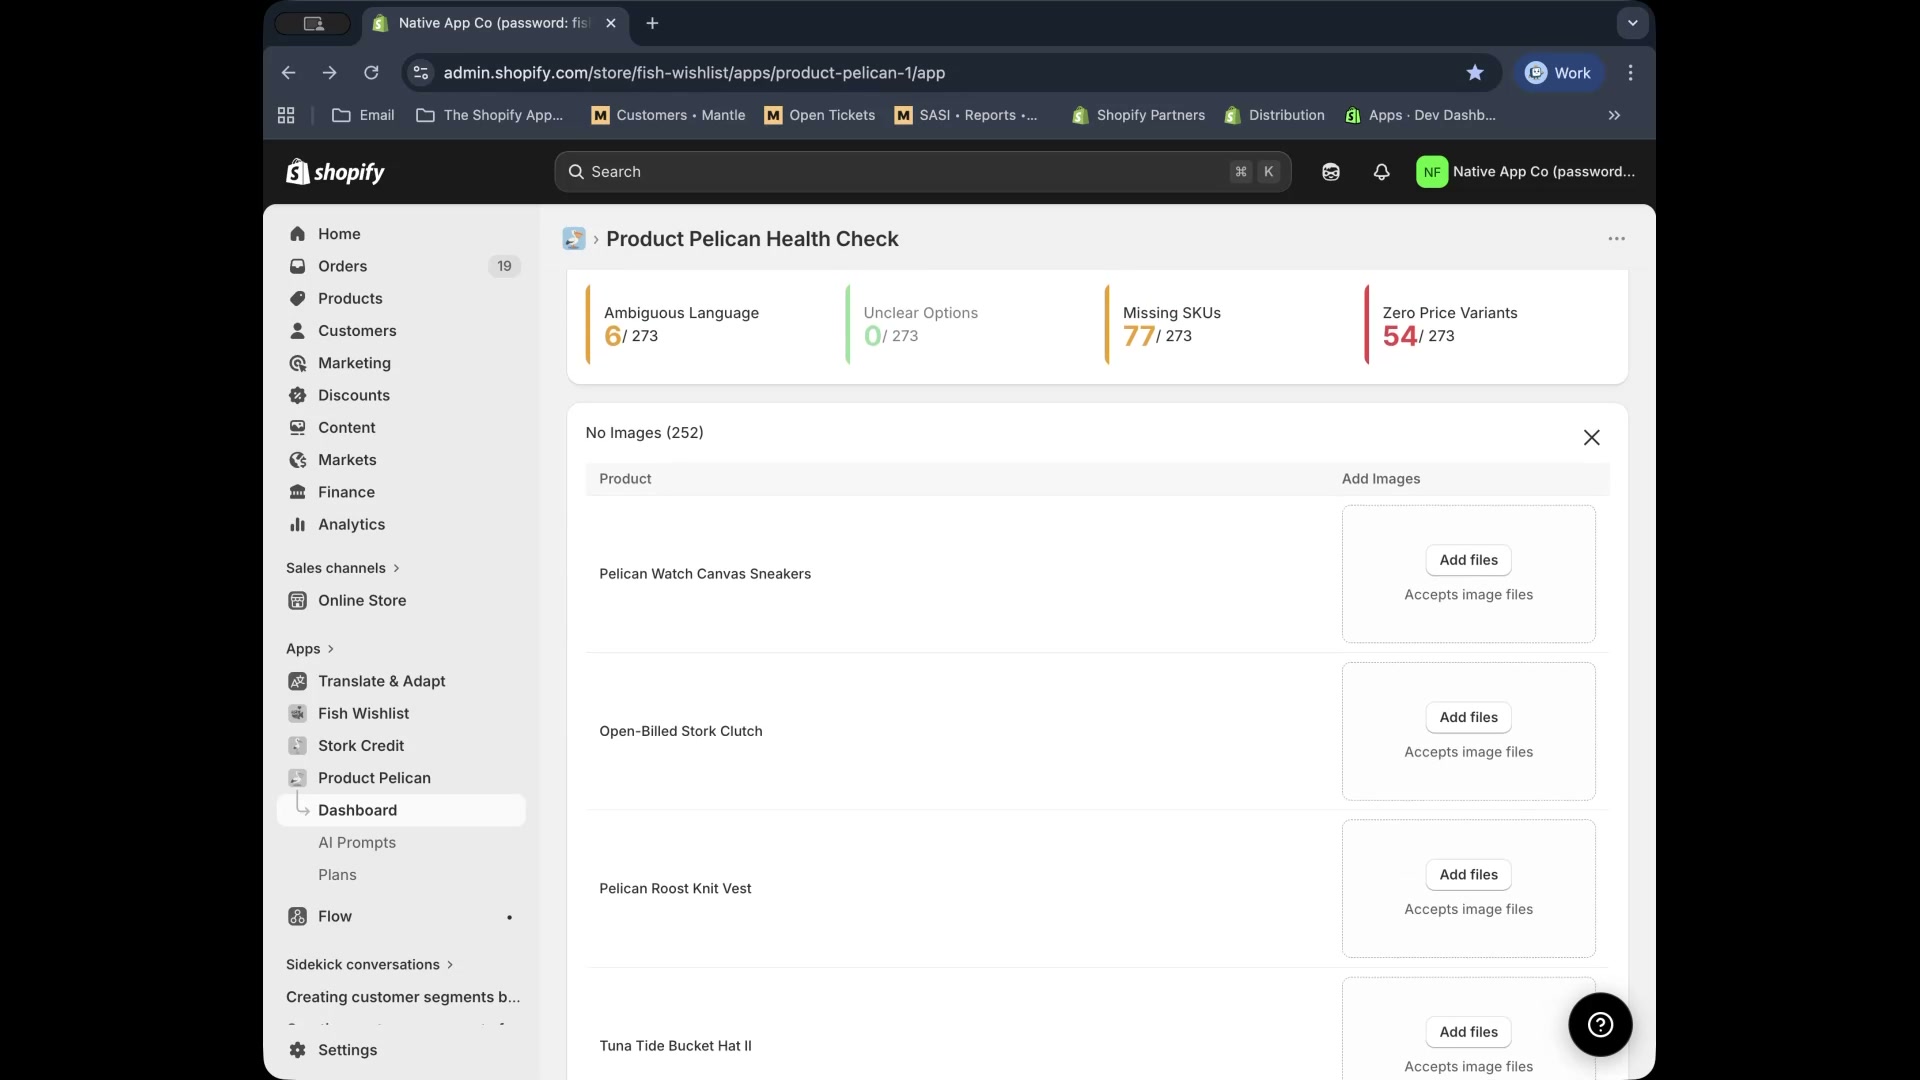
From **Product Health**, select **No Images**.
Use the **Add files** area for each product that needs an image.
The uploaded image is added to the product without opening the Shopify product editor separately.
### Missing Alt Text
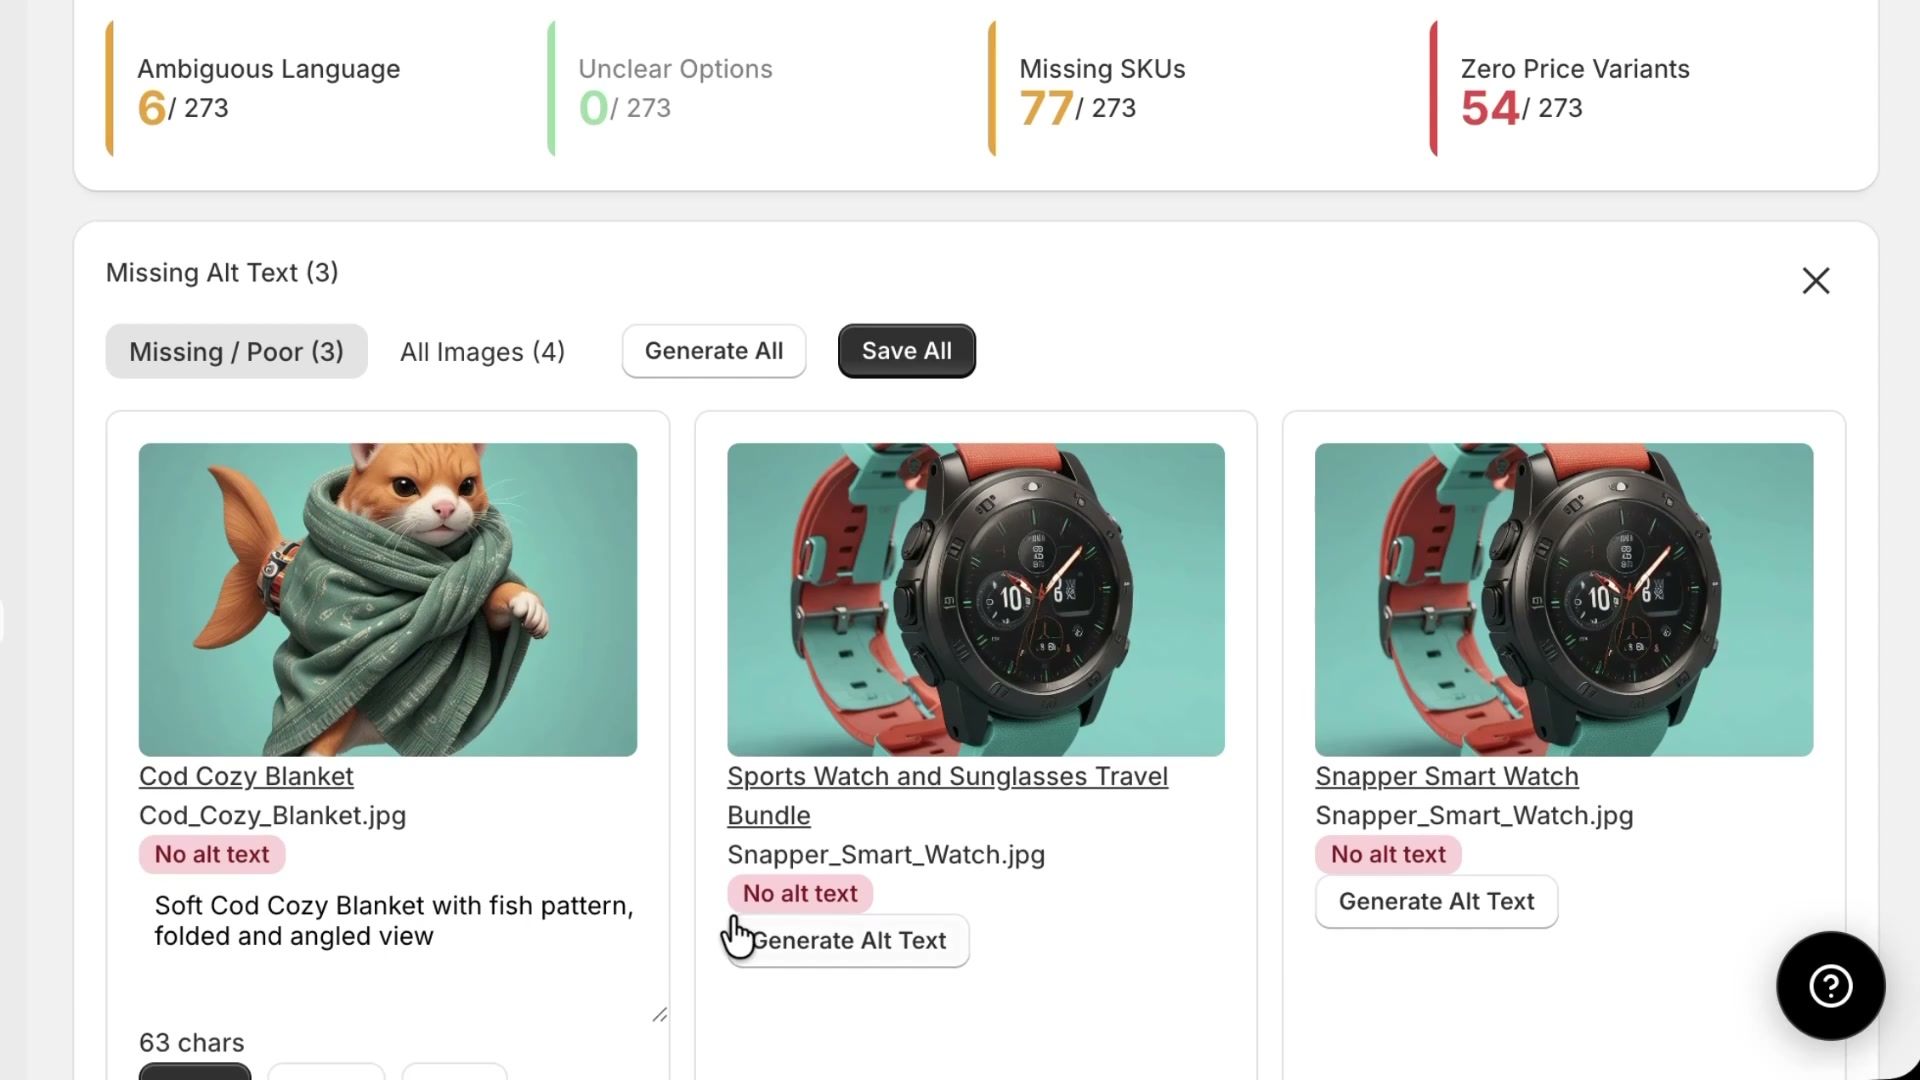
The **Missing Alt Text** audit shows image cards with the product name, filename, current issue, and a text field for the suggestion. At the top of the panel, you can switch between **Missing / Poor** and **All Images**.
The actions shown in the walkthrough include:
- **Generate Alt Text** on individual images
- **Generate All** for bulk generation
- **Save All** for bulk saving
- **Apply**, **Regen**, and **Copy** on individual suggestions
You can review the AI suggestion, edit it if needed, and then apply it directly to the product image.
The alt text workflow is useful both for accessibility and for making product imagery easier for search engines and AI systems to interpret.
## Fill in missing Shopify categories
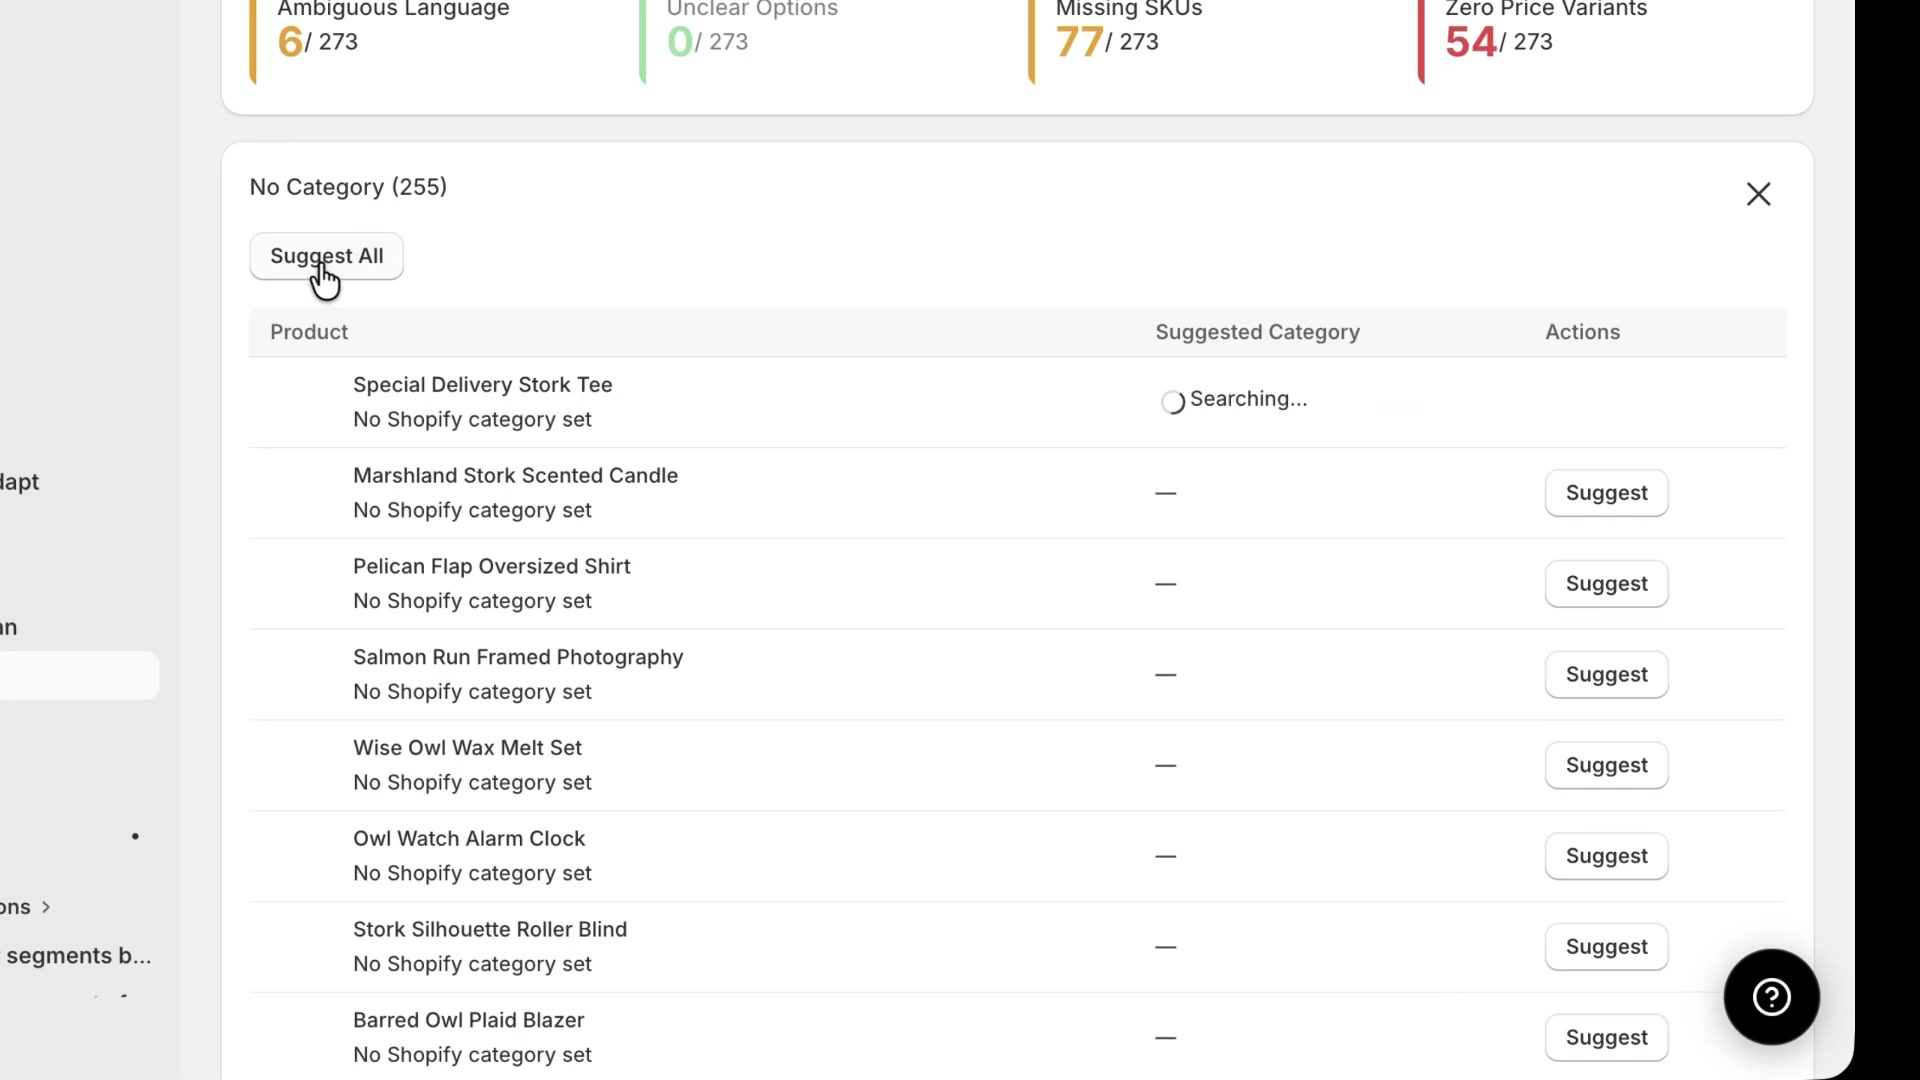
The **No Category** audit looks for products without a Shopify category set. The panel includes a table with columns such as **Product**, **Suggested Category**, and **Actions**.
To generate recommendations, use:
- **Suggest All** for the full list
- **Suggest** on individual rows
- **Apply** to accept a recommendation
- **Redo** to generate a new suggestion
- **Apply All Selected** when multiple suggestions are ready
The walkthrough also shows confidence badges such as **Low**, with applied rows marked as **Applied**.
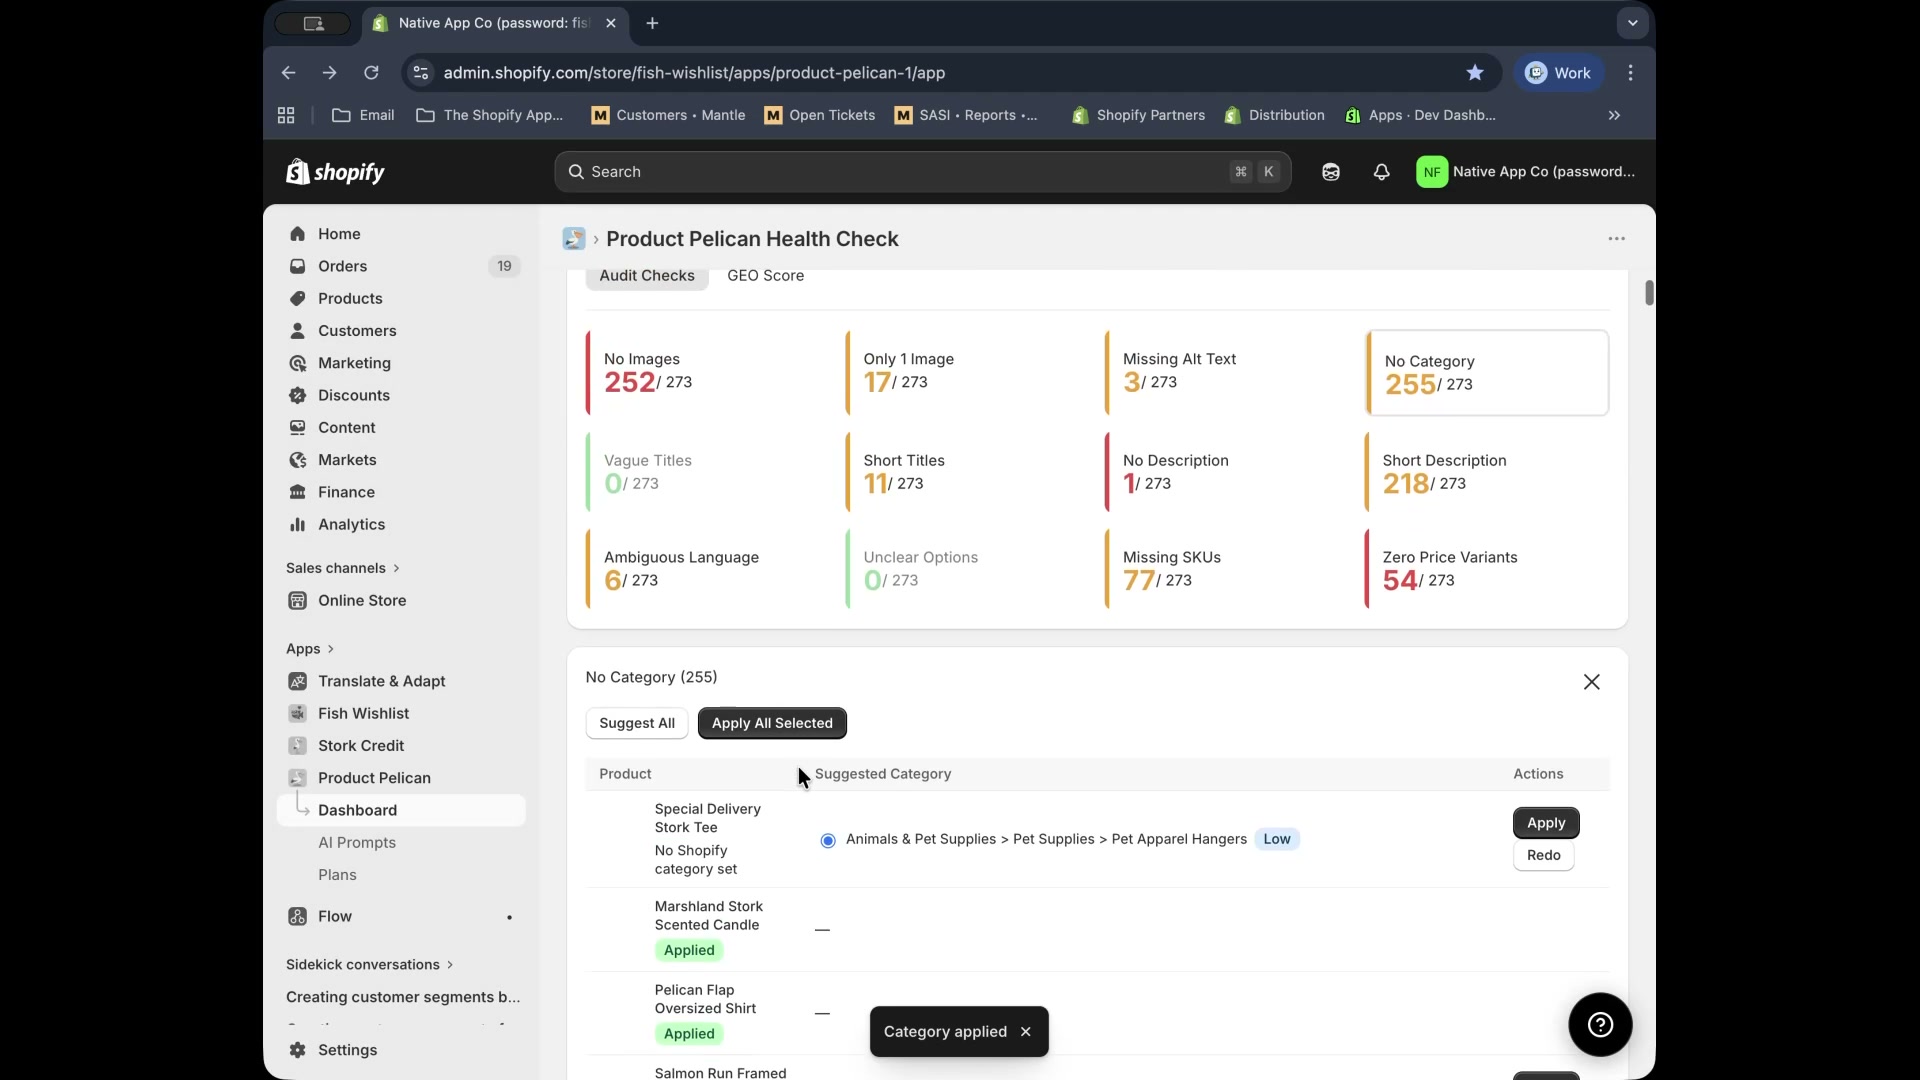
Review lower-confidence suggestions before applying them in bulk. They are useful prompts, but they may need a quick manual check.
## Improve short product titles
The **Short Titles** audit highlights products whose current titles are too short to be descriptive. Each row shows the original product title, the issue length, the **Suggested Title**, and action buttons.
Common actions in this audit are:
- **Suggest**
- **Suggest All**
- **Apply**
- **Redo**
- **Save All**
This is especially helpful for products with short names that do not clearly explain what the item is.
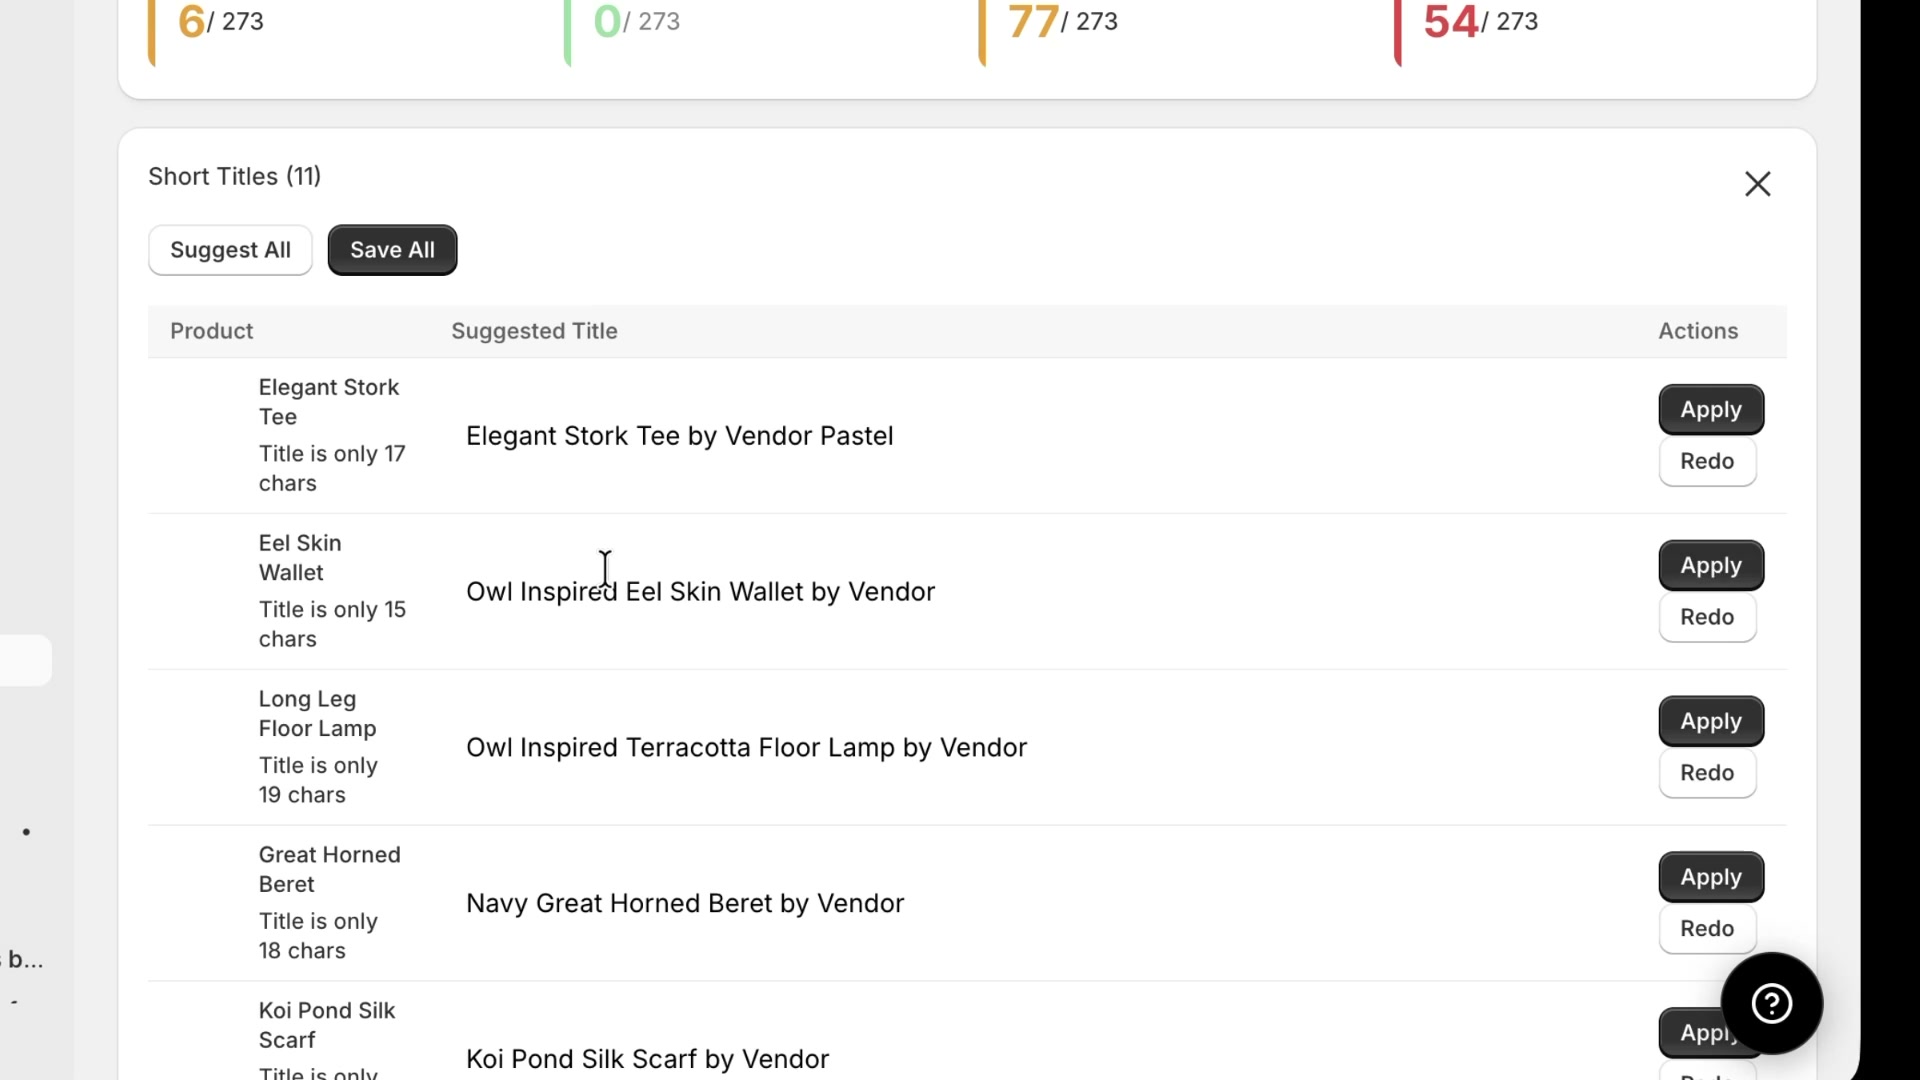
If a title suggestion is close but not perfect, edit it before applying. The walkthrough specifically shows a case where an unwanted vendor reference needed to be removed.
## Write longer product descriptions
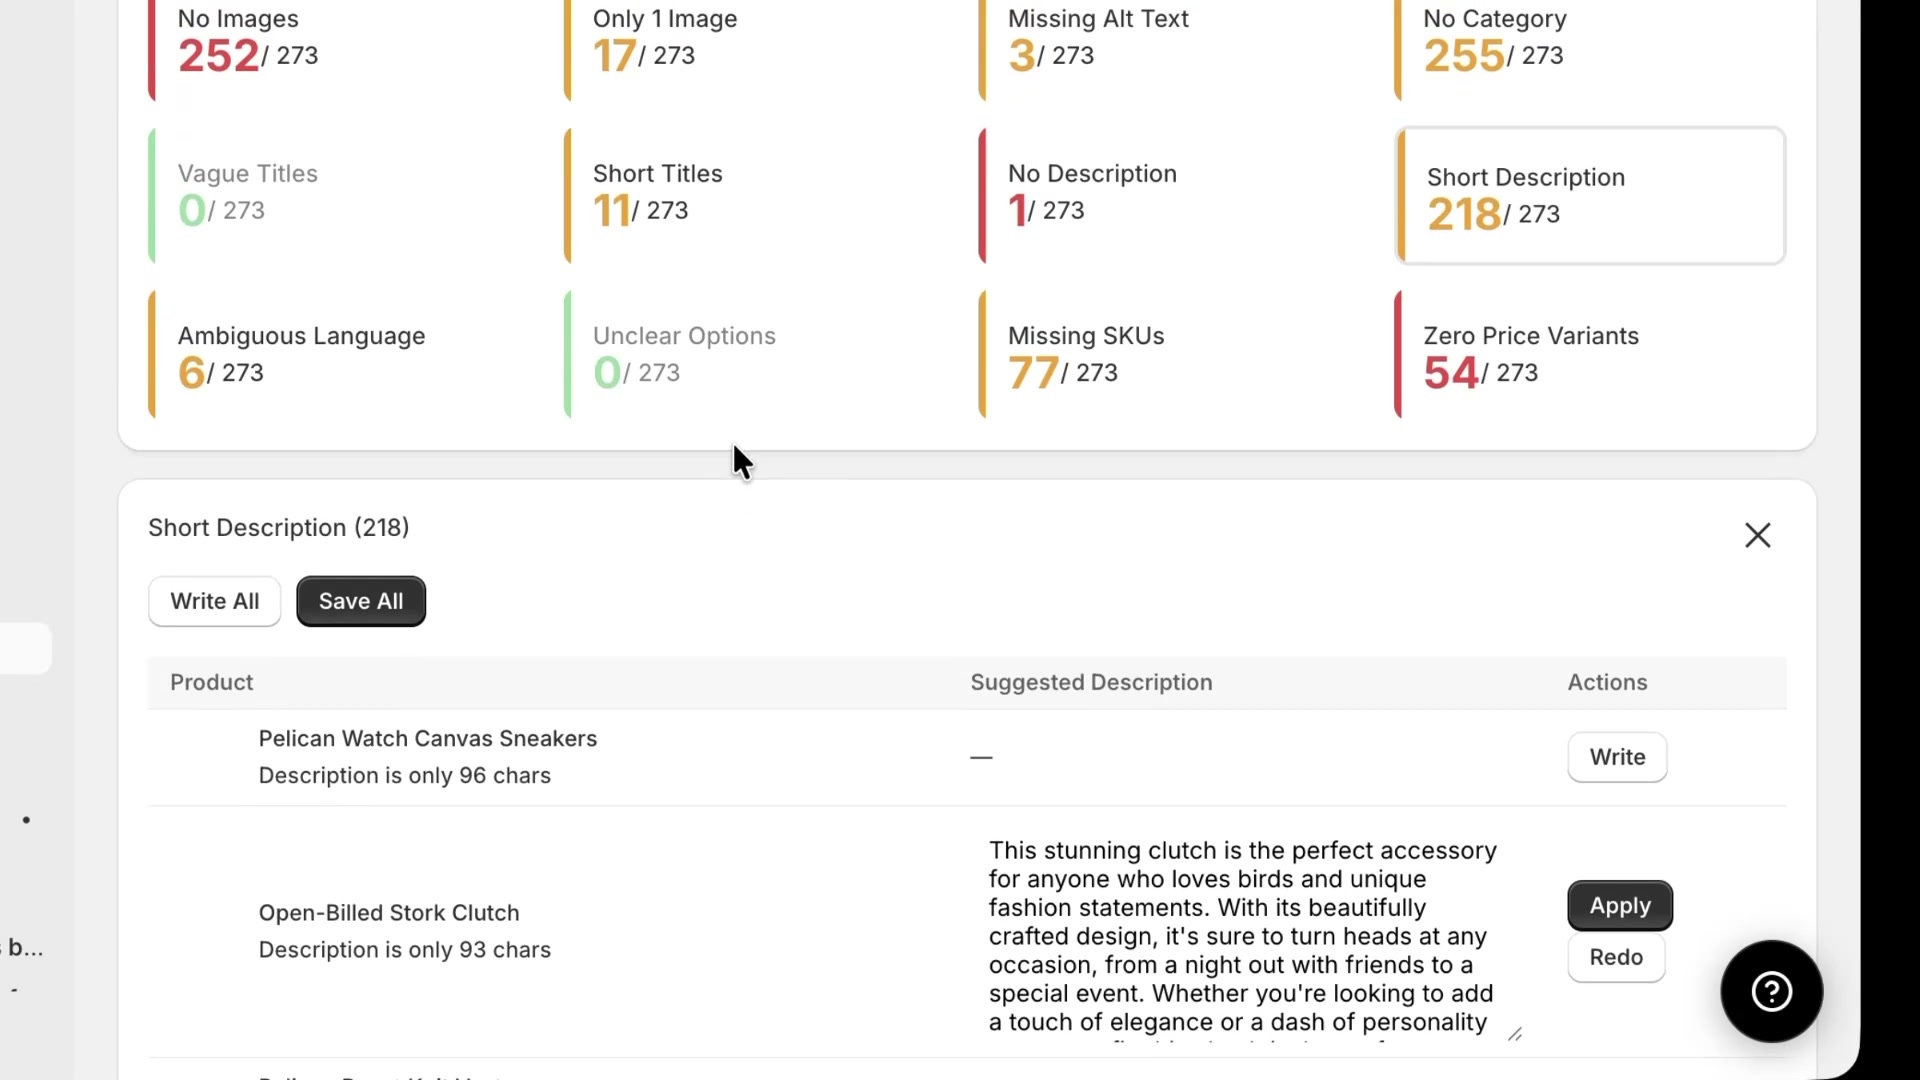
The dashboard also flags **No Description** and **Short Description**. In the walkthrough, the **Short Description** panel includes a table with the current issue, a **Suggested Description** area, and row-level actions.
Available actions include:
- **Write** for one product
- **Write All** for bulk generation
- **Apply** to save the result
- **Redo** to request a new version
- **Save All** after reviewing multiple generated descriptions
This workflow is useful when descriptions are missing or too thin to explain the product properly.
## Refresh the dashboard after loading a bigger catalog
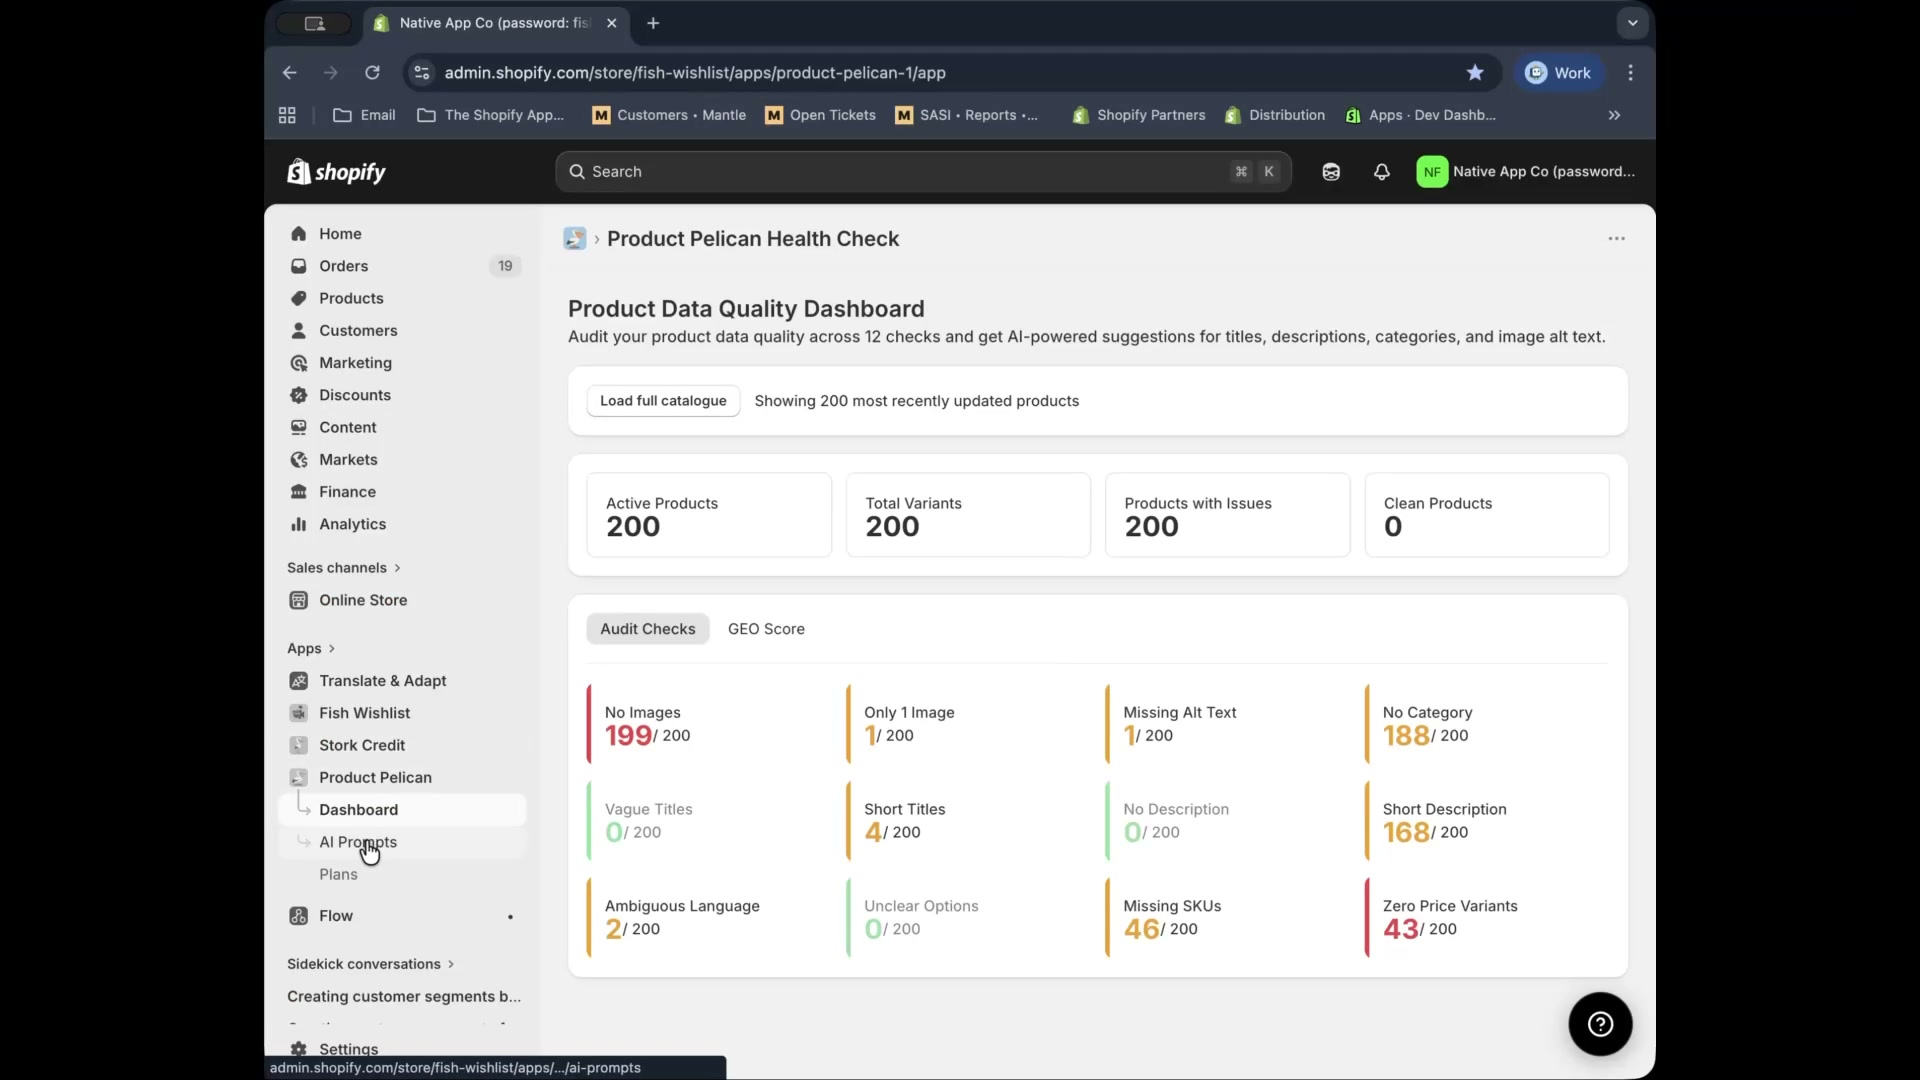
The walkthrough also shows the dashboard refreshing after selecting **Load full catalogue**. A status message appears on the page, such as **Showing 200 most recently updated products**, and the issue counts update to match the loaded dataset.
This helps explain why totals may change after loading more products into the dashboard view.
## Customize how AI suggestions are written
After reviewing the dashboard workflows, the walkthrough moves to **AI Prompts** in the left navigation. This page controls how Product Pelican generates future suggestions.
The page includes editable prompt sections for:
- **Title Prompt**
- **Description Prompt**
- **Alt Text Prompt**
- **Category Prompt**
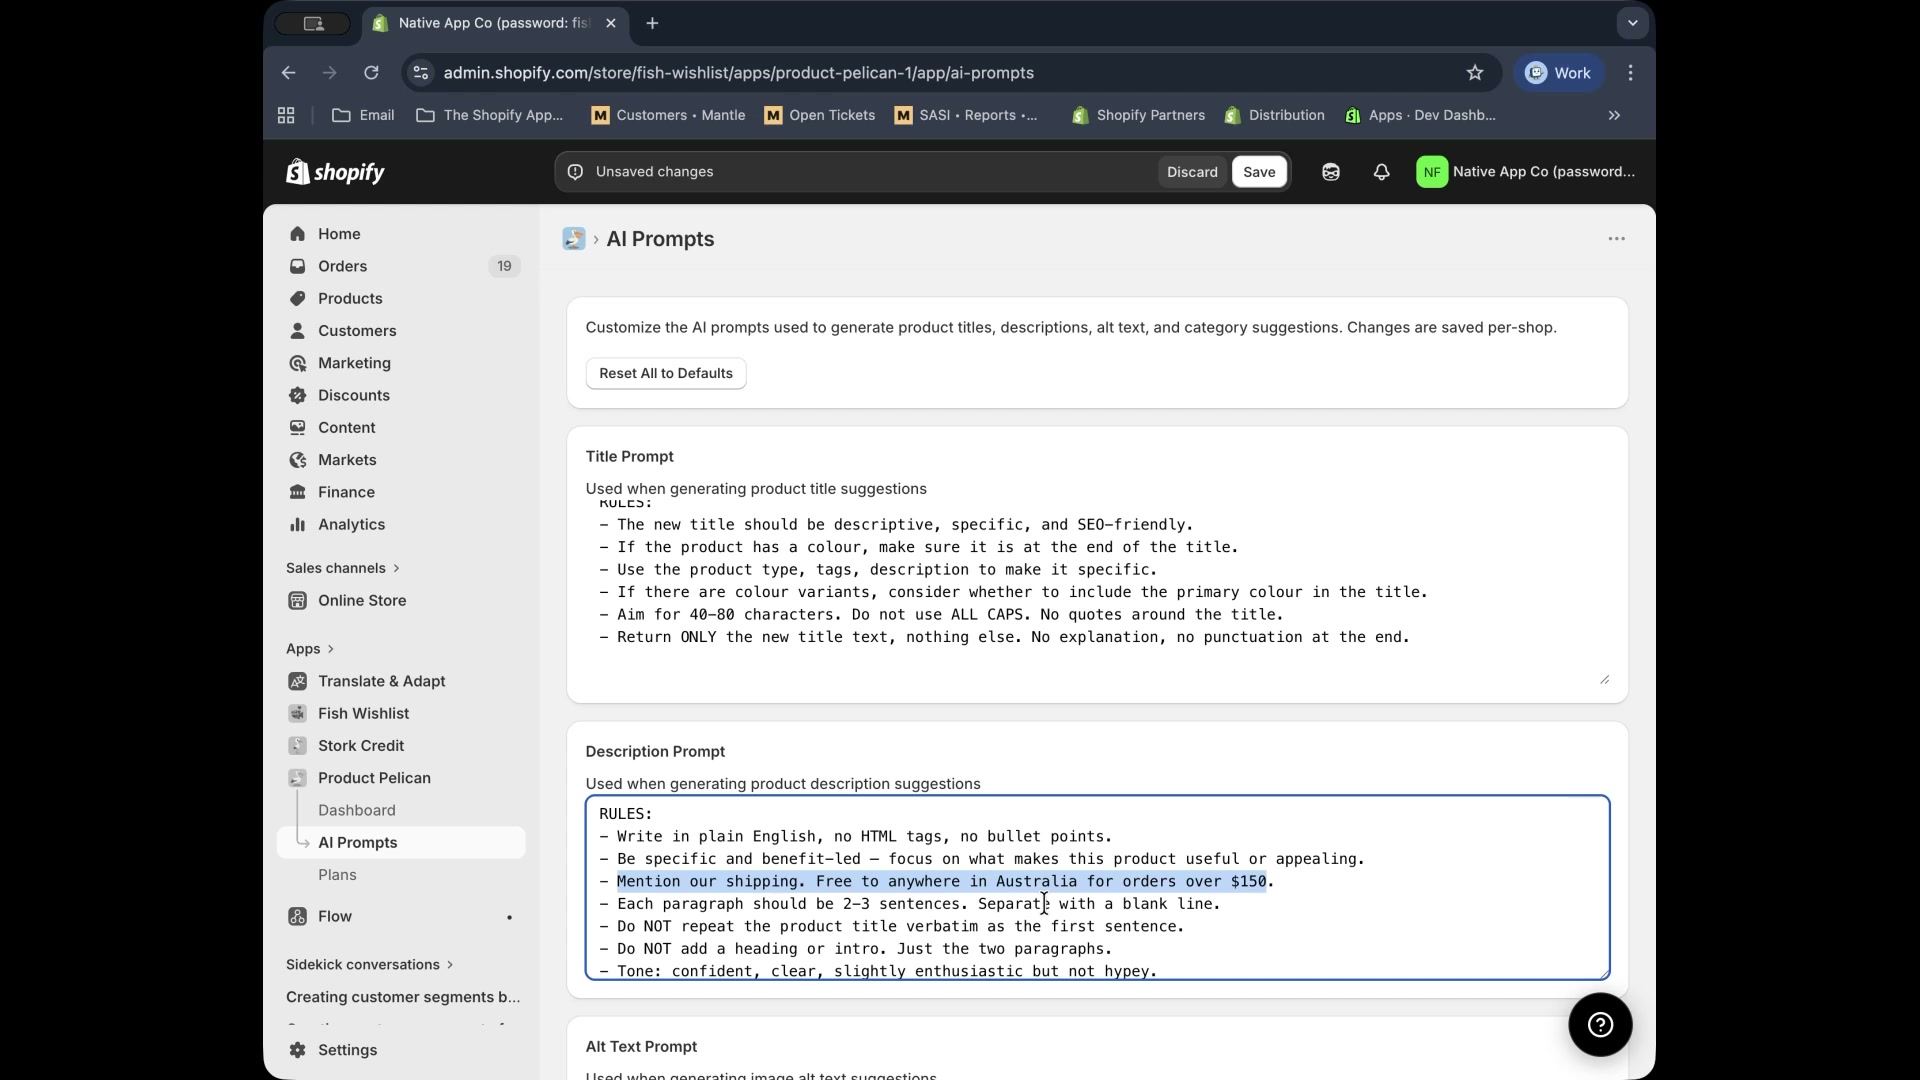
At the top of the page, there is also a **Reset All to Defaults** button. When you edit a prompt, the page shows an **Unsaved changes** banner with **Discard** and **Save** actions.
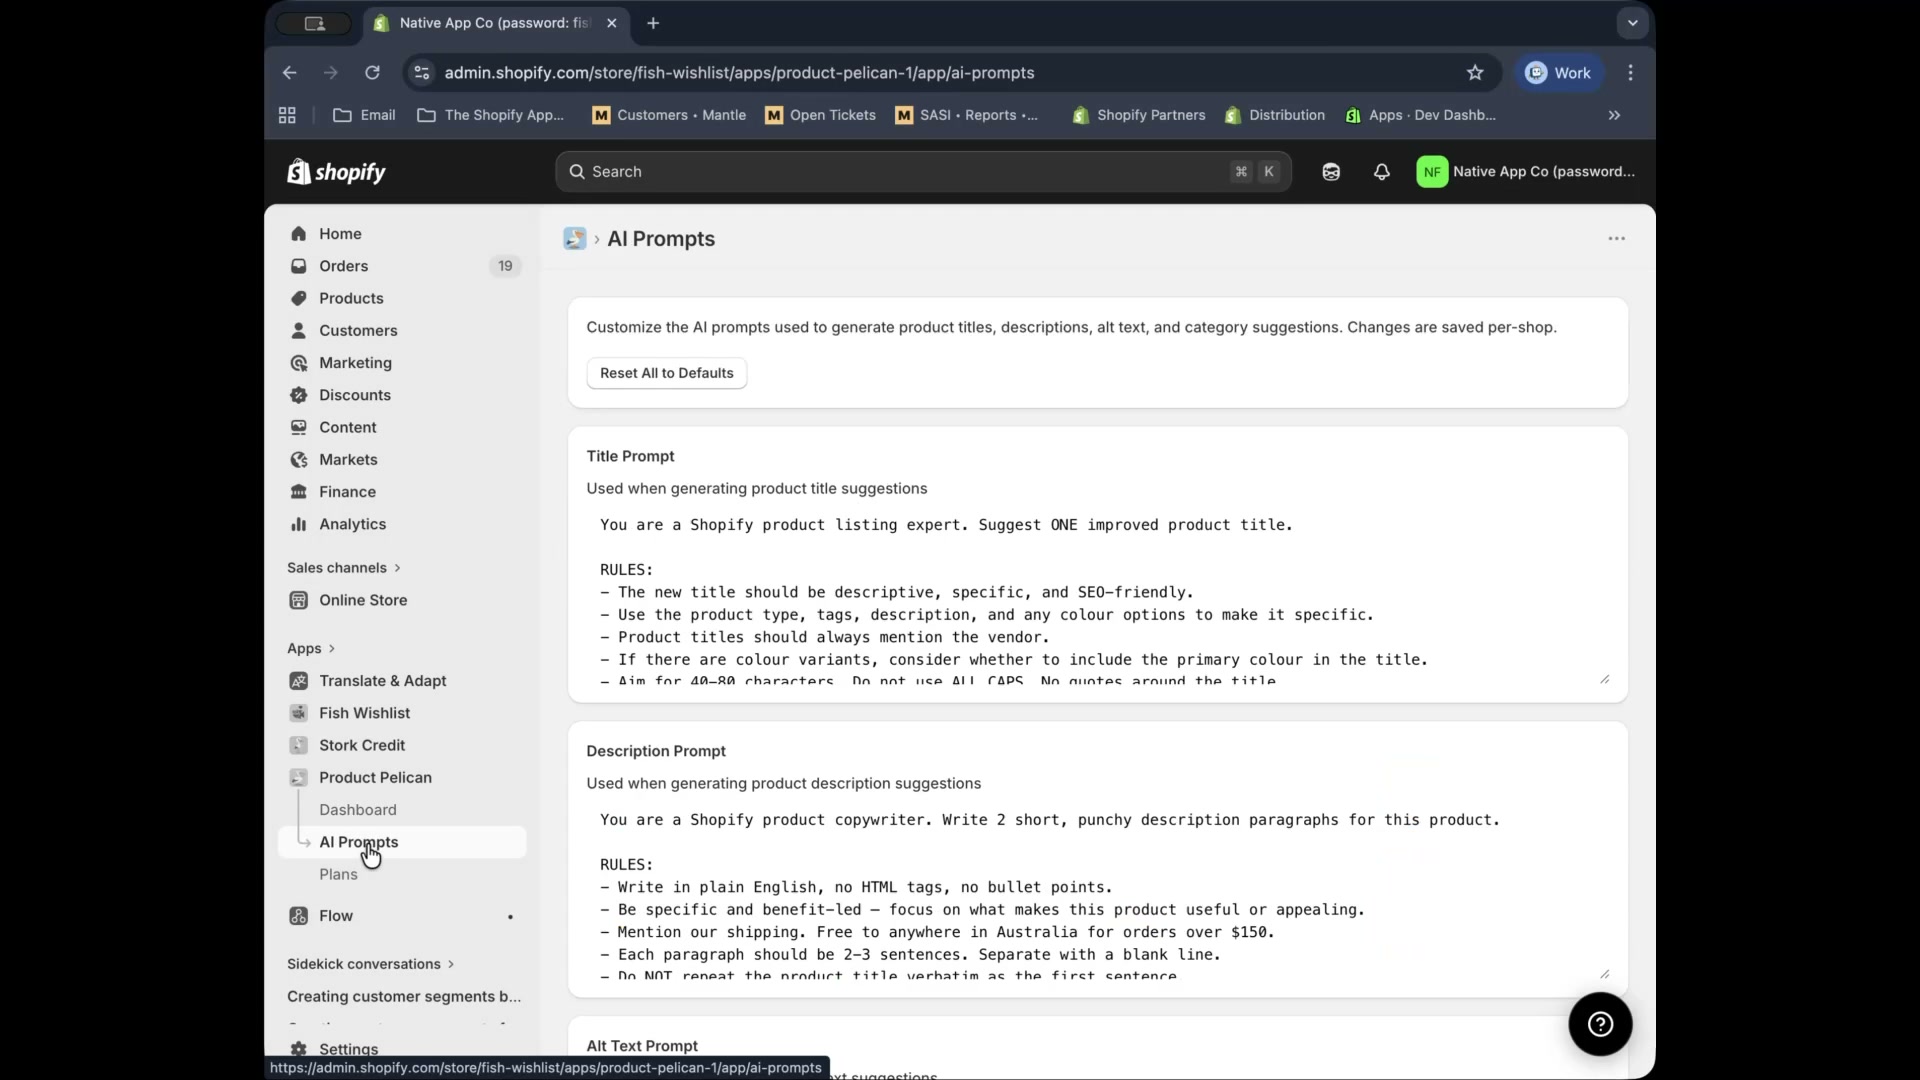
### Title Prompt
The **Title Prompt** section is used when generating product title suggestions. In the walkthrough, the rules shown in this prompt include instructions such as making the title descriptive, using product details to make it specific, keeping color at the end when relevant, and returning only the title text.
This explains why title suggestions can change significantly when you adjust the prompt rules.
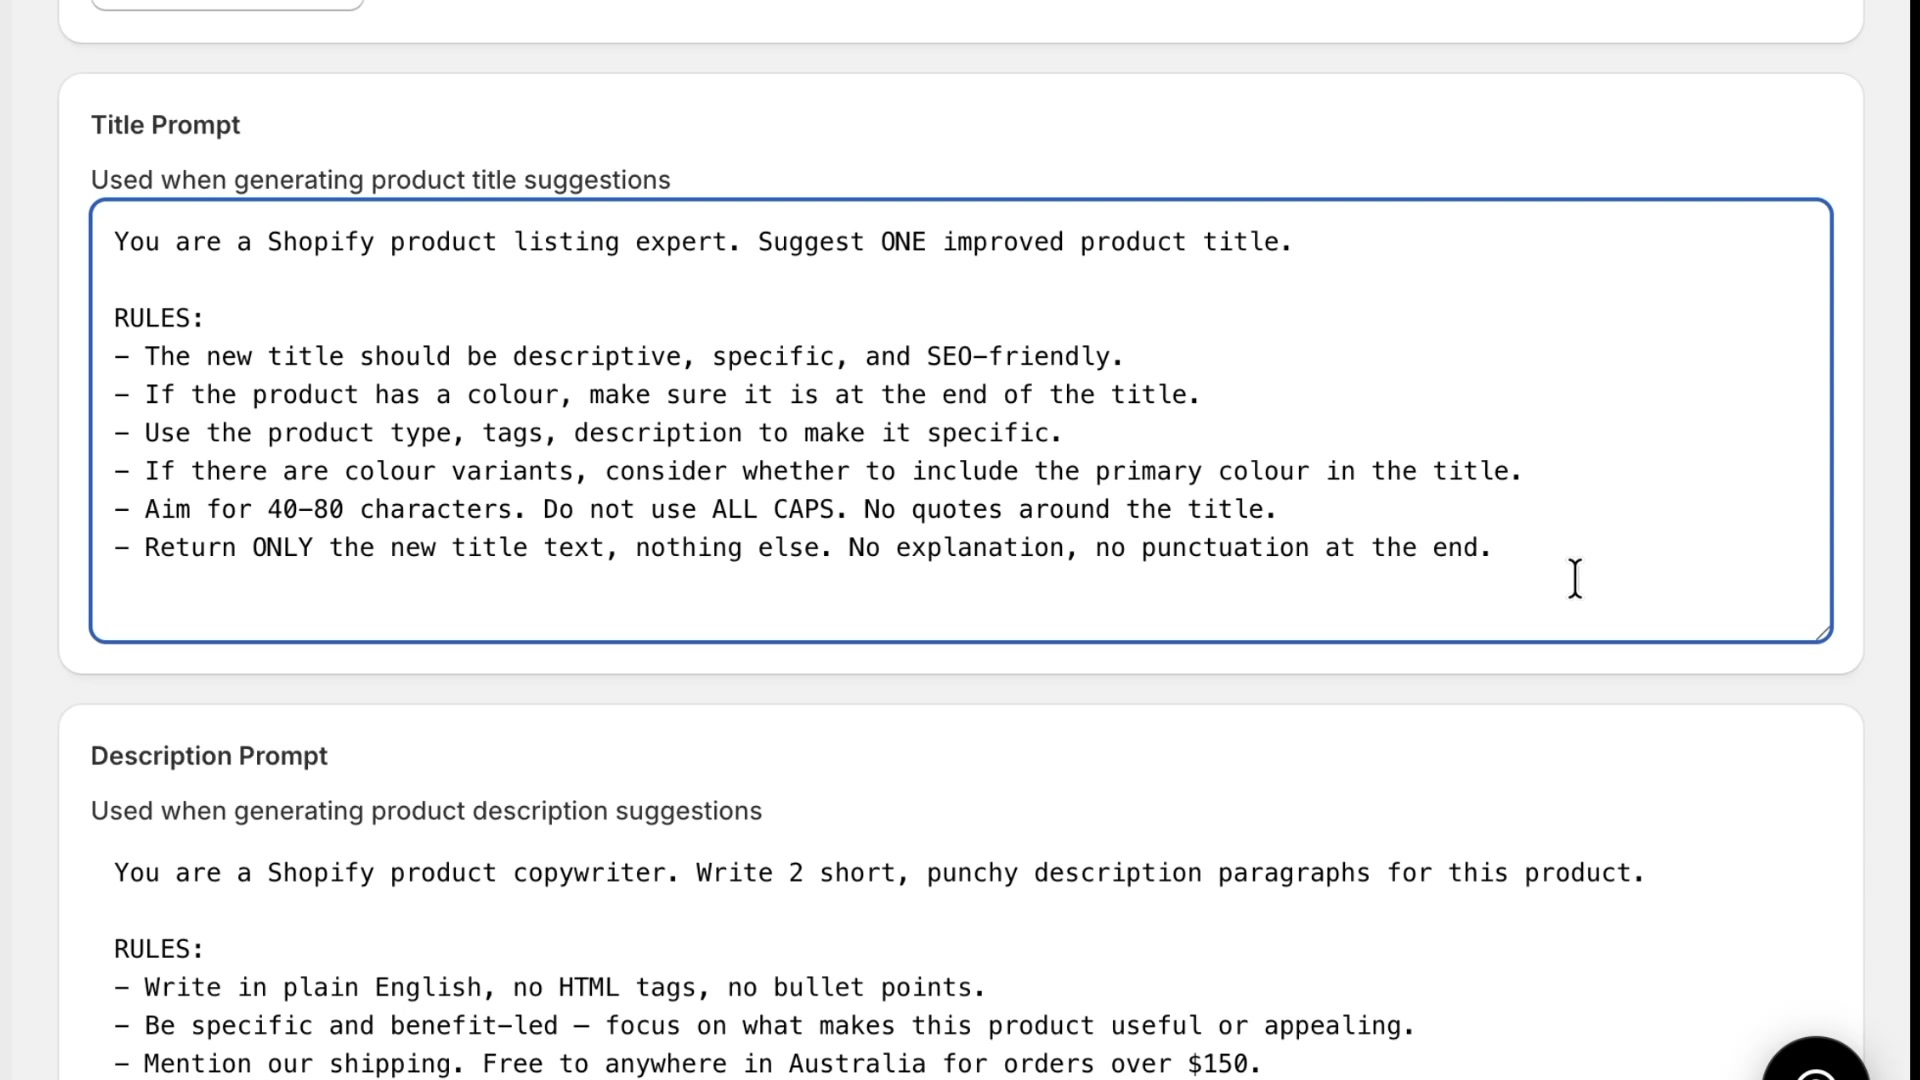
The walkthrough also demonstrates prompt tuning by showing poor title output after a deliberately bad instruction was added. This is a useful reminder that prompt rules directly affect suggestion quality.
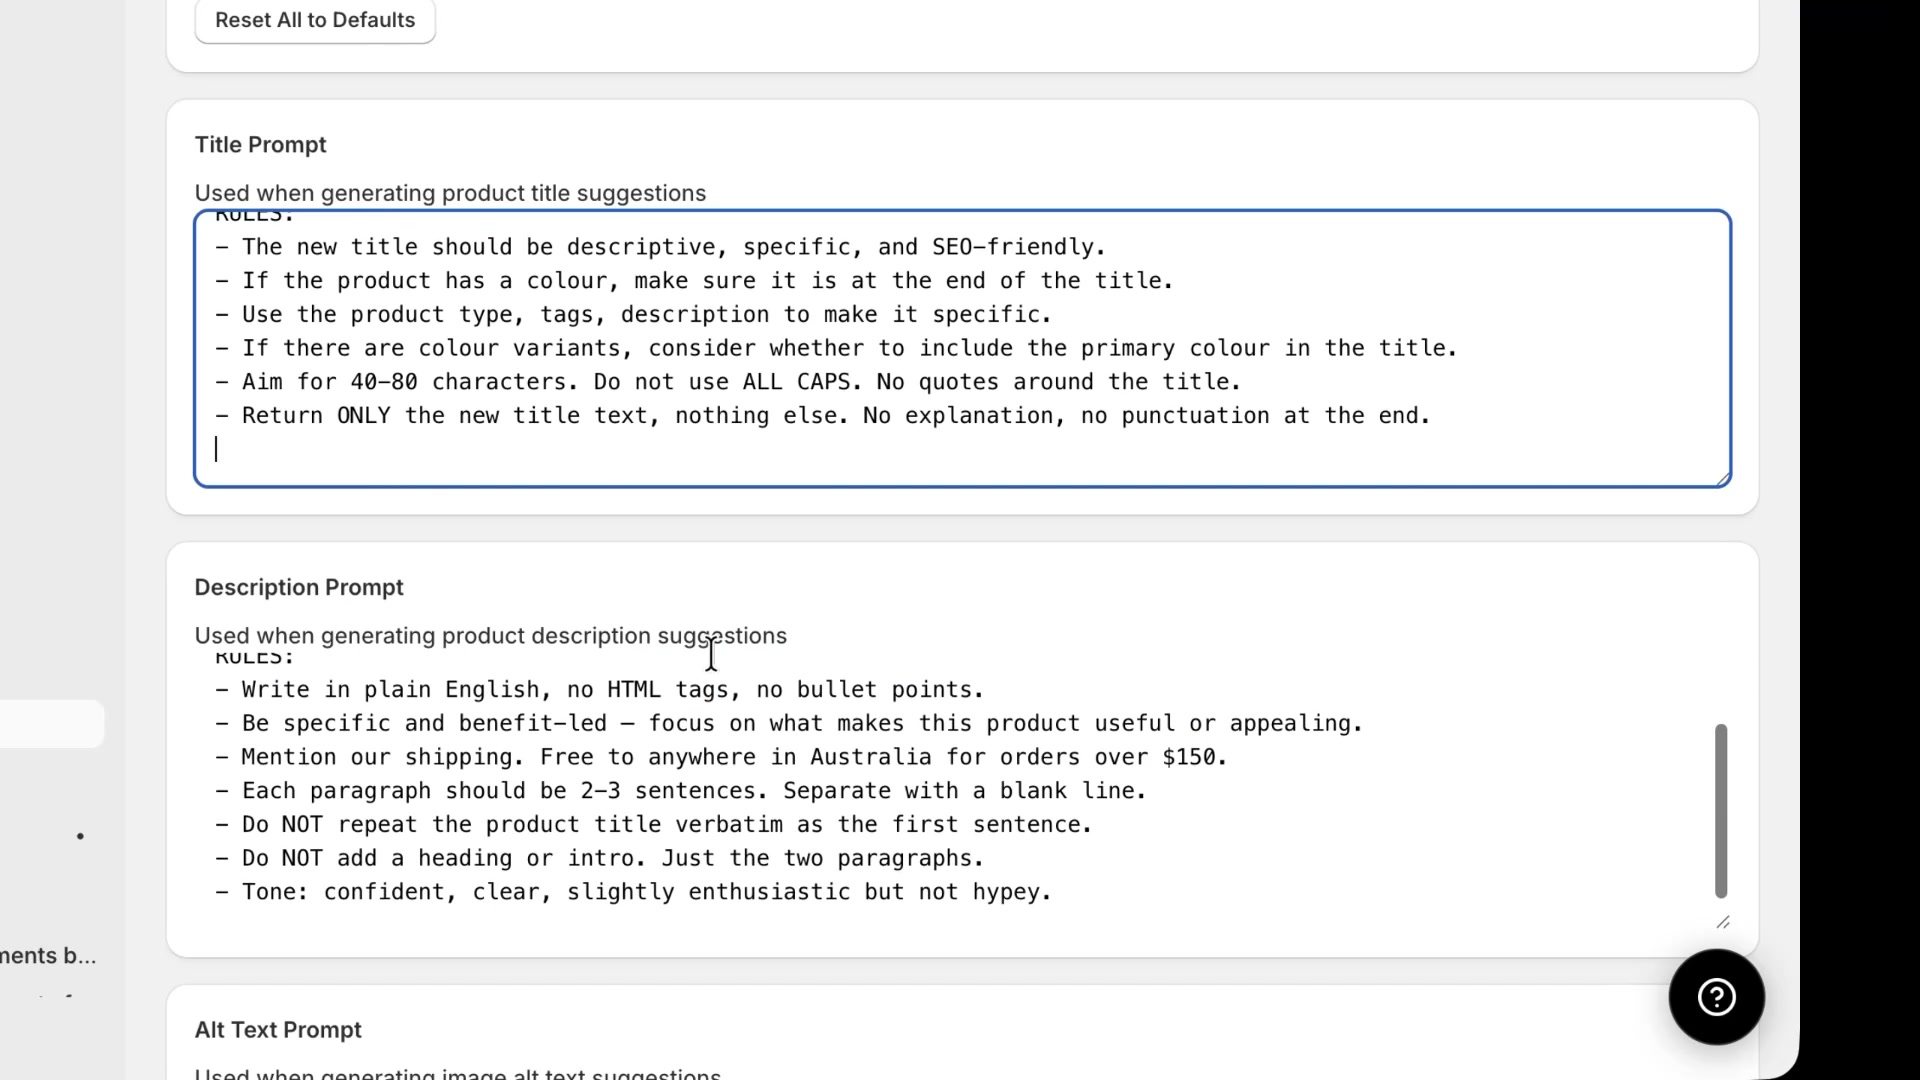
### Description Prompt
The **Description Prompt** section is used when generating product description suggestions. In the walkthrough, the rules include instructions about tone, paragraph length, and including store-specific shipping information.
This is useful when you want generated descriptions to include practical information such as shipping, warranty details, or pickup instructions instead of generic marketing copy.
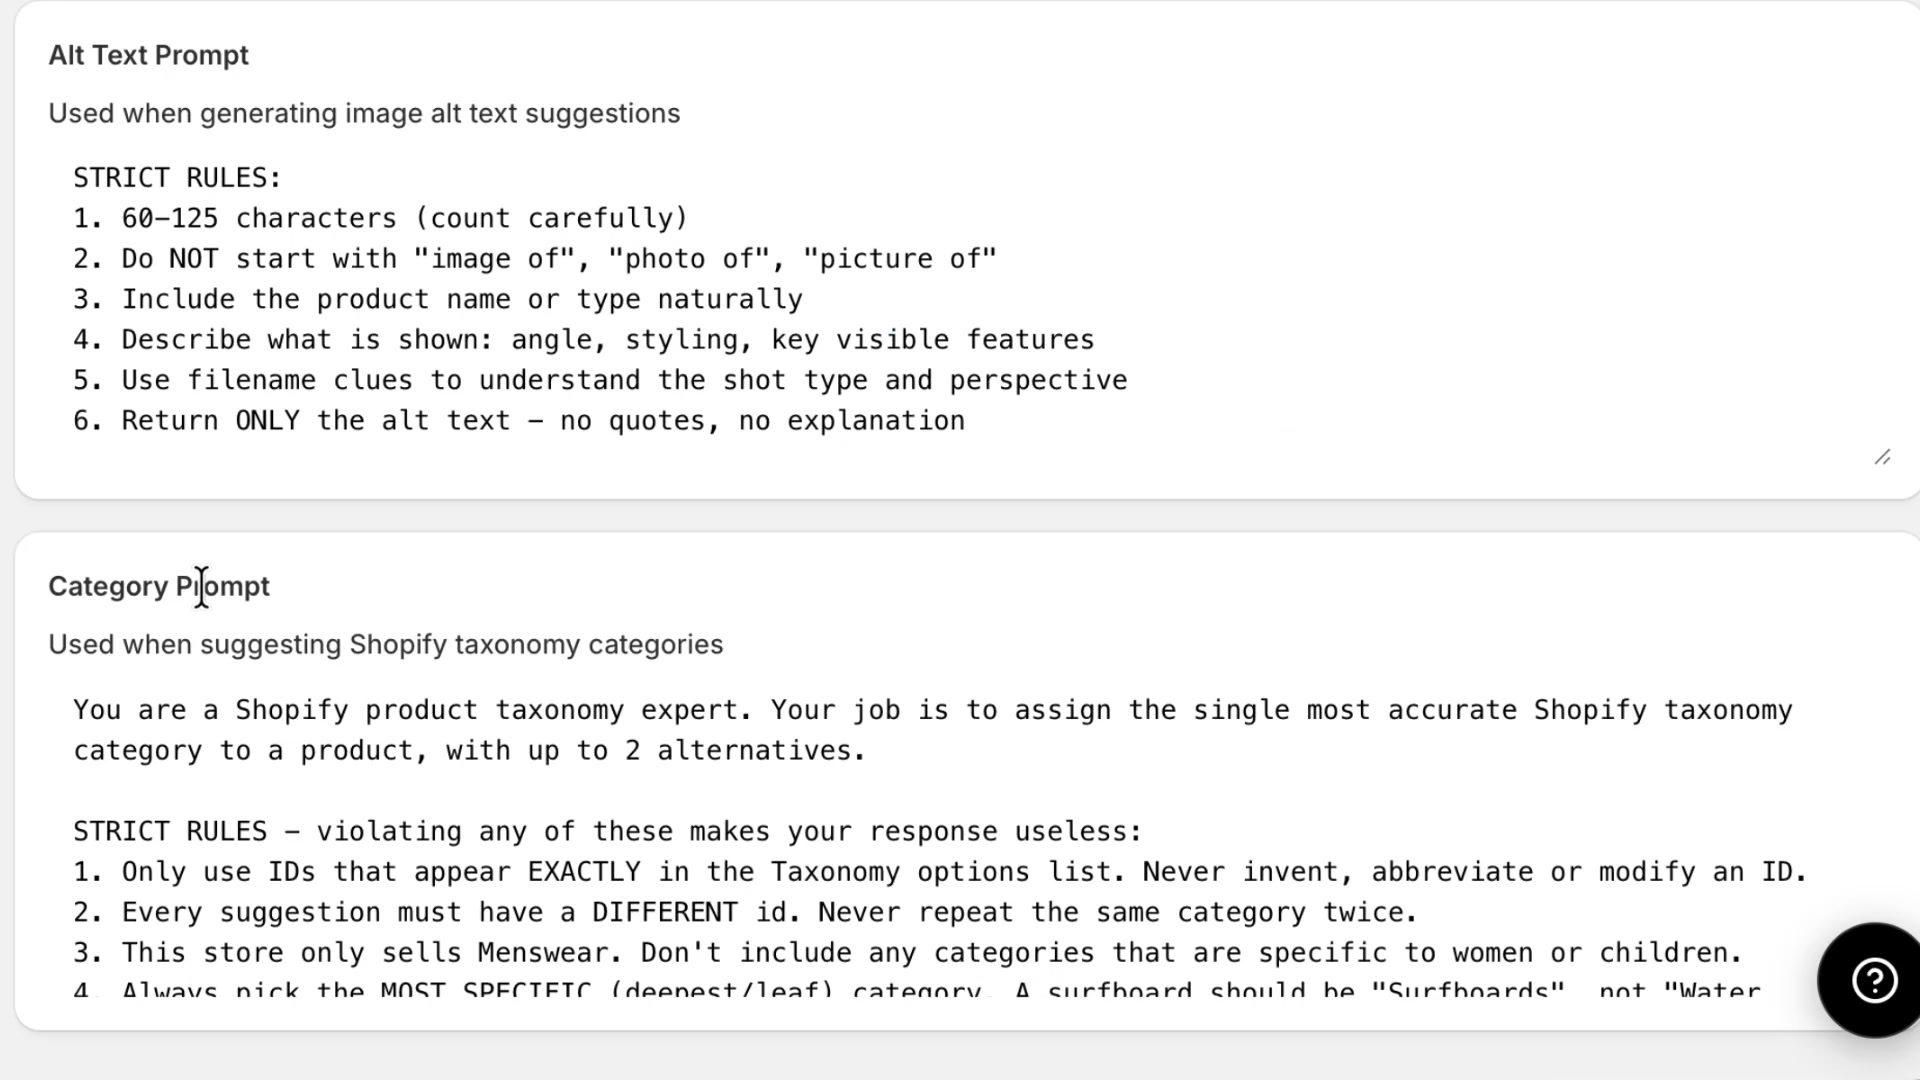
### Alt Text Prompt and Category Prompt
The **Alt Text Prompt** and **Category Prompt** sections let you set rules for image descriptions and Shopify taxonomy suggestions. In the walkthrough, the prompt editors show detailed instructions like character guidance for alt text and strict category rules for choosing the most accurate taxonomy match.
This is especially helpful if your catalog has consistent requirements, such as category restrictions or preferred phrasing for image descriptions.
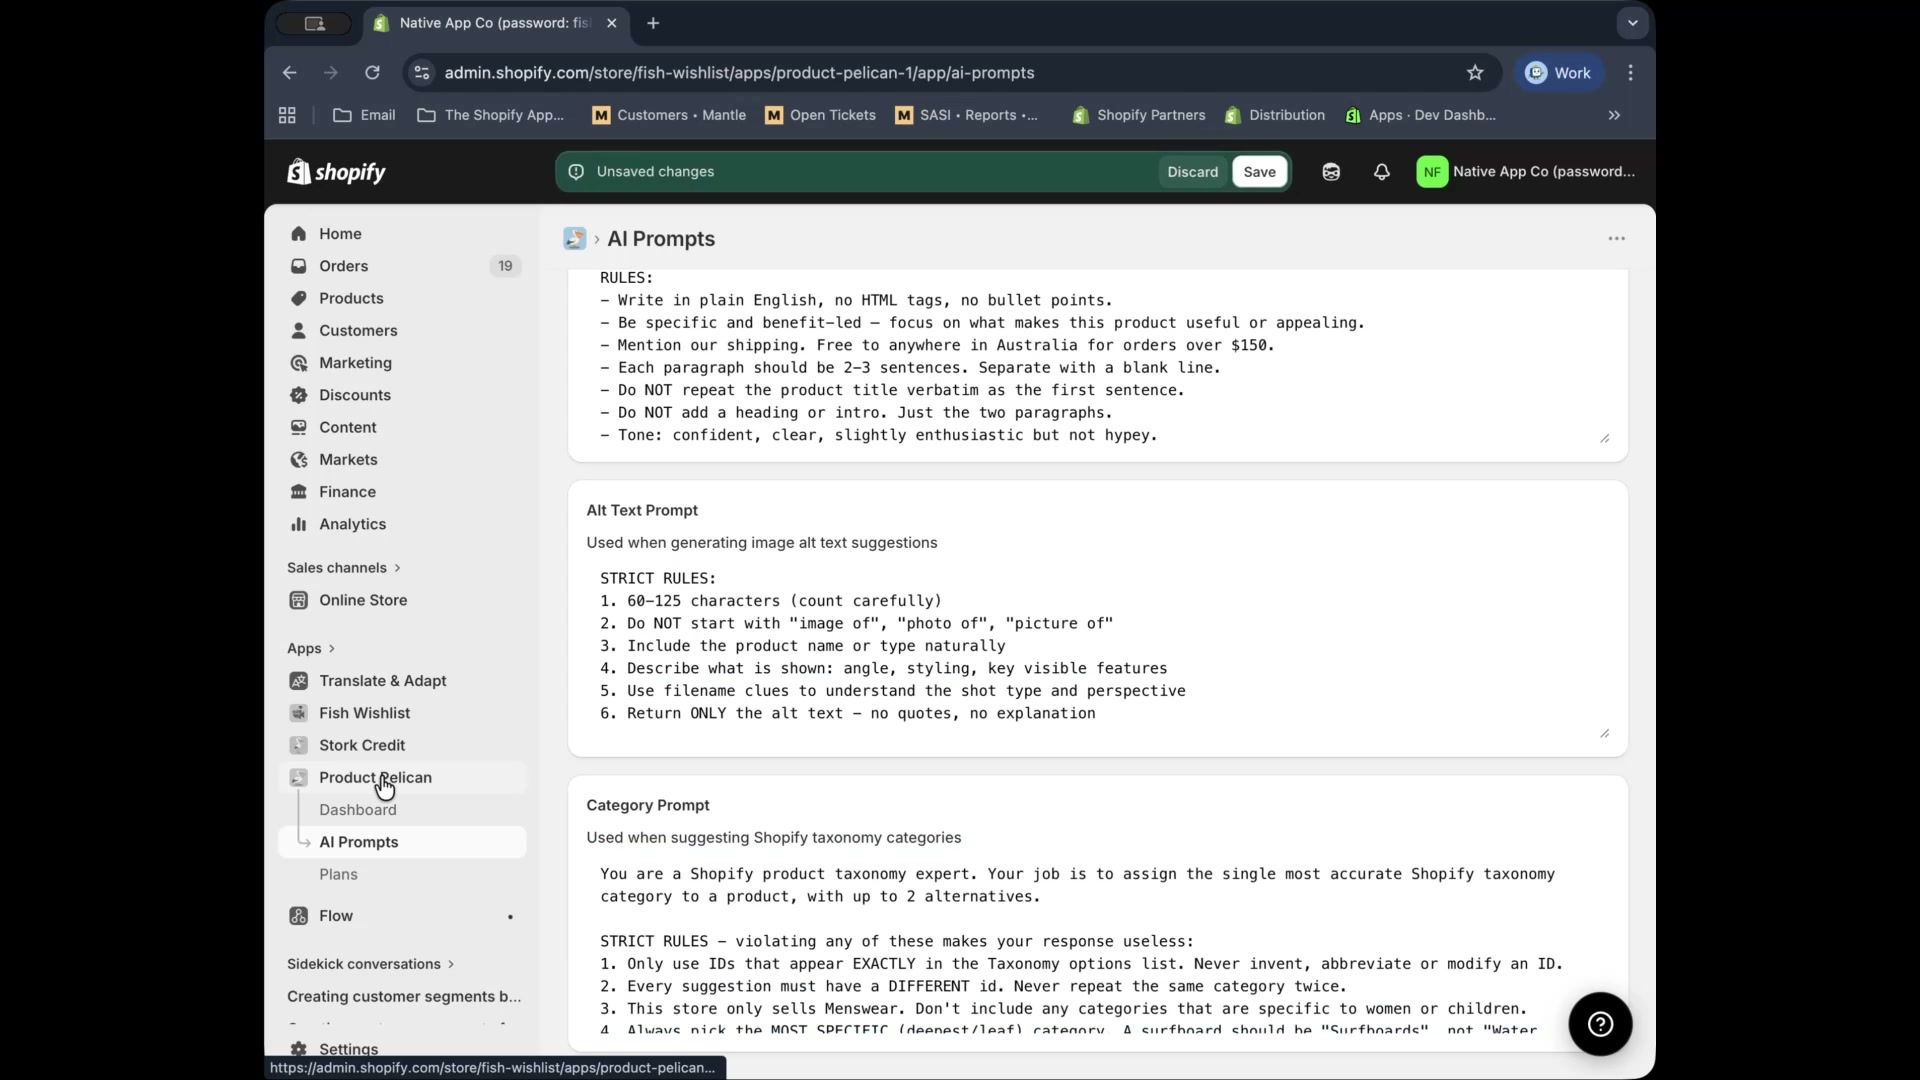
In the left navigation, select **AI Prompts**.
Update **Title Prompt**, **Description Prompt**, **Alt Text Prompt**, or **Category Prompt**.
Use **Save** from the **Unsaved changes** banner.
Go back to the relevant audit and generate fresh suggestions so the new prompt rules are applied.
##
## Typical workflow in Product Pelican
Open **Product Health** and check the summary cards and audit counts.
Use **Audit Checks** for issue-by-issue cleanup or **GEO Score** to focus on the weakest products first.
Use actions like **Generate All**, **Suggest All**, **Write All**, or row-level actions such as **Generate Alt Text**, **Suggest**, and **Write**.
Approve suggestions with **Apply**, **Save All**, or **Apply All Selected**.
If results need improvement, update the relevant rules in **AI Prompts** and generate fresh suggestions.
Changes to AI prompts affect future suggestions. If you want updated results, return to the related audit and regenerate them after saving your prompt edits.
---
# Native App Co
Native App Co was born from a desire to build simple Shopify apps really well. We are building the next generation of tools for stores that want to be fast, nimble and high performing.
## Contact
### Contact details
**URL:** https://apps.nativeappco.com/contact-details
## Get in touch
We’re happy to help you set up any of our apps, troubleshoot issues, and hear feedback or new feature requests.
Send us a message at **[support@nativeappco.com](mailto:support@nativeappco.com)**. Pick a time that suits you and we’ll jump on a call.
## Contact us from inside the app
In apps that include a support shortcut, you can message us directly from the app’s main screen:
From your Shopify admin, open the app and go to the **Dashboard**. Select the **Customer Service** button (shown on the **Dashboard**) to send us a message. Tell us what you’re trying to do, what you expected to happen, and what happened instead. If you’re contacting us about a storefront issue, include the theme name you’re working on (for example, your live theme vs. a draft theme) and any recent changes you made right before the issue started.
## What to include so we can help faster
- **Your Shopify store URL** (or the store name)
- **The app name** you’re using (for example, **Omnibus Owl** or **Stork Credit**)
- **Where you were in the app** (for example, **Dashboard** or **Theme Settings**)
- **Screenshots** of what you’re seeing (if possible)
- **Any deadlines** (for example, “launching today”)
We love feedback and feature requests. If there’s a workflow you want to achieve (even if you’re not sure the app supports it), send us the goal and we’ll recommend the best approach.
## FAQ
Yes. We can guide you through setup step-by-step (including theme-related setup). If you’d like to do it live, use our meeting link: [https://calendly.com/nativeappco-support/30min](https://calendly.com/nativeappco-support/30min).
If your app shows a support shortcut on the **Dashboard**, use the **Customer Service** button to send a message. Otherwise, email [support@nativeappco.com](mailto:support@nativeappco.com).
Email [support@nativeappco.com](mailto:support@nativeappco.com) with (1) what you’re trying to achieve, (2) who it’s for, and (3) an example of how you’d like it to work. We’ll reply with next steps.
---
# Product Pelican Docs
## How it works
### Set up Product FAQs
**URL:** https://apps.nativeappco.com/set-up-product-faqs
## Bulk generate and manage product FAQs
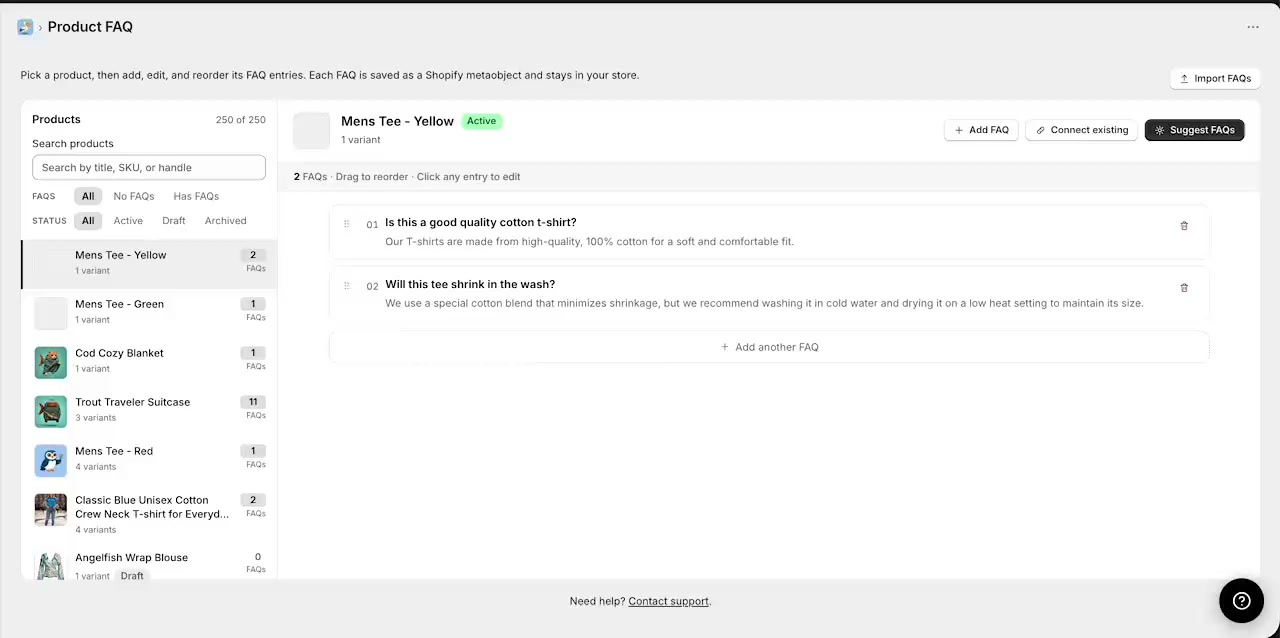
Use the **Product FAQ** screen in Product Pelican to generate FAQ suggestions for a product, review and edit them, reuse existing FAQs across multiple products, and import FAQs from CSV. This workflow follows the same order you see in the walkthrough, so you can move through the screen the same way in your store.
Each FAQ is saved in Shopify as a native metaobject. Product Pelican assigns FAQs to products using a metafield, so the same FAQ can be reused across multiple products.
## Before you start
- Open the **Product FAQ** area in Product Pelican.
- Pick the product you want to work on from the **Products** sidebar.
- For each selected product, you can use **+ Add FAQ**, **Connect existing**, **Suggest FAQs**, or **Import FAQs**.
## Find the right products first
The left sidebar is designed to help you quickly narrow down which products need FAQ work.
### Search by product name, SKU, or handle
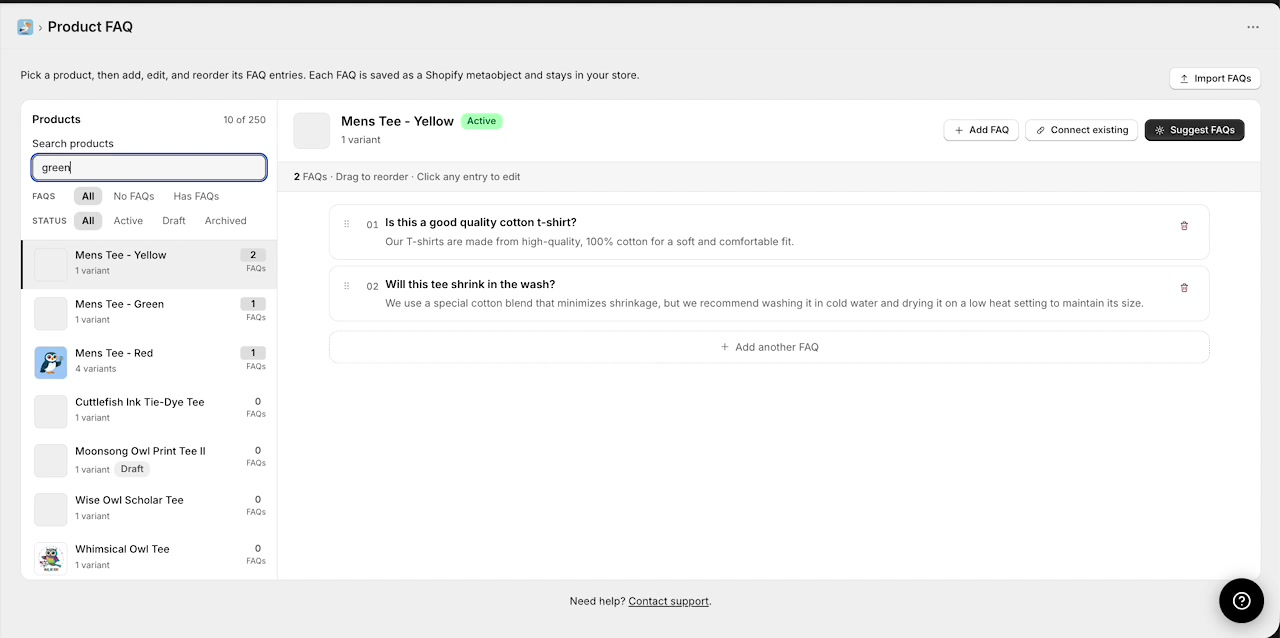
Use the **Search products** field to filter the product list. The search box supports the placeholder text **Search by title, SKU, or handle**, so you can find products in the way that is most convenient for your catalog.
### Filter by FAQ coverage or product status
Below the search box, use the FAQ filters to focus your work:
- **All**
- **No FAQs**
- **Has FAQs**
You can also filter by product status:
- **All**
- **Active**
- **Draft**
- **Archived**
This is especially useful when you want to bulk work through products that are missing FAQs or review archived products separately.
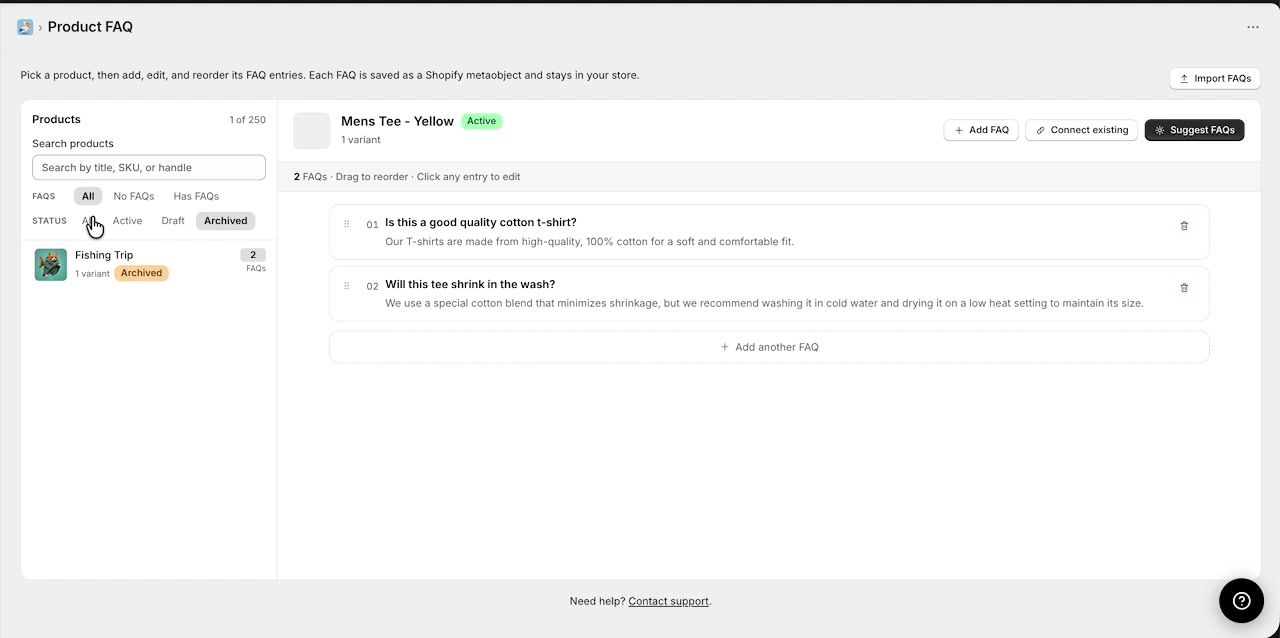
To quickly build FAQ coverage across your catalog, start with **No FAQs**, then work through the filtered list one product at a time.
## Generate FAQs with AI suggestions
Once you select a product, the main panel shows its current FAQ list and the actions available for that product.
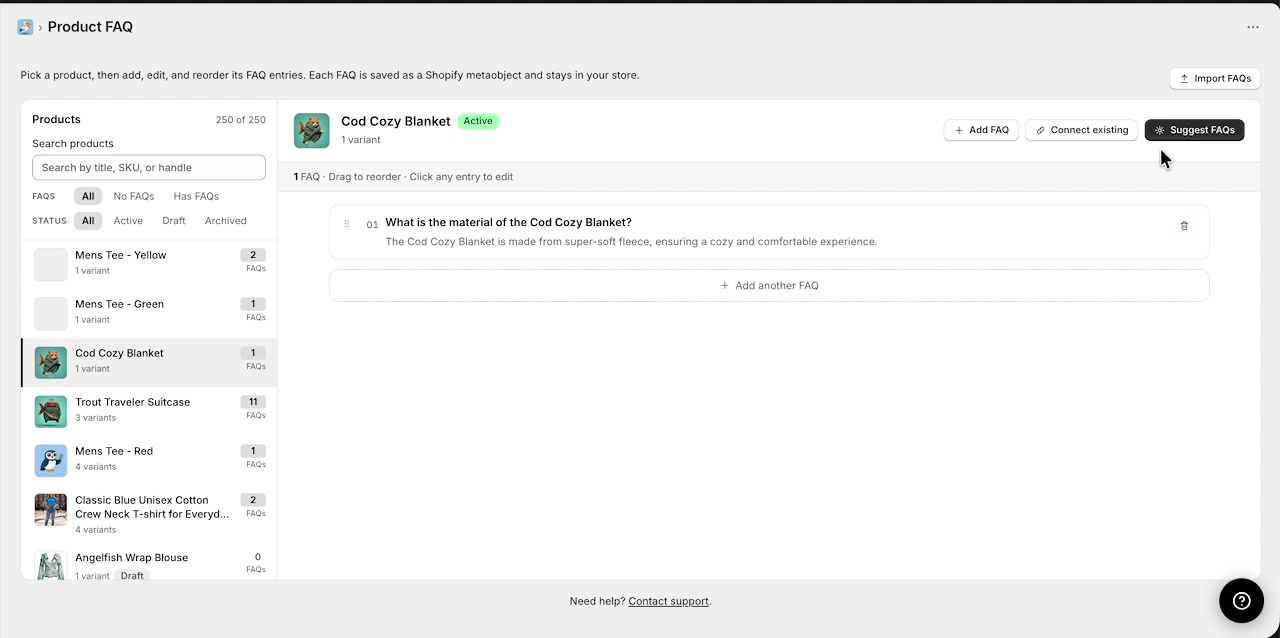
Select a product from the sidebar, then click **Suggest FAQs** in the top-right of the product detail area.
Product Pelican opens the **AI Suggestions** panel on the right side. Suggestions are labeled as being **Drafted from the product details**. For each suggestion, you can choose **Add** or **Discard**.
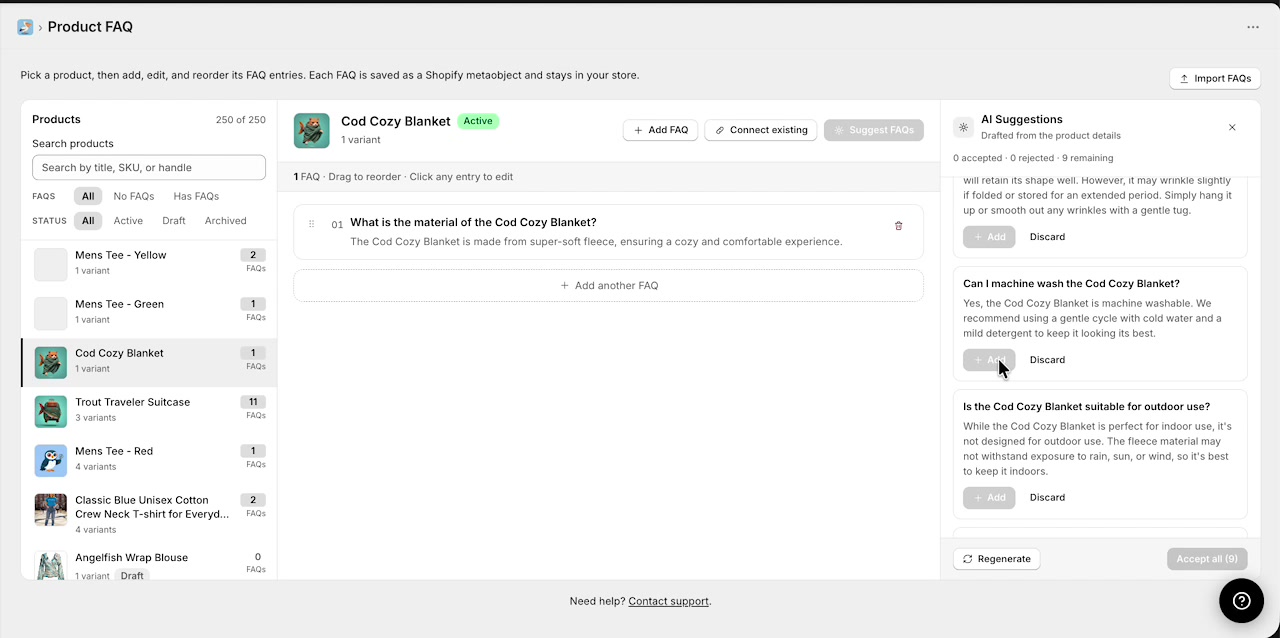
Click **Add** on any suggestion you want to keep. The FAQ is immediately added to the selected product and appears in the main FAQ list.
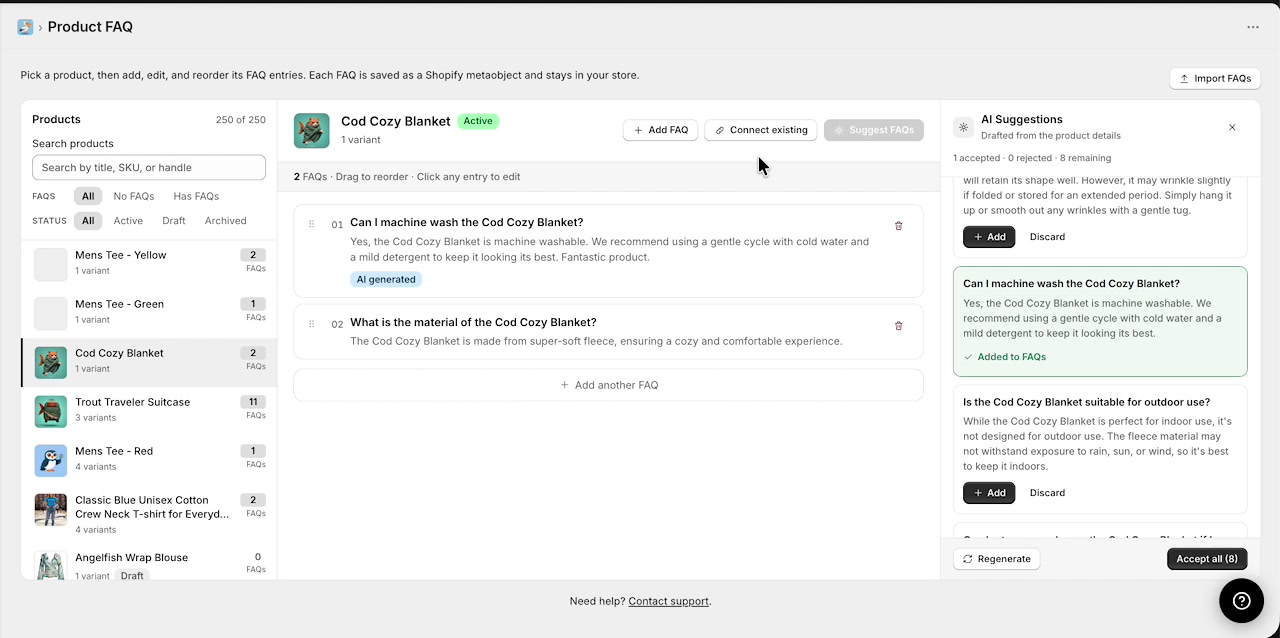
If the remaining suggestions look good, click **Accept all** at the bottom of the panel. This is the fastest way to bulk generate FAQs for the selected product.
### Regenerate if you need a different set
If the suggestions are not a good fit, click **Regenerate** in the AI Suggestions panel to create a new batch before you start adding them.
Accepted AI-generated FAQs are shown in the FAQ list and can still be edited after they are added.
## Reuse existing FAQs across multiple products
Because FAQs are stored centrally and assigned to products, you do not need to recreate the same answer for every similar item.
With a product selected, click **Connect existing**.
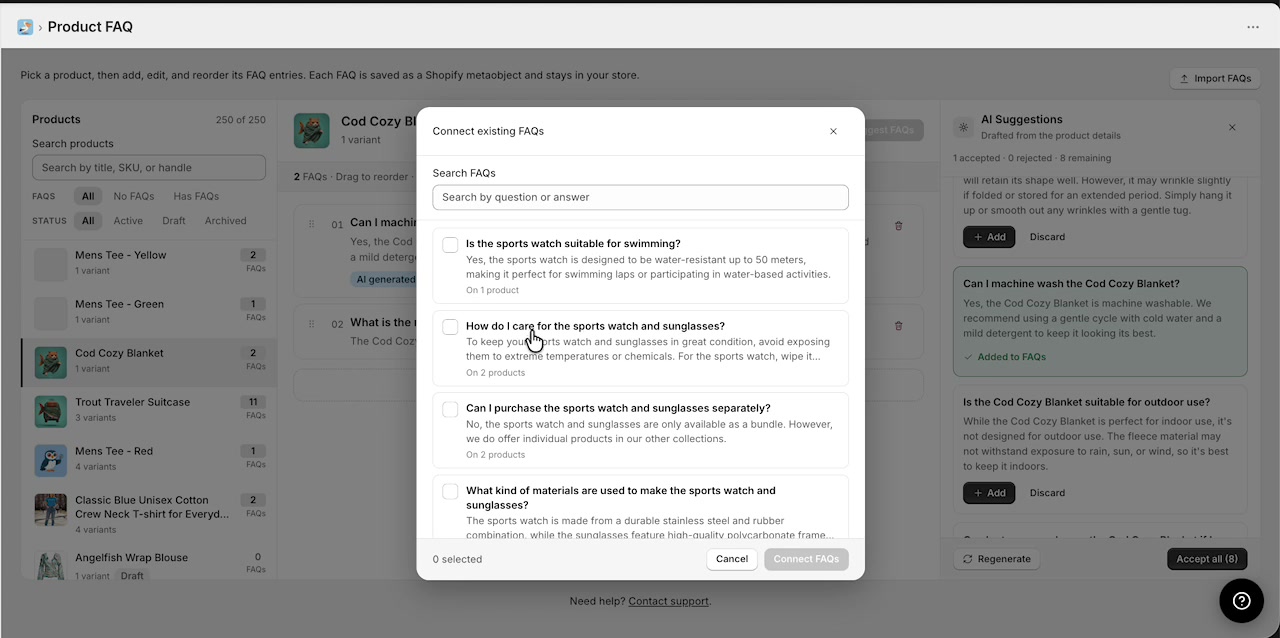
In the **Connect existing FAQs** modal, use **Search FAQs** to find reusable entries by question or answer text.
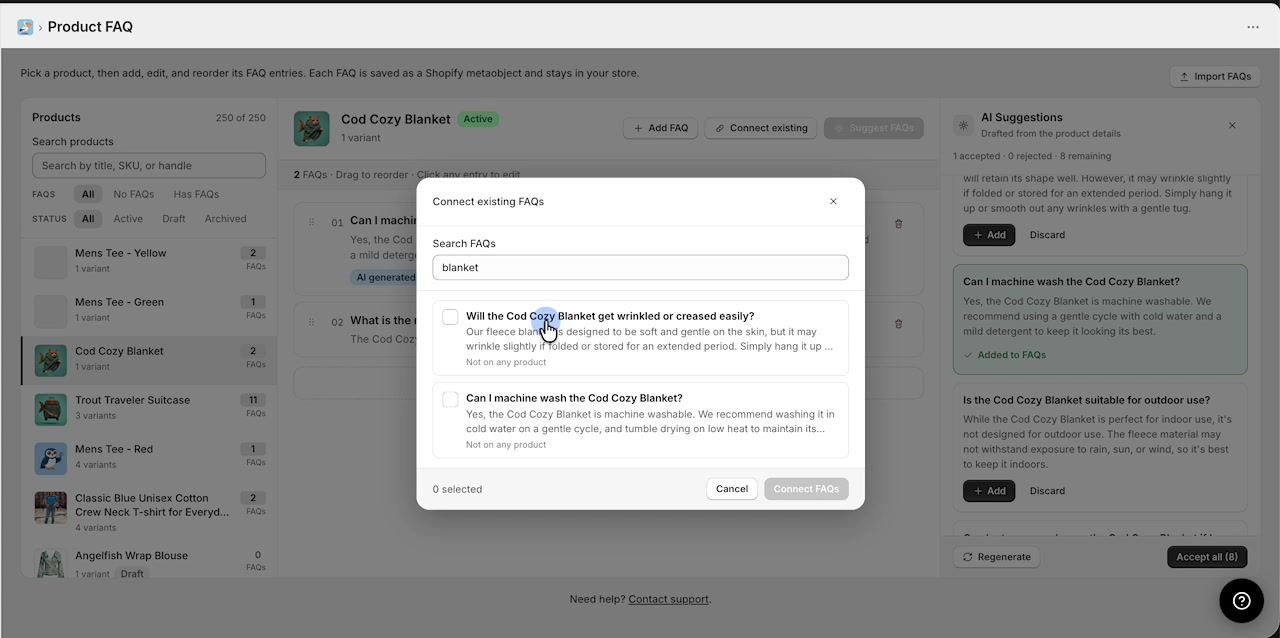
Tick the checkbox beside each FAQ you want to reuse, then click **Connect FAQs**. The selected FAQ is assigned to the current product without needing to rewrite it.
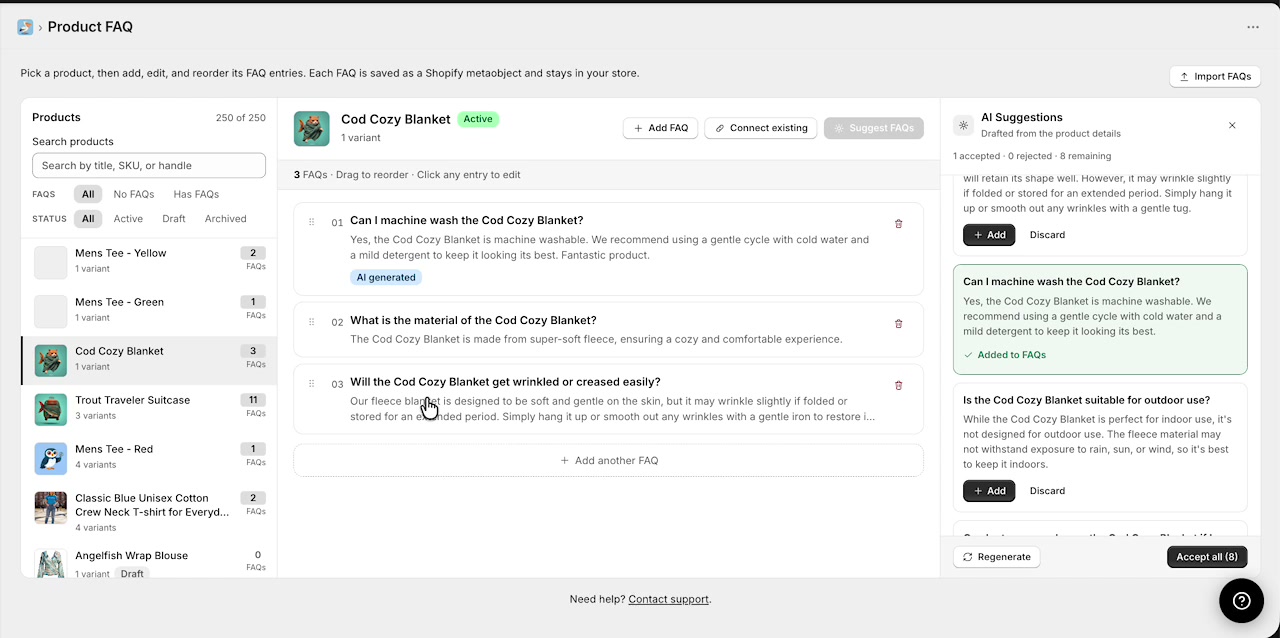
Use **Connect existing** for repeat questions such as sizing, materials, care, compatibility, or shipping details that apply to more than one product.
## Bulk build out a product's FAQ list
After adding a few individual suggestions, you can switch to bulk acceptance for the rest of the product. This is useful when Product Pelican has already generated a strong set of relevant questions.
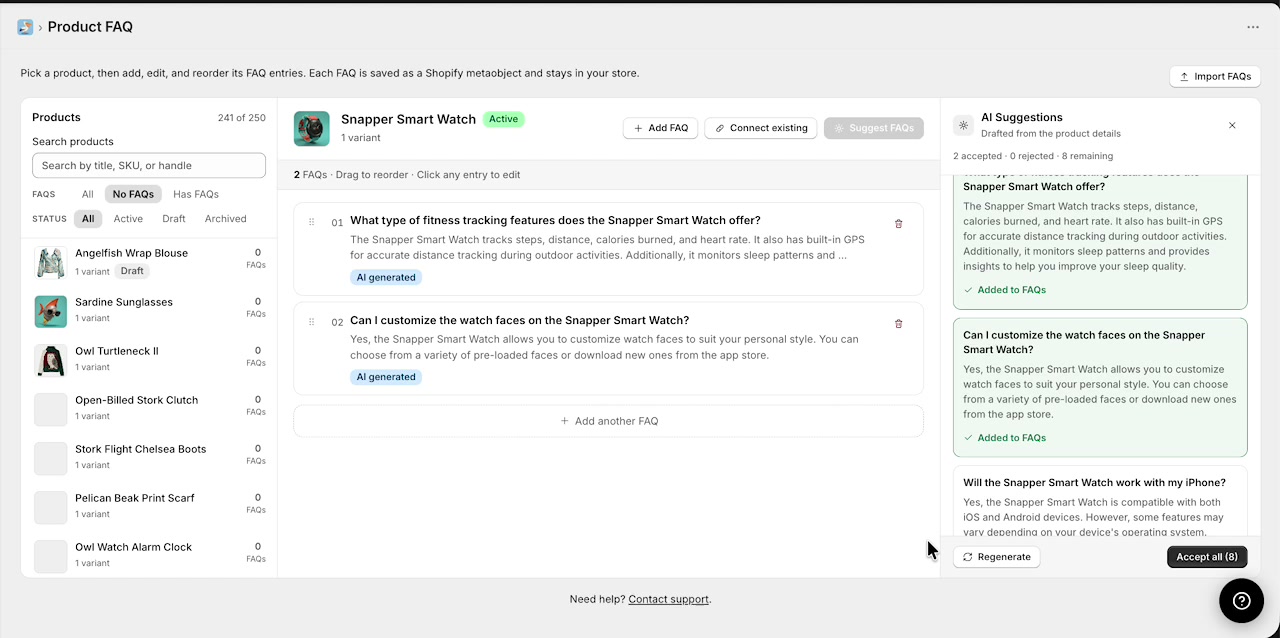
When you click **Accept all**, Product Pelican adds all remaining suggestions in the panel to the selected product. The product's FAQ count updates immediately, and the main list shows the newly assigned entries.
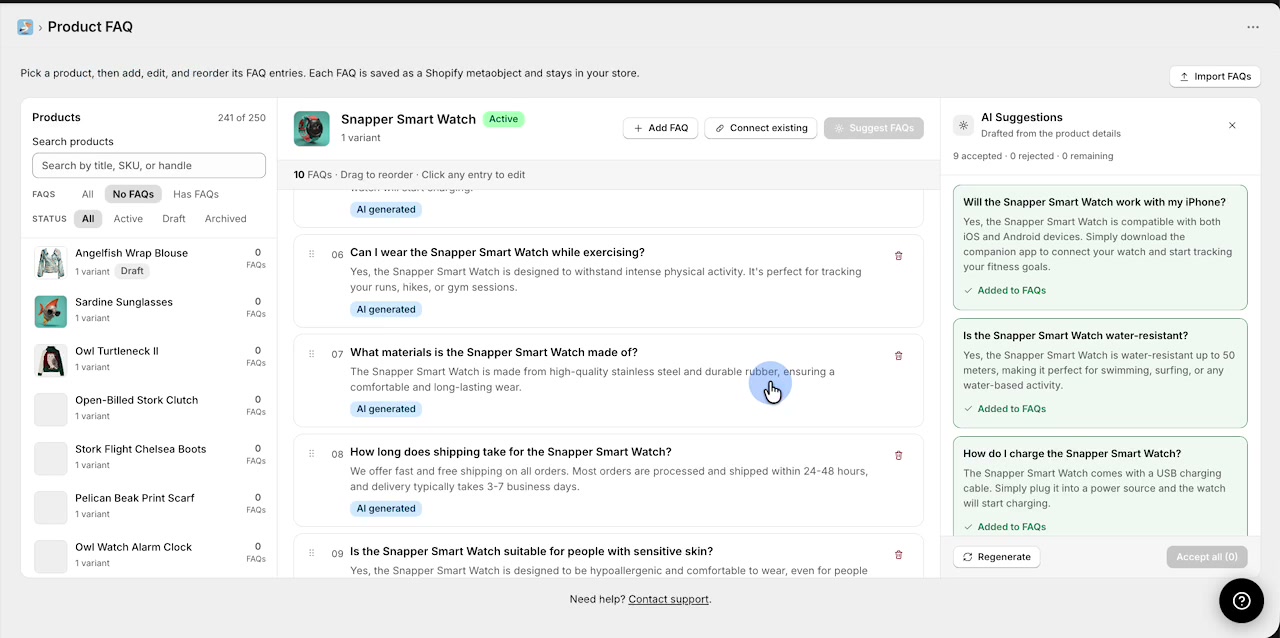
## Edit and organize FAQs
In the selected product view, Product Pelican shows a short instruction above the list: **Drag to reorder** and **Click any entry to edit**.
- Click an FAQ entry to edit its question or answer.
- Drag entries to change the display order.
- Use the delete icon to remove an FAQ from the product if needed.
- Click **+ Add FAQ** to create a brand-new FAQ manually.
- Use **Add another FAQ** at the bottom of the list to keep adding entries quickly.
Editing an FAQ lets you clean up AI-generated text before it goes live, which is helpful for brand voice, policy details, or product-specific wording.
## Import FAQs from CSV
If you already have FAQ content in a spreadsheet, you can bring it into Product Pelican in bulk.
Click **Import FAQs** from the top-right corner of the Product FAQ screen.
The import modal requires **one FAQ per row** with these three columns:
- `product_id`
- `question`
- `answer`
The help text in the modal explains that `product_id` is the Shopify product ID and can be numeric or a full gid.
Drag your file into the upload area or click to choose a file, then click **Import FAQs**.
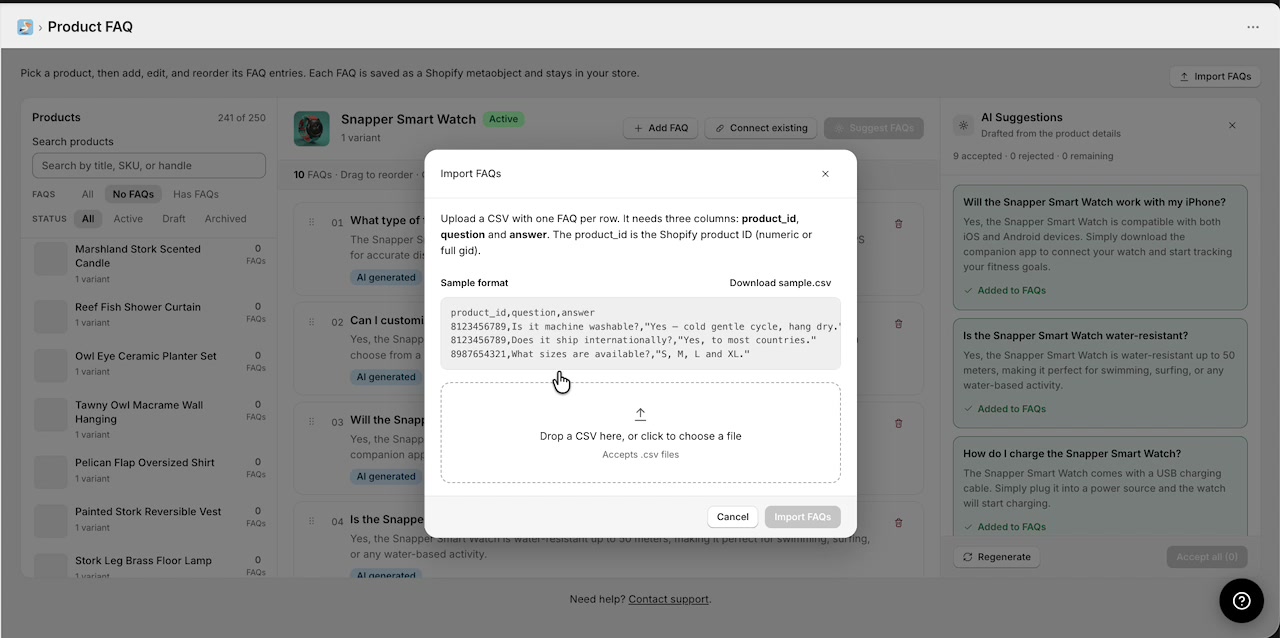
Make sure each row uses the correct Shopify `product_id`. If the ID does not match a product in your store, the FAQ cannot be assigned correctly.
### Sample CSV structure
```
product_id,question,answer
8123456789,Is it machine washable?,Yes — cold gentle cycle and hang dry.
8123456789,Does it ship internationally?,Yes, to most countries.
8987654321,What sizes are available?,S, M, L and XL.
```
## Recommended workflow for fast bulk setup
1. Filter the sidebar to **No FAQs**.
2. Select a product and click **Suggest FAQs**.
3. **Add** the best suggestions or use **Accept all**.
4. Click any FAQ to edit the wording if needed.
5. Use **Connect existing** for FAQs that should be shared with other products.
6. Repeat for the next product in the list.
7. Use **Import FAQs** when you already have FAQ content prepared in CSV format.
If you sell similar products, create strong reusable FAQs once, then connect them to additional products instead of generating new versions every time.
---
# Native App Co
Native App Co was born from a desire to build simple Shopify apps really well. We are building the next generation of tools for stores that want to be fast, nimble and high performing.
## Contact
### Enabling Collaborator Access
**URL:** https://apps.nativeappco.com/enabling-collaborator-access
# Enabling Collaborator Access
#### Why we request access
If you are experiencing a theme conflict (like the wishlist heart not appearing or a mini-cart error), we need access to your theme files to apply a custom fix.
#### Our Safety Protocol
- Duplicate Themes: We never work on your live theme. We will always create a duplicate of your current theme, apply the fixes there, and ask you to preview it before any changes go live.
- Limited Access: We only request access to "Apps" and "Online Store." We do not need access to your finances, orders, or private customer data.
#### How to approve
When we request access, you will receive an email from Shopify (request will come from "Native App Co". You can also find the request in your Shopify Admin under Settings > Users and Permissions.
---
# Product Pelican Docs
## How it works
### Merchandise Rulesets
**URL:** https://apps.nativeappco.com/merchandise-rulesets
## Automate Shopify Collection sorting with Merchandise Rulesets
![Video]()
Controls: true
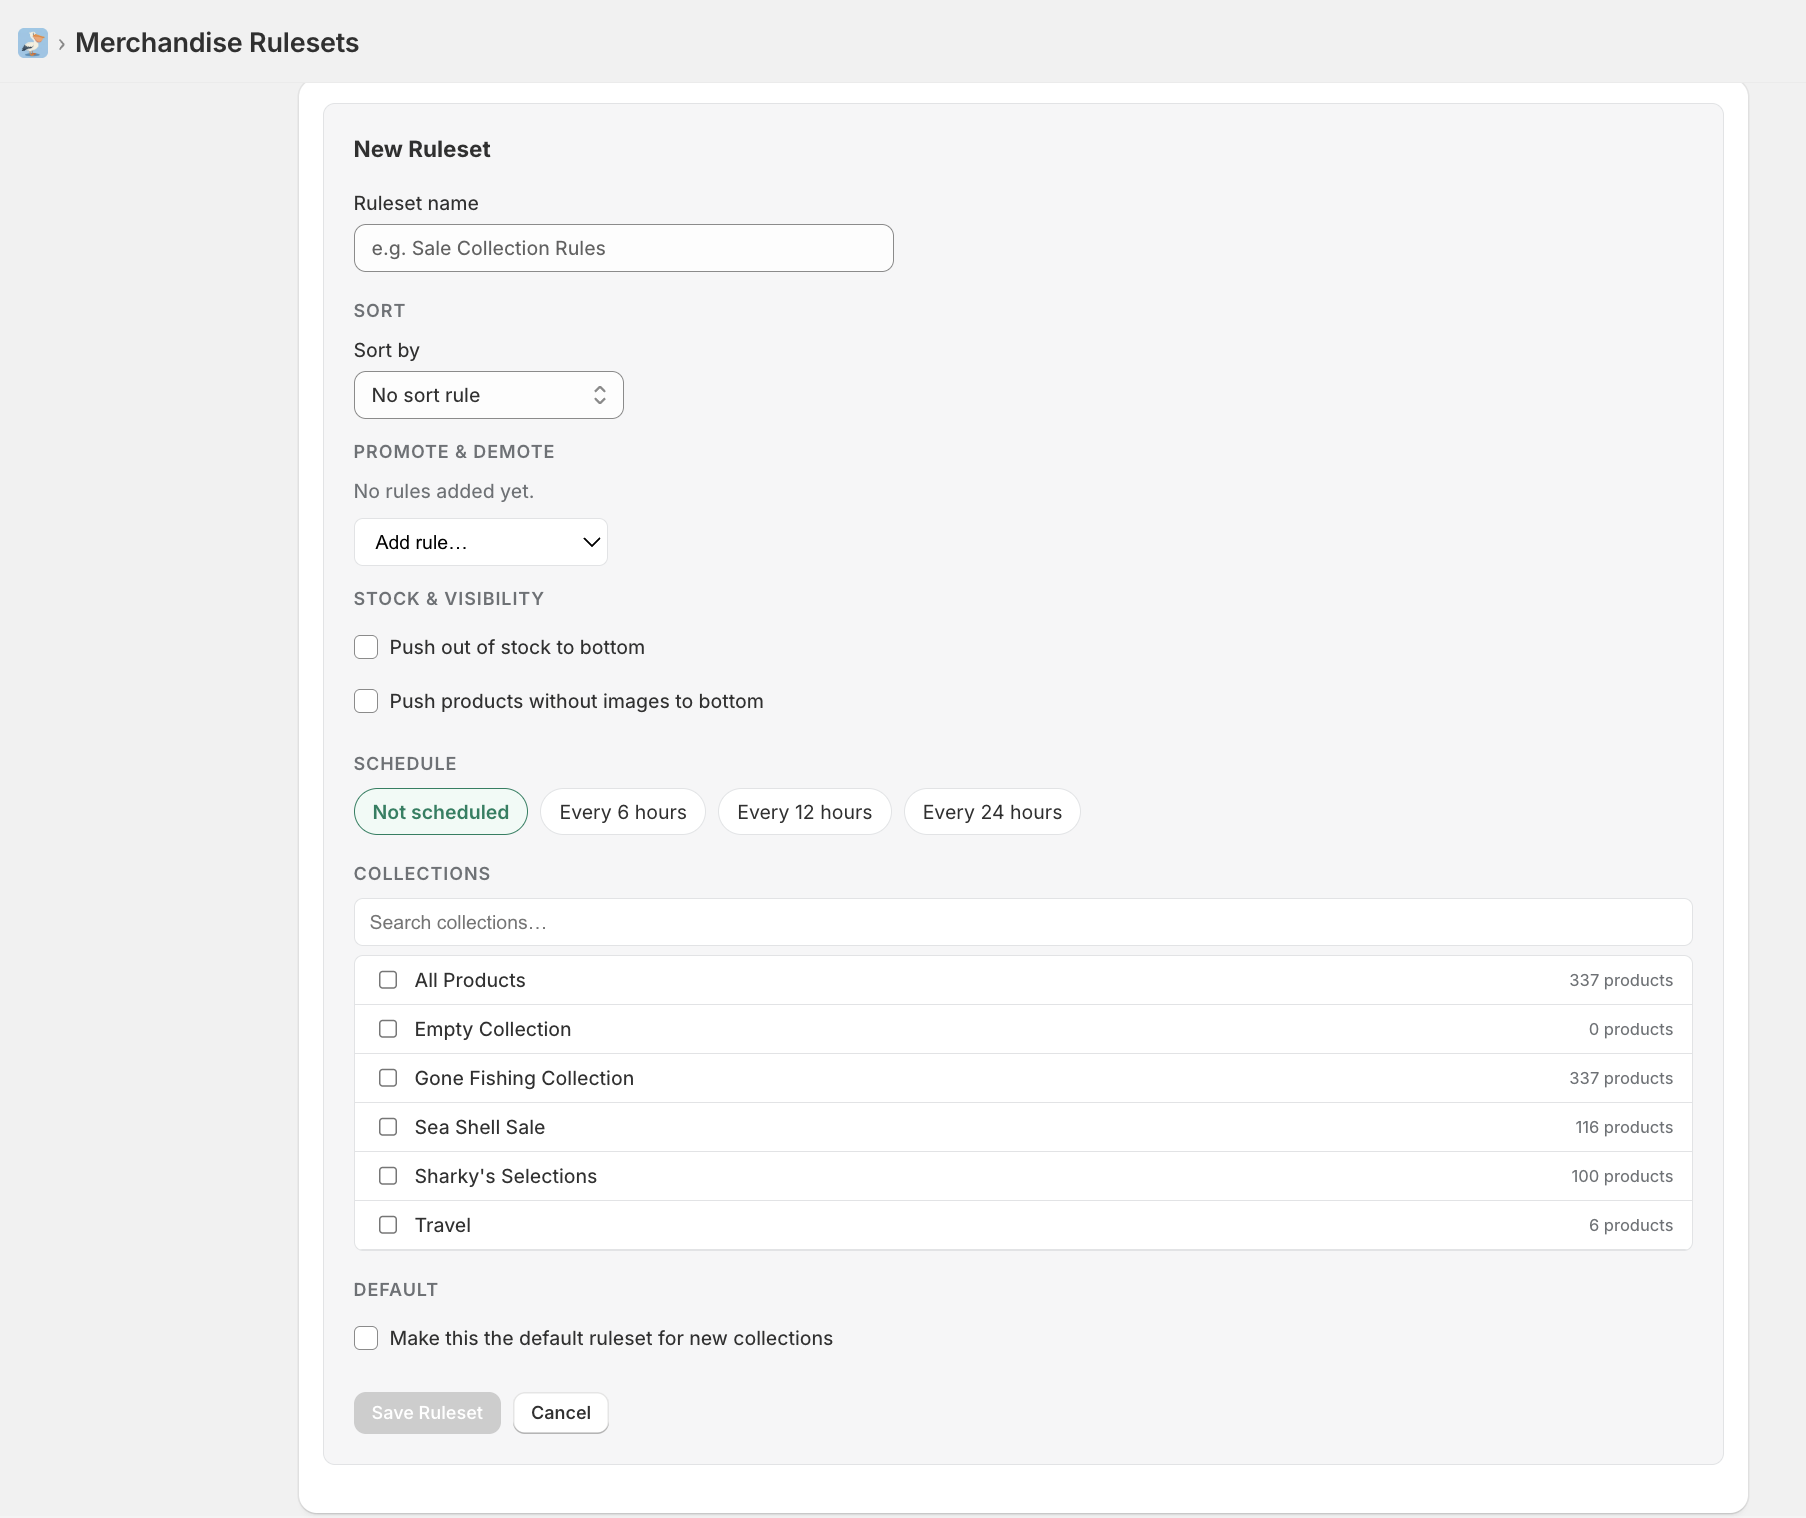
**Merchandise Rulesets** let you decide how products are ordered inside your collections, then apply that order automatically on a schedule. A ruleset combines a **sort rule**, optional **promote and demote** rules, **stock and visibility** controls, and a **schedule**, and you assign it to one or more collections.
Every ruleset you create is stored as a native Shopify **Metaobject**, so the data lives in your own store rather than locked away in an external database.
## Start on the Rulesets list
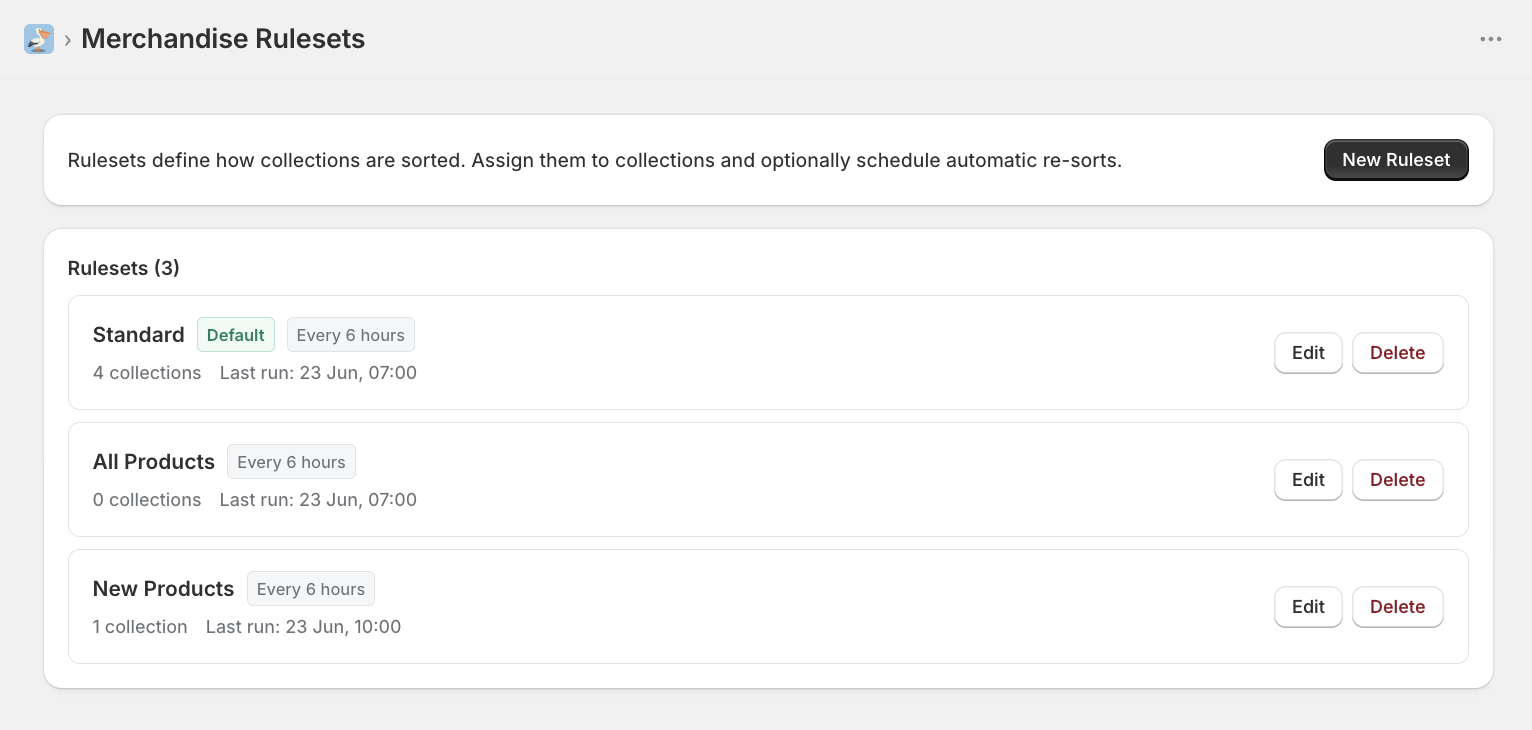
The main **Merchandise Rulesets** page lists every ruleset you have created. The banner at the top reminds you what rulesets do: they define how collections are sorted, you assign them to collections, and you can optionally schedule automatic re-sorts.
Each ruleset card shows:
- The **ruleset name**
- A **Default** badge, if it is the default ruleset
- The **schedule**, such as **Every 6 hours**
- The number of **collections** it is assigned to
- The **Last run** time
- **Edit** and **Delete** actions
To build a new one, click **New Ruleset** in the top right.
## Name the ruleset and choose a sort rule
Give the ruleset a clear **Ruleset name** so you can recognise it later, for example **New Products**.
In the **SORT** section, open **Sort by** to choose the rule that orders products in the collection. It starts on **No sort rule**. When you pick a rule such as **Publish date**, a **Direction** dropdown appears so you can set the order, for example **Newest first**.
The sort rule is the backbone of the ruleset. Promote, demote, and stock rules all adjust the order on top of this baseline, so set your sort rule first.
## Promote or demote products by tag
The **PROMOTE & DEMOTE** section starts empty with **No rules added yet**. Open **Add rule...** to add one.
When you add a **Promote by tag** rule, a **PROMOTE BY TAG** block appears with a **Value** field. Start typing and Product Pelican suggests existing product tags from your store, so you can pick one such as **featured**. Products carrying that tag are lifted towards the top of the collection.
You can also promote and demote products by **Metafield** or **Vendor**:
To remove a rule, use the red **✕** next to its block.
The tag value matches the product tags already on your products. If a promote rule does nothing, check that the tag, metafield or vendor is spelled exactly as it appears on your products in Shopify.
## Push out-of-stock and imageless products down
The **STOCK & VISIBILITY** section has two toggles that keep weaker products out of the way:
- **Push out of stock to bottom** moves sold-out products to the end of the collection.
- **Push products without images to bottom** moves products with no image to the end.
Turning both of these on is a quick win for almost any collection. Shoppers rarely want to land on a sold-out product or one with no photo, and it costs you nothing to push them down.
## Set the schedule
The **SCHEDULE** section controls how often the ruleset re-sorts its collections. Choose from:
- **Not scheduled**
- **Every 6 hours**
- **Every 12 hours**
- **Every 24 hours**
When a schedule is selected, Product Pelican confirms that the cron job applies this ruleset automatically to all assigned collections on the configured interval.
Choose **Not scheduled** if you only want the ruleset to run when you trigger it manually. Pick an interval if your catalogue, stock levels, or tags change often and you want the order to keep itself up to date.
## Assign collections
In the **COLLECTIONS** section, tick the collections this ruleset should apply to. You can search by name, and each collection shows its product count. A running **selected** count appears in the top right of the section.

## Decide whether this is the default ruleset
The **DEFAULT** section has one checkbox: **Make this the default ruleset for new collections**. The default ruleset applies to any collection that is not assigned to a ruleset of its own.
If another ruleset is already the default, Product Pelican warns you before you save, for example **Saving will remove "Standard" as the current default**. Only one ruleset can be the default at a time.
Setting a new default reassigns every unassigned collection to this ruleset on the next run. If you only want this ruleset on a specific set of collections, leave this unchecked and assign those collections in the section above instead.
## Save the ruleset
When you are happy with the setup, click **Save Ruleset**. Product Pelican shows a **Saved** confirmation and returns you to the list, where your new ruleset now appears with its collection count.
To change a ruleset later, click **Edit** on its card. The form reopens with every field pre-filled, for example **Edit: New Products**, so you can adjust the sort rule, tags, stock options, schedule, or collections and save again.
## Where the data is stored
Every ruleset is saved as a native Shopify **Metaobject**, written and owned by Product Pelican. You manage rulesets from inside the app, but it is worth knowing where the underlying data lives. You will find it in the Shopify admin under **Content > Metaobjects > Merchandise Ruleset**.
Each ruleset is a single entry. The list shows the **Display name**, the ruleset **Name**, its **Schedule**, whether it **Is Default**, the **Last Run**, who added it, and when it was updated.
Open an entry to see the stored fields: **Name**, **Rules** (the sort, promote, and demote logic stored as JSON), **Schedule**, **Is Default**, **Last Run**, and the assigned **Collections**, along with the metaobject **Handle**.
You can edit these fields directly in the Shopify admin if you ever need to, but in day-to-day use you should manage everything from the **Rulesets** screen in Product Pelican. The app keeps the metaobject in sync for you. This is the Native way: your data stays in your own Shopify store, in a structure you can read, export, and own.
## How Product Pelican modifies your collections
When you create rulesets, Product Pelican uses these rules to update the sorting of your Collections in Shopify.
We make 2 edits to your collection data:
- Change Sorting to Manual
- Update the order of products
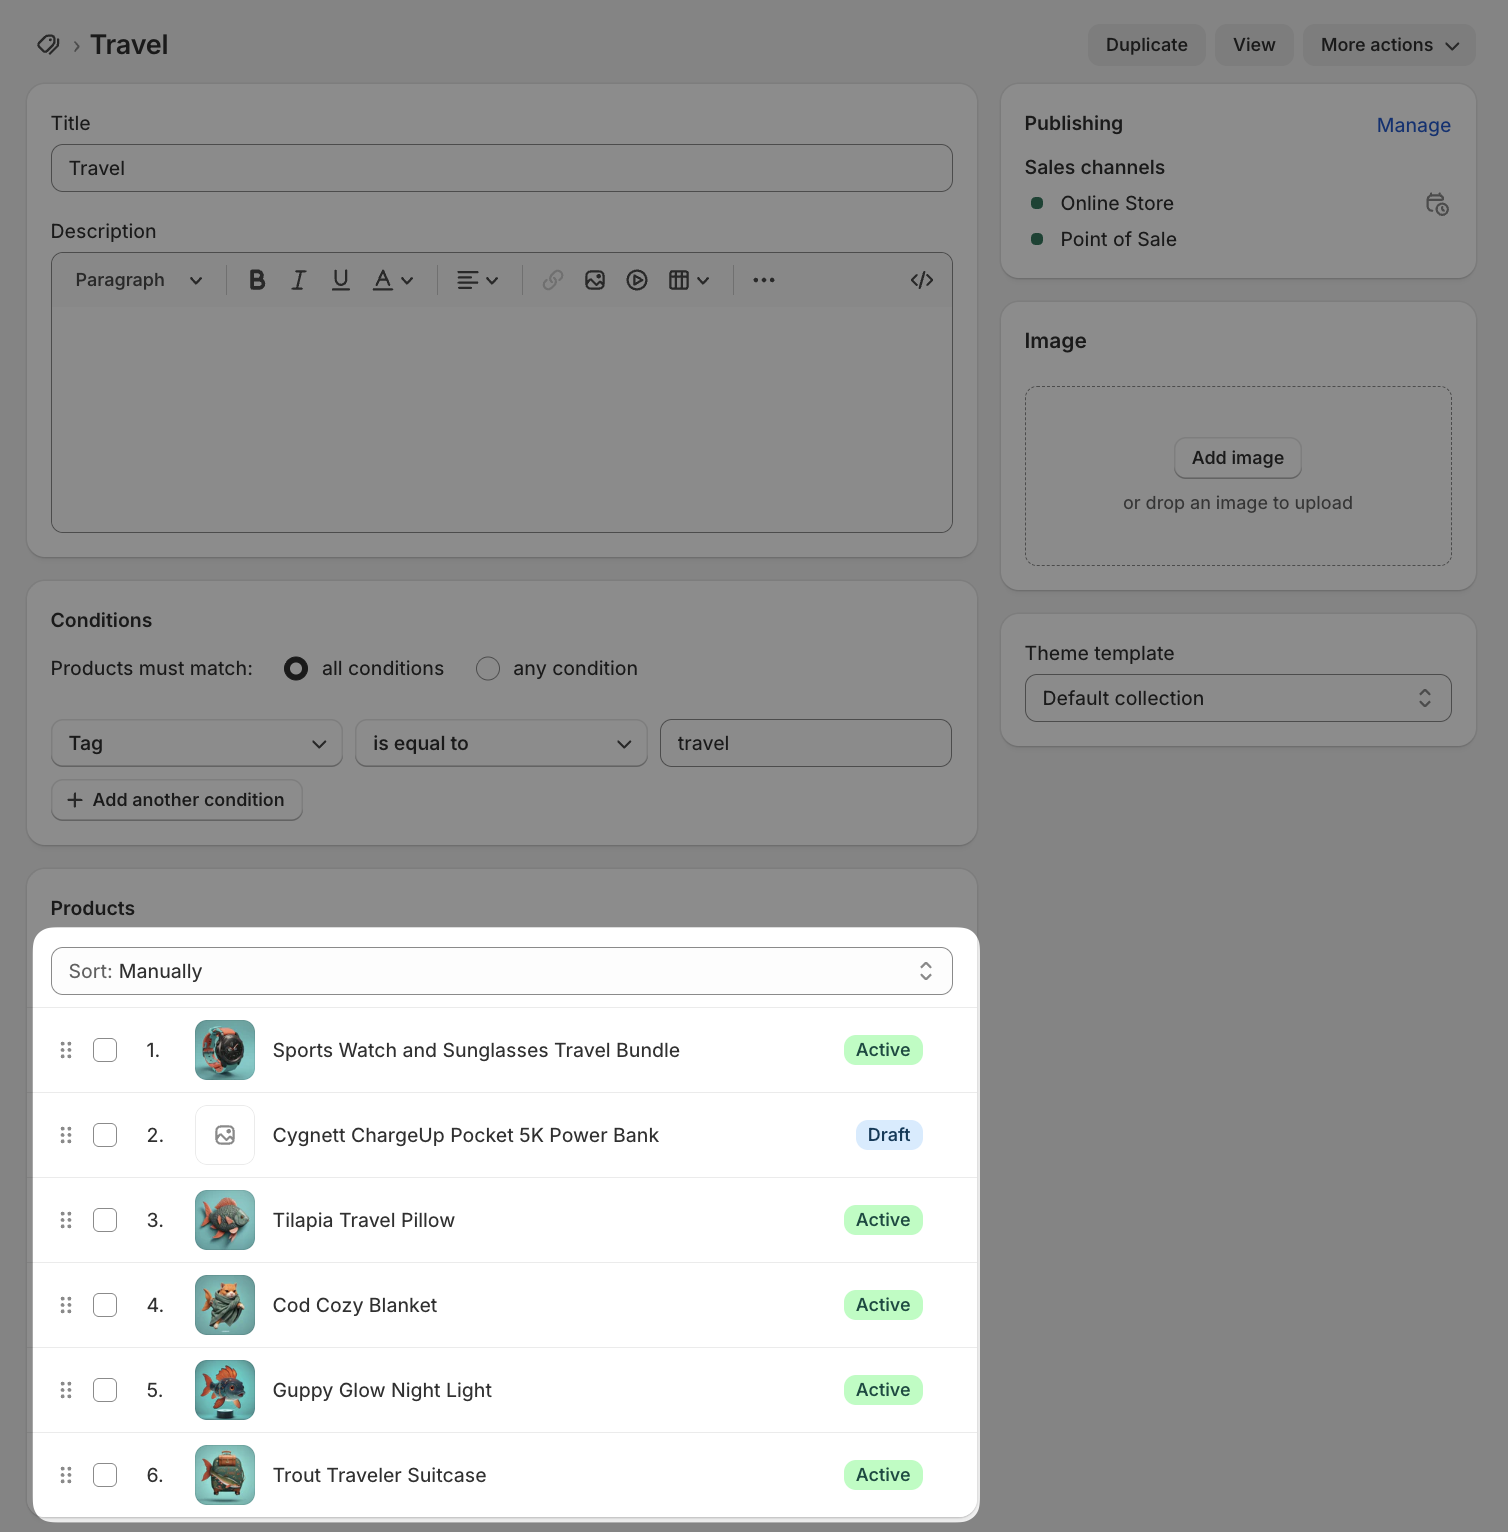
When you remove a ruleset from a collection or uninstall Product Pelican, the sorting will stop updating automatically and you can modify the sort order in Shopify however you wish.
## Best practices
- Set your **Sort by** rule first, then layer promote, demote, and stock rules on top.
- Keep **tag values** consistent with the tags already on your products so promote rules actually match.
- Turn on both **stock and visibility** toggles for most collections as an easy quality win.
- Use **Not scheduled** for one-off sorts and an interval for collections that change often.
- Only set a **default ruleset** when you genuinely want it to catch every unassigned collection.
---
### Collection audits and AI prompts
**URL:** https://apps.nativeappco.com/collection-audits-and-ai-prompts
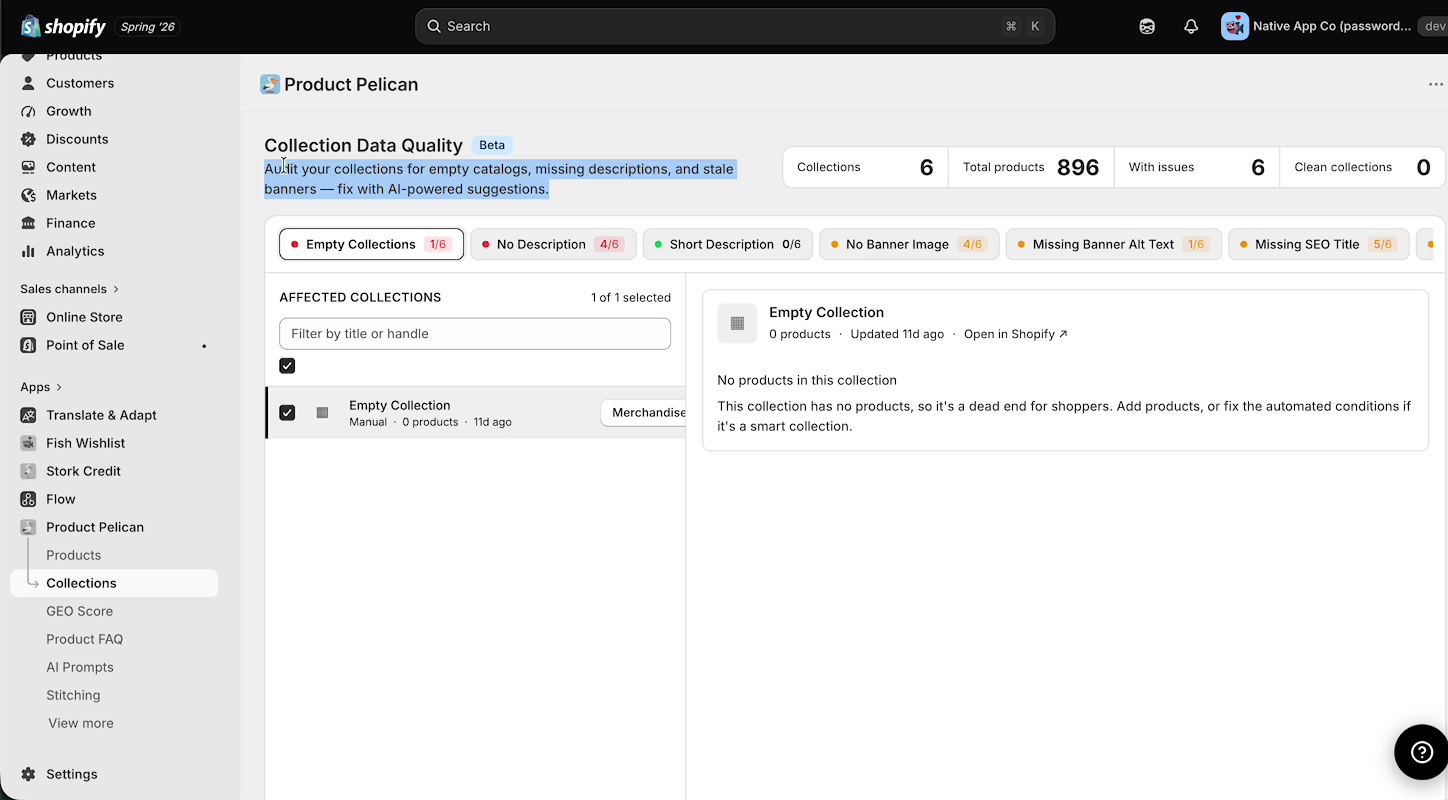
Product Pelican helps you review and improve your Shopify collections from one place. On the **Collections** page, the **Collection Data Quality** dashboard highlights missing or weak collection content, then gives you actions to generate and apply fixes.
This matters for both **SEO** and **GEO**. Strong collection descriptions, banner images, alt text, and search engine fields make your collection pages clearer for shoppers, more understandable to search engines, and easier for AI systems to interpret.
This guide follows the same order as the walkthrough: start on **Collections**, work through the collection audits, then finish on **AI Prompts** to customize future AI output.
## Start on the Collections dashboard
In Shopify admin, open **Product Pelican** and select **Collections** in the left navigation. The main page heading is **Collection Data Quality** and it is marked **Beta**.
Below that, the dashboard groups collection issues into audit tabs. The walkthrough shows these collection checks:
- **Empty Collections**
- **No Description**
- **Short Description**
- **No Banner Image**
- **Missing Banner Alt Text**
- **Missing SEO Title**
- **Missing Meta Description**
- **Stale (90d+)**
When you open an audit, the left side shows **AFFECTED COLLECTIONS** with a filter box labeled **Filter by title or handle**. The right side shows details and actions for the selected collection.
Start with the audits that block shoppers or leave a collection page looking unfinished: **Empty Collections**, **No Description**, **No Banner Image**, and missing SEO fields.
## 1. Review empty collections
The walkthrough starts with **Empty Collections**. This audit identifies collections with no products and explains why they need attention.
When you select an empty collection, the details panel explains that the collection has no products and can become a dead end for shoppers. From that panel, you can use the **Open in Shopify** link to jump to the collection in Shopify admin.
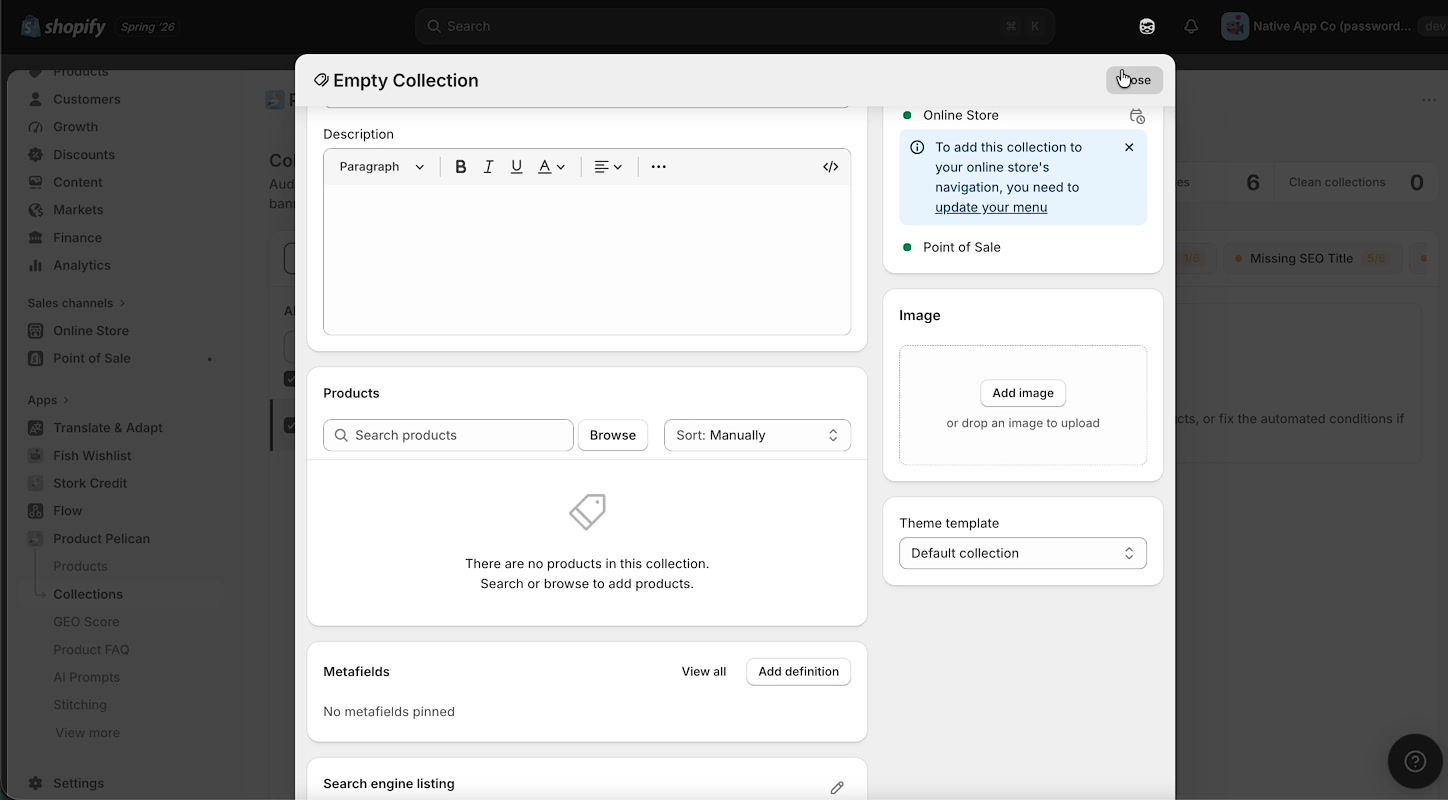
Product Pelican can help you improve collection content, but an empty collection still needs products or working collection conditions in Shopify.
## 2. Fill in missing collection descriptions
Next, the walkthrough moves to the **No Description** audit. This is where Product Pelican helps you write collection descriptions with AI.
You can select one or more collections in **AFFECTED COLLECTIONS**, then use:
- **Suggest Selected** to generate descriptions for the selected rows
- **Write description** on an individual collection
- **Accept Selected** once you are happy with the generated content
The right side of the screen also shows **Analysis depth (this run)**, with the walkthrough using **Store default**.
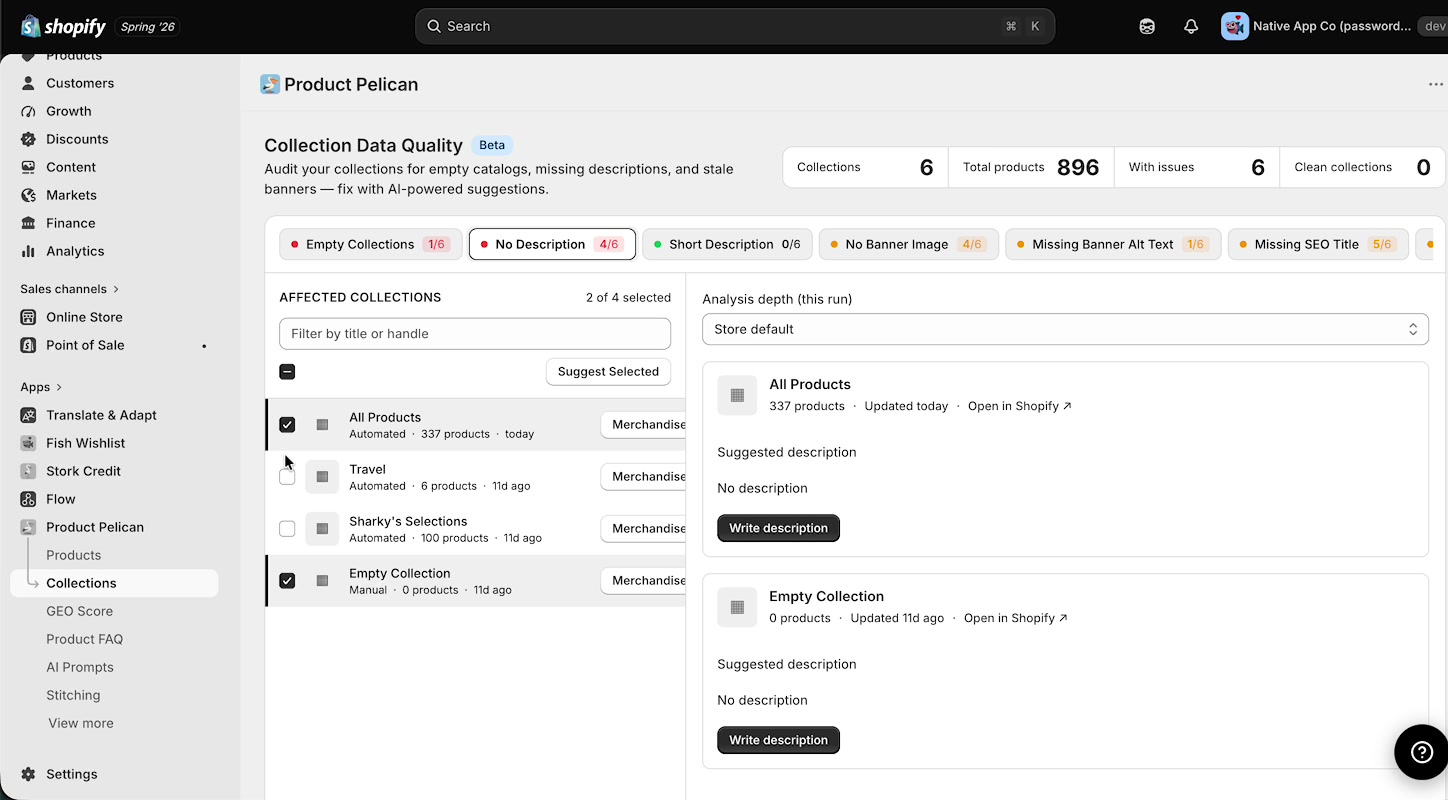
After generation, Product Pelican shows the full suggested text inside the collection detail panel. The walkthrough then shows the controls you use to finish the job:
- **Apply** to save that suggestion
- **Redo** to generate a different version
- **Accept Selected** for multi-select review workflows
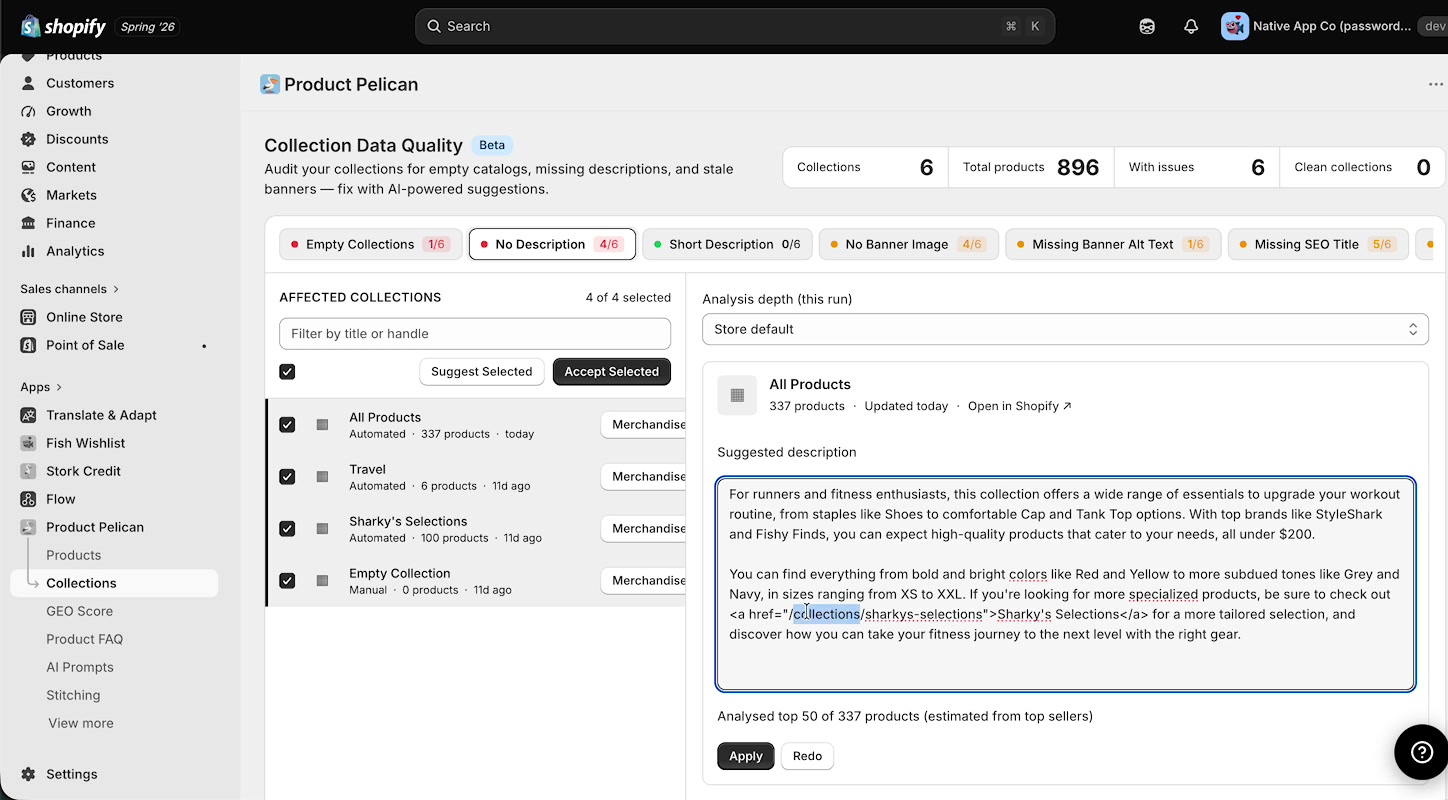
Always review generated collection copy before applying it. Collections often represent broad product groups, so the description should match what is actually in the collection.
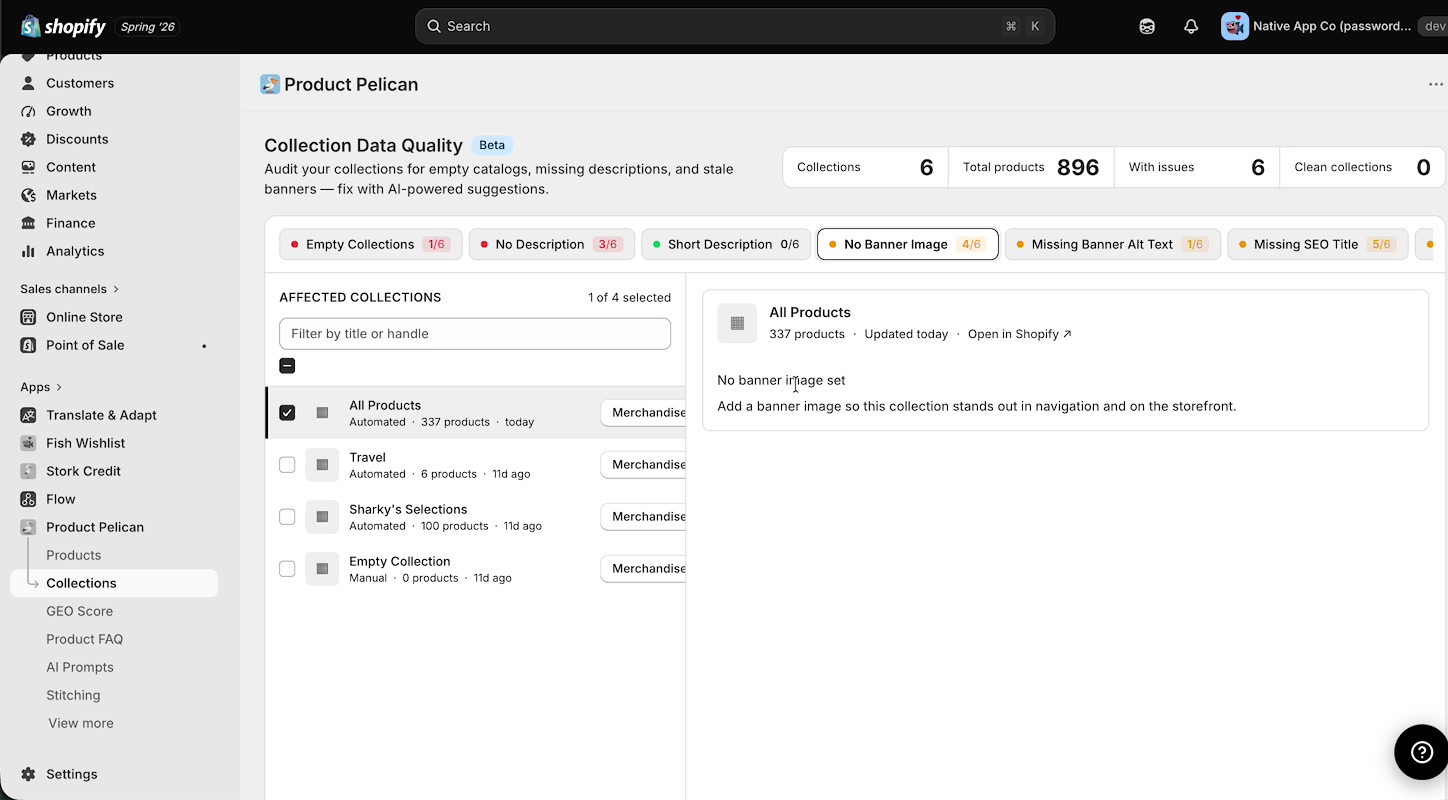
## 3. Add missing banner images
After the description is in place, the walkthrough moves to **No Banner Image**. This audit shows collections that do not yet have a banner image set.
When you select a collection, Product Pelican explains the issue in plain language, such as **No banner image set**, and prompts you to add a banner so the collection stands out in navigation and on the storefront.
From there, the walkthrough opens the Shopify collection editor again. You can see the new AI-written description already in place, plus the **Image** area where the banner image can be uploaded.
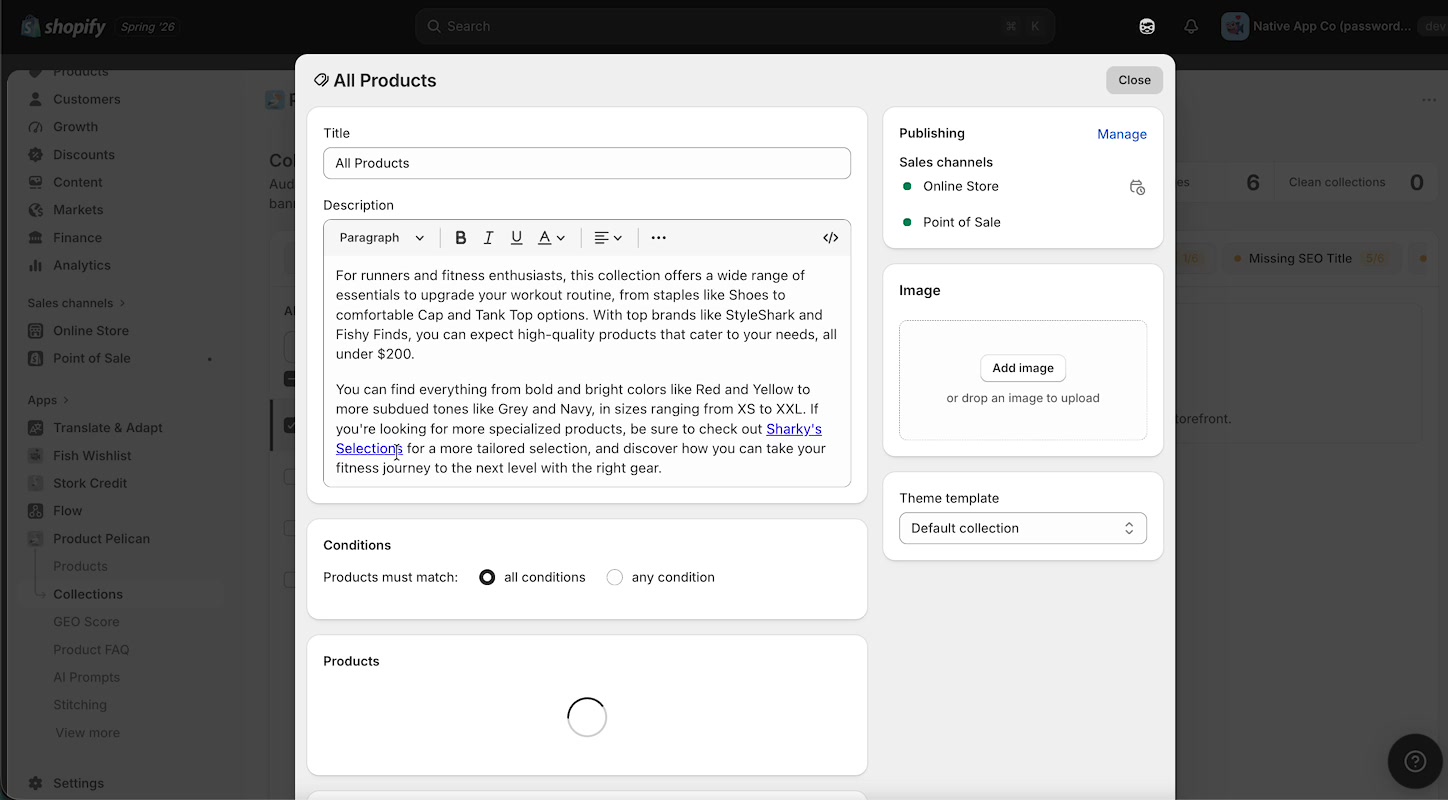
Use this workflow when a collection already has products and copy, but still needs a visual banner to feel complete.
## 4. Generate missing banner alt text
Once banner images exist, Product Pelican can help you fill in missing image alt text through the **Missing Banner Alt Text** audit.
The walkthrough shows a selected collection with a status of **Generating...** while Product Pelican creates a suggested alt text for the banner image.
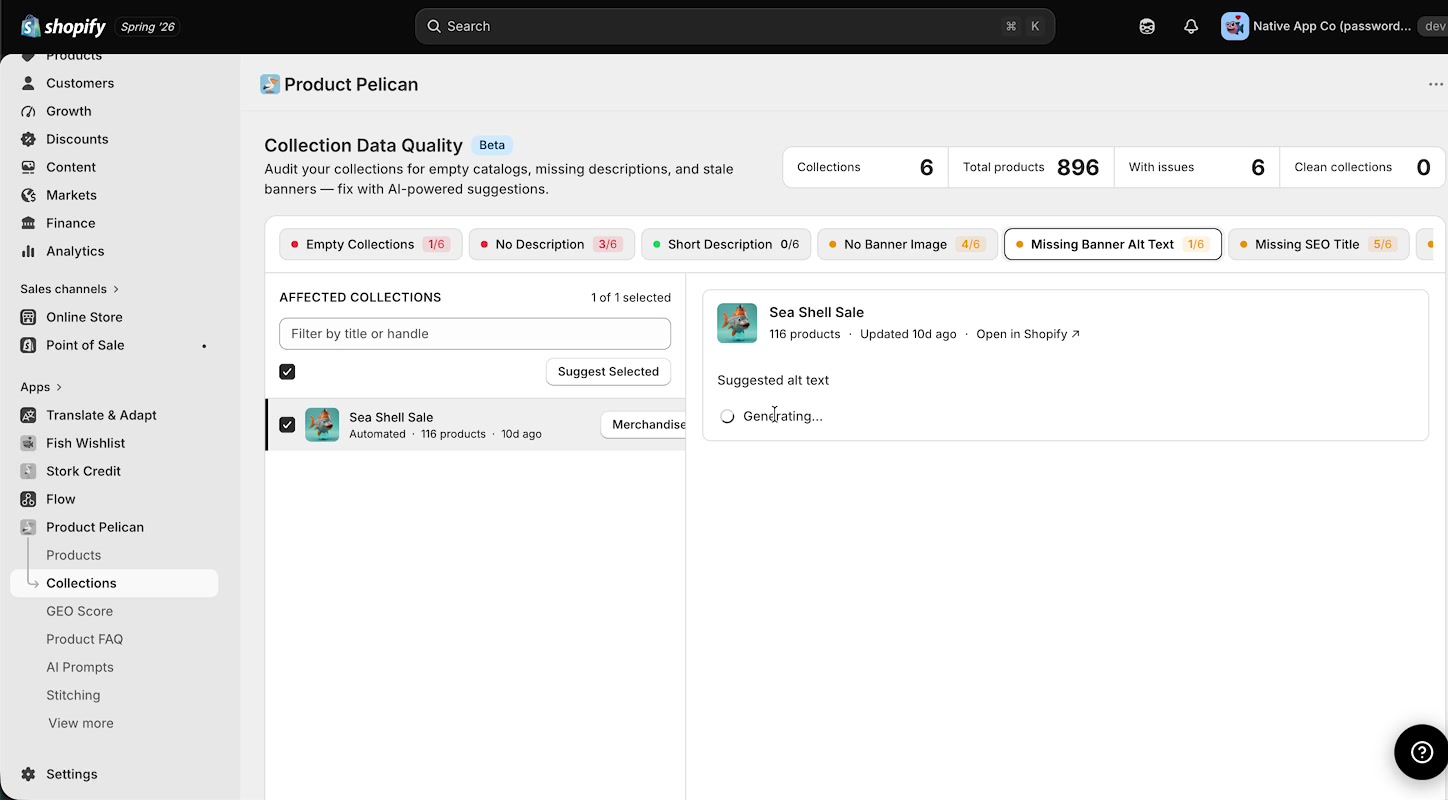
This audit is useful for both accessibility and discoverability. Good alt text helps describe the banner image clearly while reinforcing the collection topic.
Banner alt text should describe the image and the collection theme naturally. Avoid stuffing keywords into the text just to rank.
## 5. Apply missing SEO title and meta description
The walkthrough then moves to collection SEO fields. Product Pelican surfaces missing search engine content through audits including **Missing SEO Title** and **Missing Meta Description**.
In the **Missing SEO Title** view, Product Pelican prepares the search fields so you can review and apply them without writing everything from scratch.
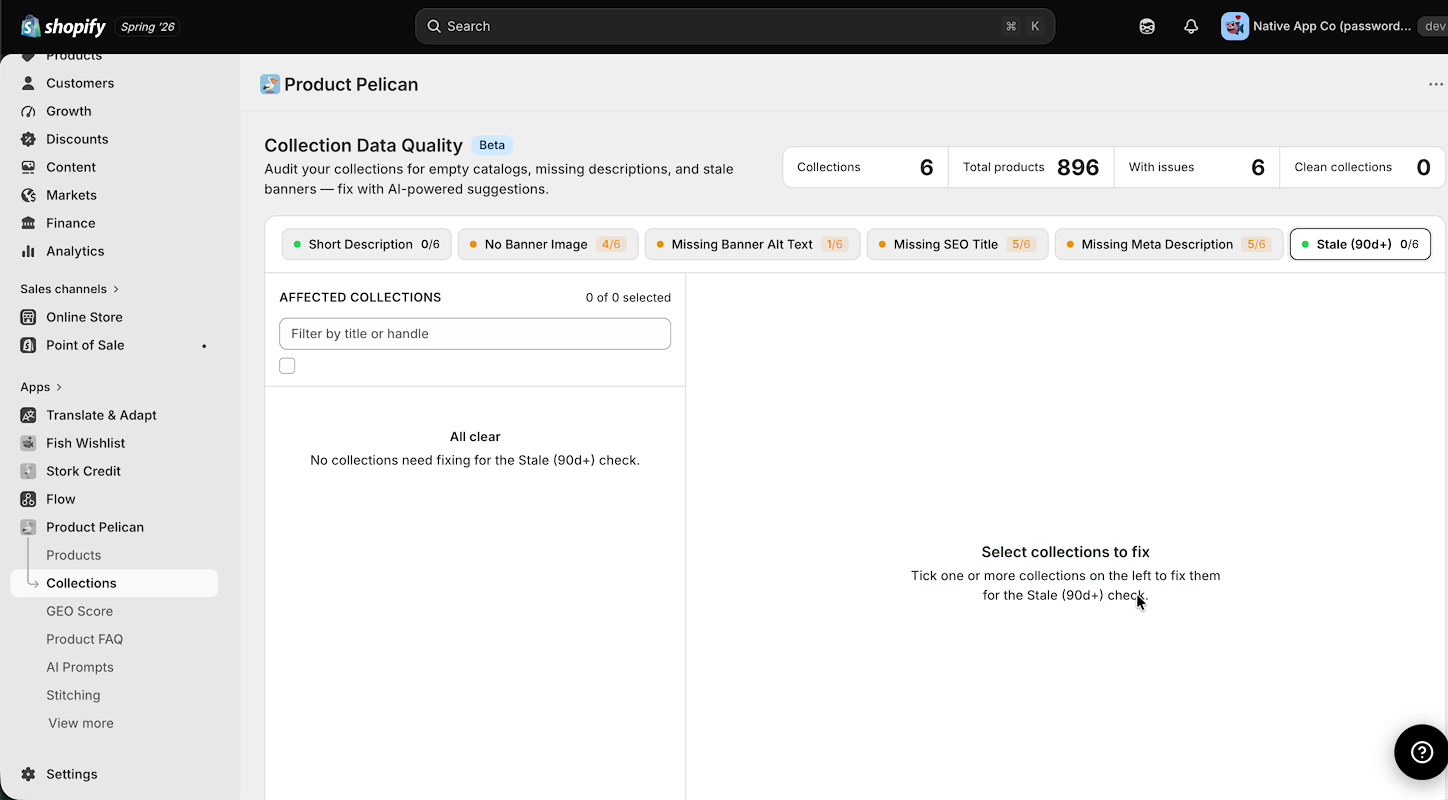
Use these audits to improve how collection pages appear in search results. Strong SEO titles and meta descriptions can make collection pages more descriptive, easier to understand, and more clickable.
## 6. Customize collection AI prompts
The walkthrough finishes on **AI Prompts** in the left navigation. This is where you control how Product Pelican generates future AI suggestions.
For collections, the prompt list shown in the walkthrough includes:
- **Collection Description**
- **Collection Banner Alt Text**
- **Collection SEO**
The screen also shows other prompt types for products, but for collection work, these three are the key ones to review.
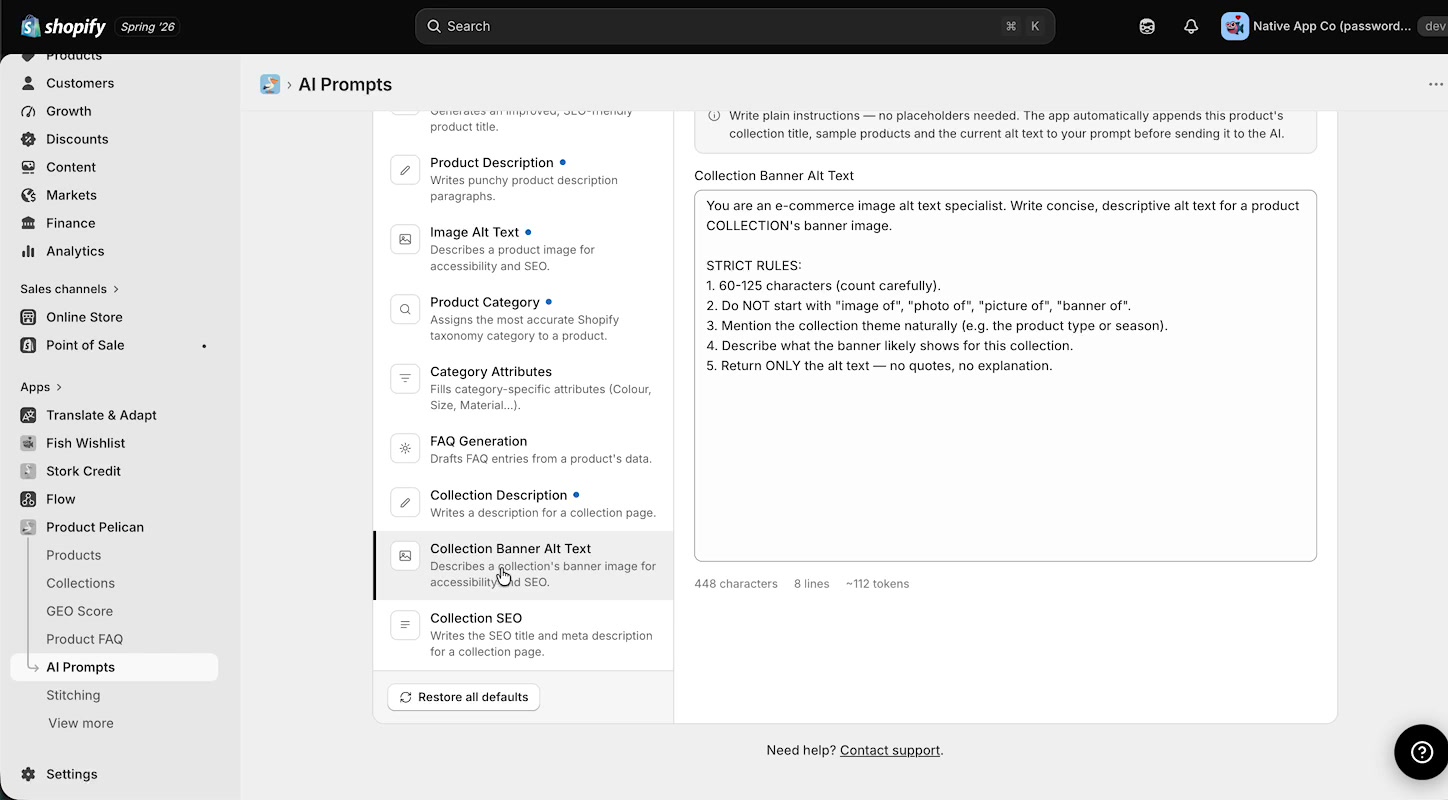
When you open **Collection Banner Alt Text**, the prompt editor lets you define the rules Product Pelican should follow. The walkthrough shows prompt instructions that control things like character length, phrasing, and how the collection theme should be reflected.
Use the prompt settings when you want collection content to consistently match your brand, merchandising style, and SEO priorities.
Prompt changes affect future suggestions. If you want updated descriptions, alt text, or SEO fields, return to the audit and generate them again after saving your prompt changes.
##
## Why these audits matter for SEO and GEO
- **Descriptions** help explain what the collection contains and why it is useful.
- **Banner images** make collection pages feel complete and more engaging.
- **Banner alt text** improves accessibility and helps image content make sense to search systems.
- **SEO titles and meta descriptions** improve how collection pages are represented in search results.
- **Prompt customization** helps you keep AI-generated collection content aligned with your store’s voice and standards.
Optimizing collections is not just a content cleanup task. It improves how your collection pages are understood by shoppers, search engines, and AI-driven discovery tools.
---
### Add FAQ
**URL:** https://apps.nativeappco.com/add-faq
## Add the Product FAQs block to your theme
Use Product Pelican's **Product FAQs** app block to show FAQs directly on your Shopify product page. In the theme editor, the block appears inside your product template and pulls in the FAQs assigned to that product from the **Product FAQ** screen in Product Pelican.
The block settings are **Heading**, **Output style**, **Collapsible accordion layout**, **Expand the first FAQ by default**, **Custom styles**, **Output FAQPage structured data (JSON-LD)**, and **Manage app**.
In Shopify, go to your theme customizer and open the product template you want to edit. In the left sidebar, find the **Product information** area, then add the **Product FAQs** app block where you want the FAQ section to appear.
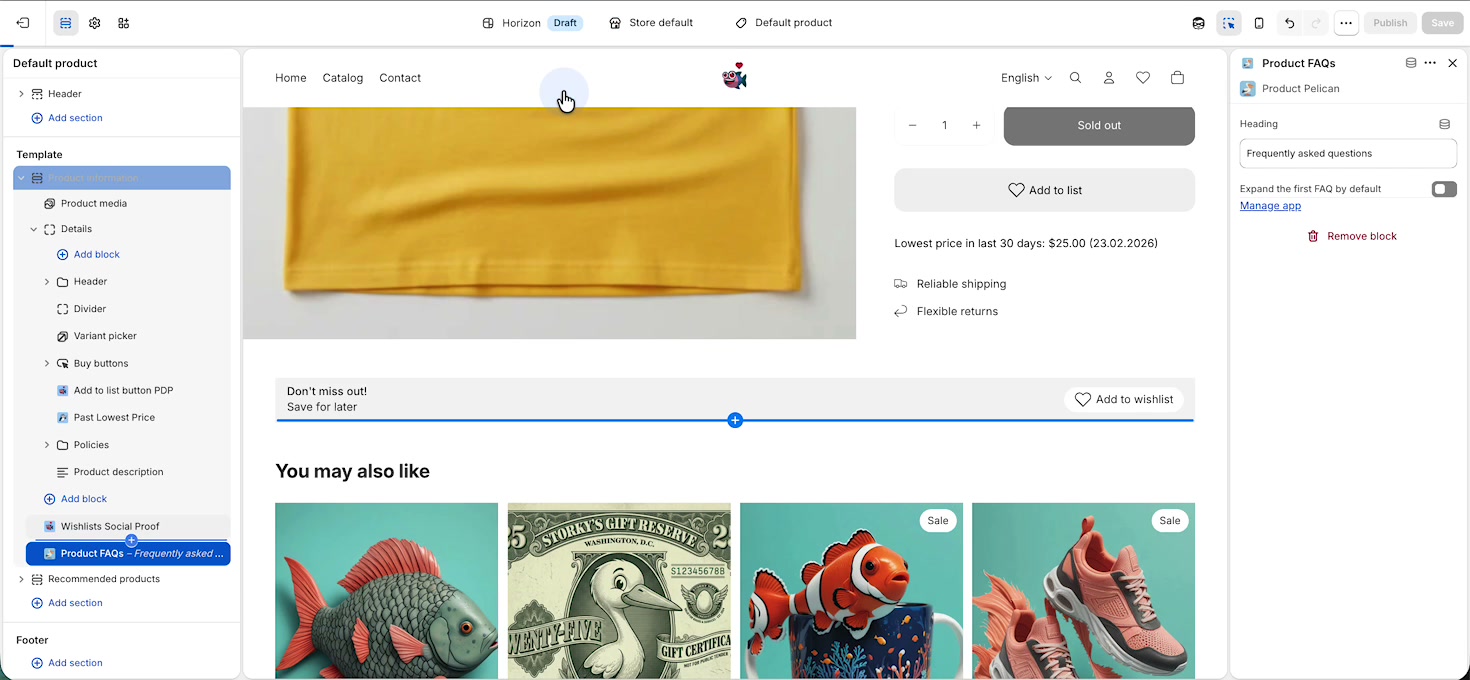
As soon as the block is added, the FAQ section appears on the product page preview. By default, the heading is **Frequently asked questions**, and the assigned FAQs display as accordion items.
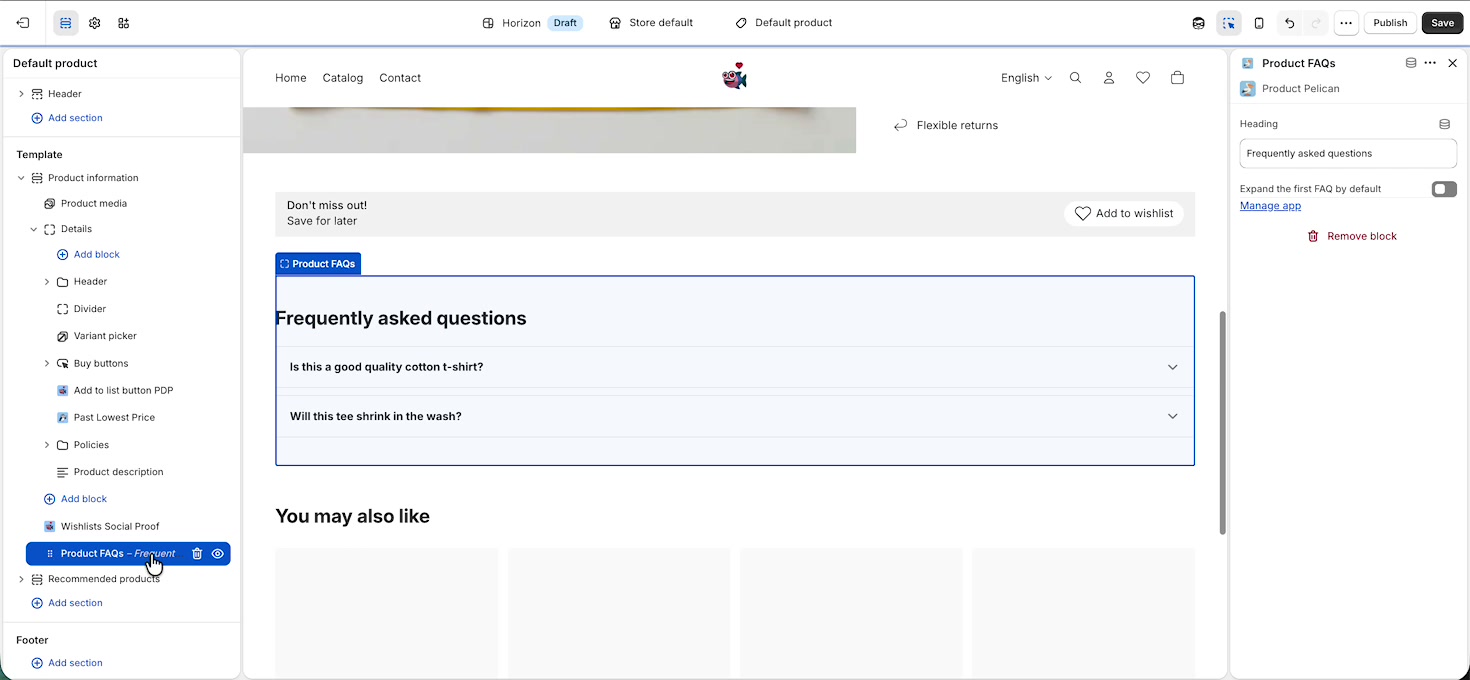
In the block settings on the right, edit the **Heading** field to the title you want customers to see. In the walkthrough, the heading is shortened from **Frequently asked questions** to **FAQ**.
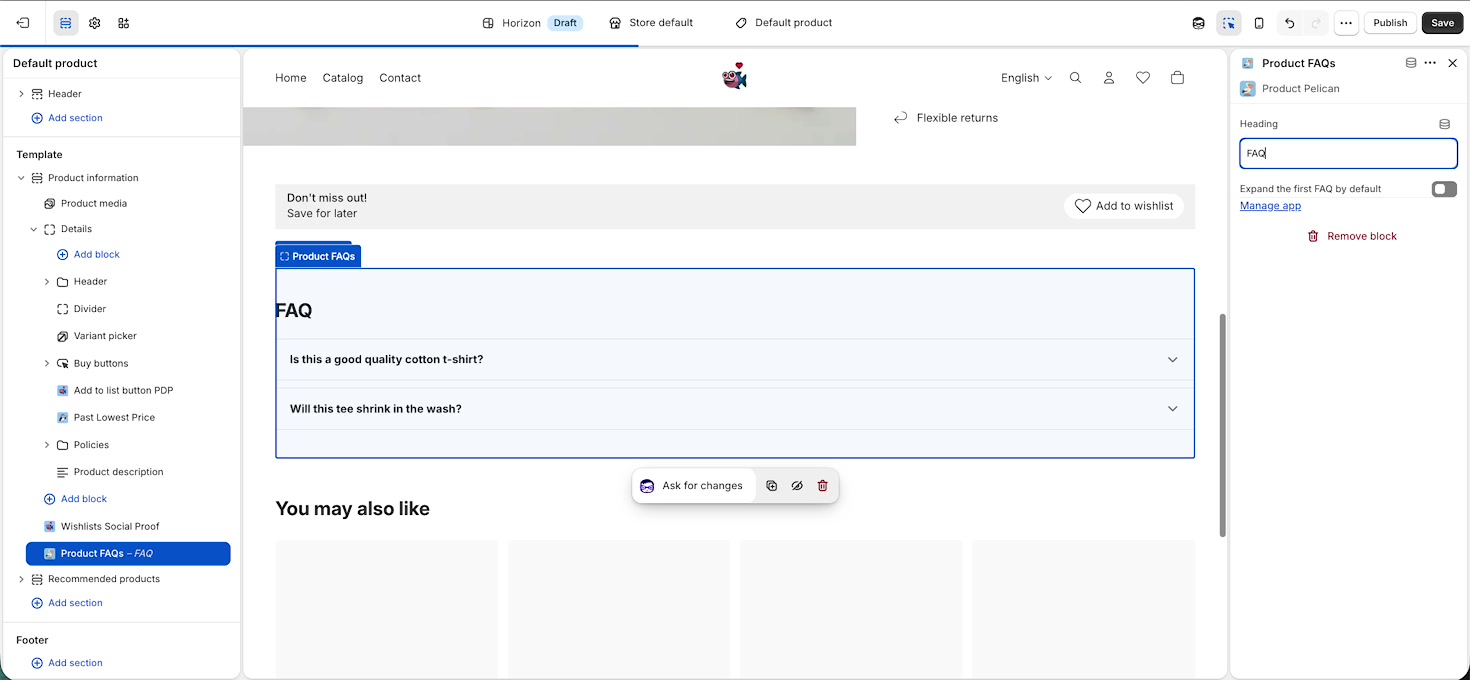
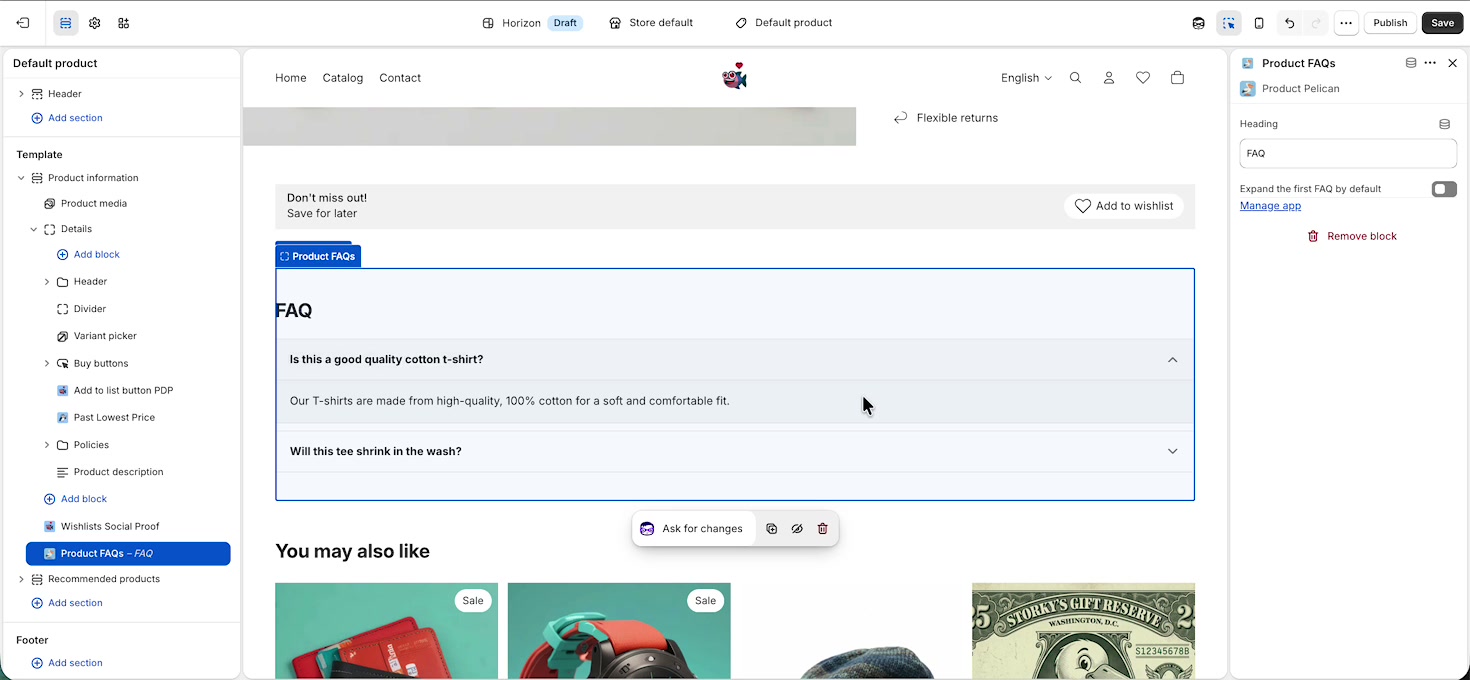
Use the **Expand the first FAQ by default** toggle if you want the first accordion item to start open when the page loads. Leave it off if you want all items collapsed by default. This setting only applies when **Collapsible accordion layout** is switched on.
In the final walkthrough frame, the first FAQ is expanded so customers can immediately see the answer content.
## More control over how it looks and behaves
Alongside the heading and expand-first-FAQ settings, the block gives you full control over layout, styling, and structured data output:
- **Output style: Styled or Raw HTML.** Styled uses Product Pelican's built-in accordion look. Raw HTML outputs plain `h3` and `p` tags with no styling of its own, so your theme's own CSS applies instead.
- **Collapsible accordion layout.** Turn this off to show every answer expanded at once. Use this if your theme already wraps the block in its own accordion, so you're not nesting two.
- **Custom styles.** Override the theme-matched look with your own fonts, sizes, and colours, without going all the way to Raw HTML.
- **Output FAQPage structured data (JSON-LD).** On by default. Turn this off if another SEO app already adds FAQ schema to your product pages, to avoid duplicate structured data.
Raw HTML plus your own theme CSS, or Custom Styles on top of the default look, cover most cases where a merchant wants the FAQ section to match a specific brand style exactly.
## Where the FAQs come from
The **Product FAQs** block displays the FAQs already assigned to that product in Product Pelican. If you need to create, edit, or assign FAQs, click **Manage app** in the block settings to open the **Product FAQ** screen.
From there, you can:
- Add a new FAQ with **+ Add FAQ**
- Reuse entries with **Connect existing**
- Generate suggestions with **Suggest FAQs**
- Reorder items by dragging them
- Click any entry to edit its question or answer
Each FAQ is saved in Shopify as a native metaobject, and Product Pelican assigns it to products using a metafield. That means you can reuse the same FAQ across multiple products when it makes sense.
## What customers will see
On the storefront, customers see a clean accordion section with your chosen heading and the FAQs assigned to the current product. If the first item is expanded by default, shoppers will see one answer immediately without needing to click.
Use a short heading like **FAQ** if your product page already has several sections and you want the layout to feel more compact.
## Best practice for setup
1. Assign or create the FAQs for the product in **Product Pelican**.
2. Add the **Product FAQs** app block to your product template.
3. Set the **Heading** text to match your brand.
4. Decide whether to enable **Expand the first FAQ by default**.
5. Choose an **Output style**, and decide whether to enable **Custom styles** if you want more control over the look.
6. Save the template and preview the product page.
If the block is visible but no questions appear, the product likely does not have any FAQs assigned yet in the **Product FAQ** screen.
## Schema Markup
The FAQ section automatically adds best practice Schema markup to your page. This is valuable for LLMs to crawl your product data. It's on by default and needs no configuration, but can be turned off using the **Output FAQPage structured data (JSON-LD)** setting if another app is already adding FAQ schema to your product pages, to avoid duplicate structured data.
Sample schema markup for FAQ section:
```
```
---
### View product FAQs in Shopify admin
**URL:** https://apps.nativeappco.com/view-product-faqs-in-shopify-admin
## See a product's FAQs without leaving Shopify admin
Product Pelican adds a **Product FAQs** block to your Shopify product editor so you can quickly check which FAQs are attached to a product. From that same block, you can use **Edit FAQs** to open the matching product in Product Pelican and make changes.
This is useful when you are already reviewing a product in Shopify admin and want to confirm its FAQ content before editing it.
## What this walkthrough shows
The flow follows the same order as the screencast:
- Open a product in **Shopify admin**
- Scroll down to the **Blocks** section
- Review the **Product FAQs** app block on the product
- Select **Edit FAQs** to jump into Product Pelican's **Product FAQ** page for that product
## Walkthrough
In Shopify admin, go to **Products** and open the product you want to review. In the walkthrough, the product is **Mens Tee - Yellow**.
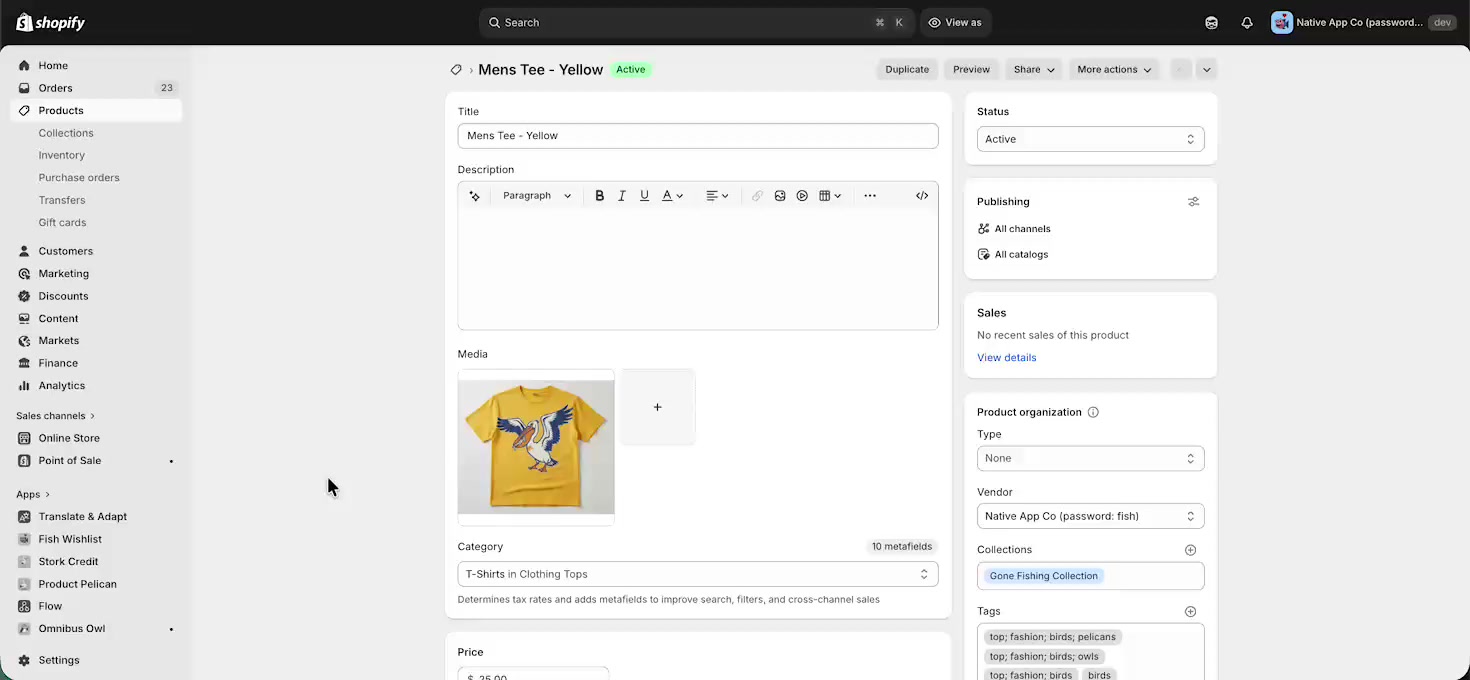
You can stay on the normal Shopify product editing screen. There is no need to open Product Pelican first.
Scroll down the product page until you reach **Blocks**. This is where Shopify shows app blocks added to the product editor.
If Product Pelican is installed and the block is available for the product, you will see a block titled **Product FAQs**.
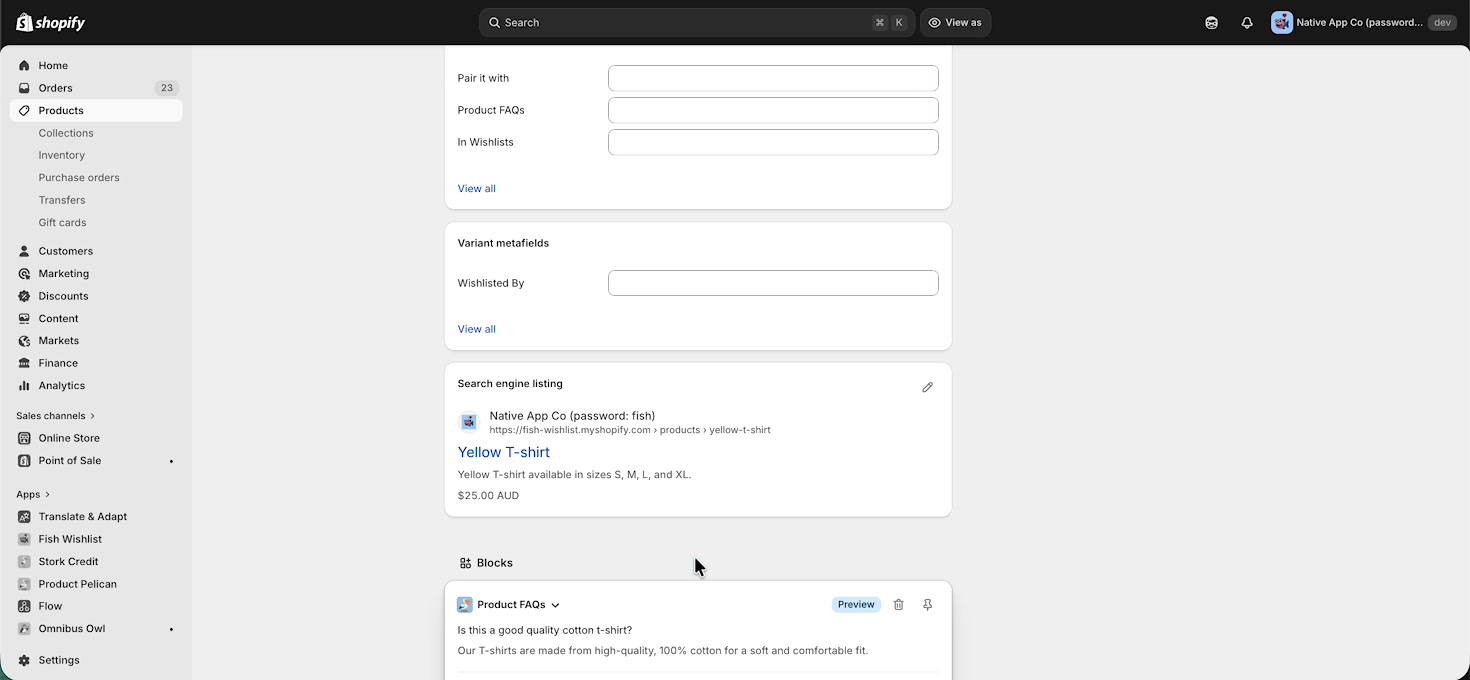
Expand the **Product FAQs** block to see the FAQs currently connected to that product. The block shows the FAQ questions and answers directly on the Shopify product page, so you can quickly confirm what shoppers will be able to read.
At the bottom of the block, select **Edit FAQs** when you want to update the list.
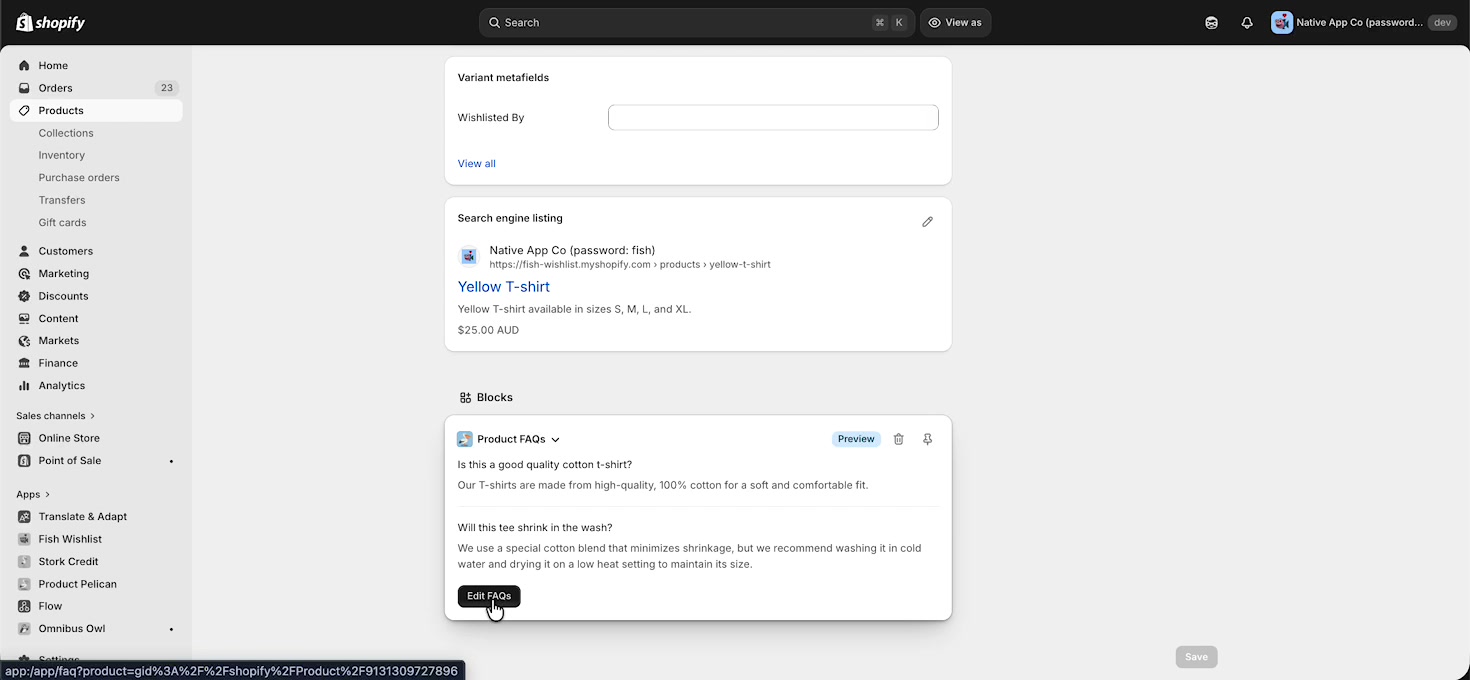
Use this block as a quick QA step when reviewing product content. You can confirm the product has the right FAQs before making any edits. Selecting **Edit FAQs** opens Product Pelican on the **Product FAQ** screen for that exact product.
On this page, you can manage the product's FAQ list using the actions shown in the app, including **Add FAQ**, **Connect existing**, and **Suggest FAQs**. If needed, you can also use **Import FAQs** from the top right.
The left side of the page includes product browsing and filters such as **All**, **No FAQs**, and **Has FAQs**, plus status filters like **All**, **Active**, **Draft**, and **Archived**.
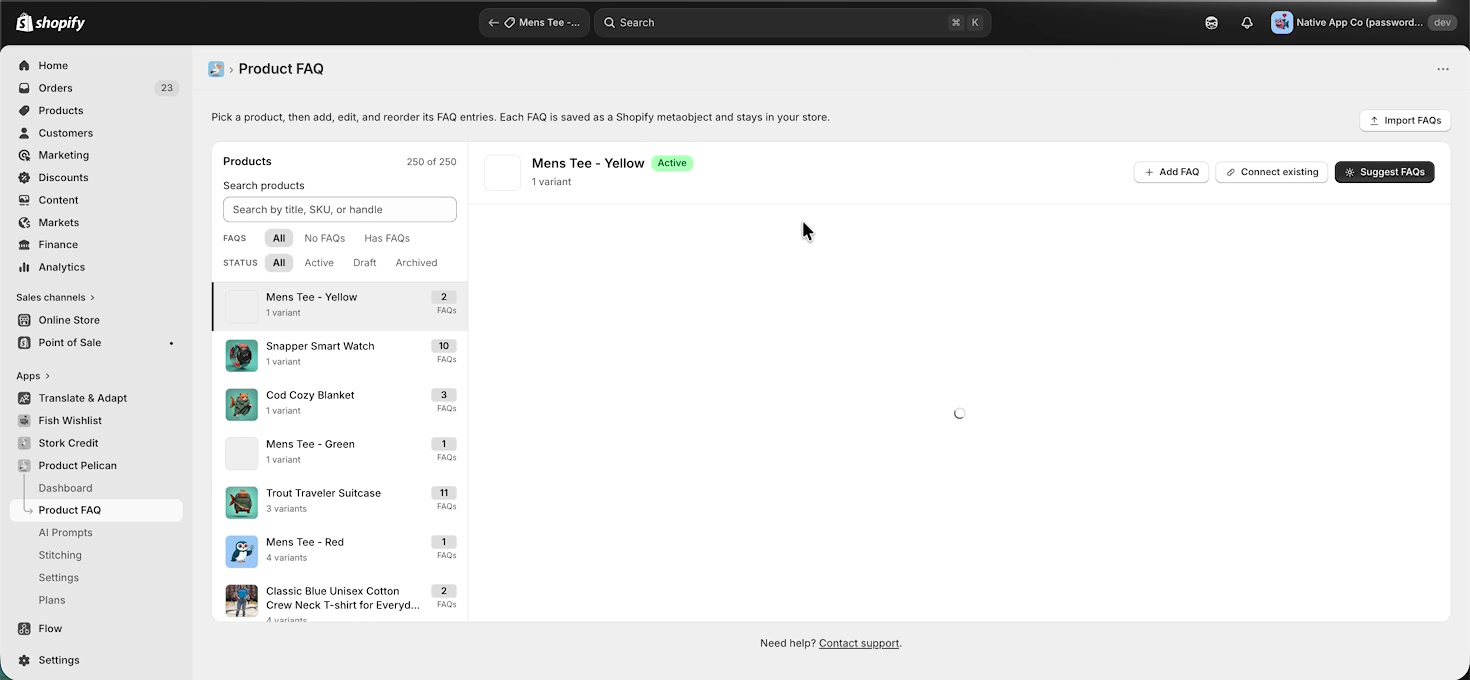
Because the product is already selected for you, you can start editing immediately instead of searching for it again.
## What happens after you click Edit FAQs
The **Edit FAQs** link is designed to save time. Rather than opening Product Pelican separately and searching for the product, it takes you straight to that product's FAQ record on the **Product FAQ** page.
From there, you can:
- Add a new FAQ with **Add FAQ**
- Attach an existing FAQ with **Connect existing**
- Use **Suggest FAQs** to generate recommendations
- Bring in FAQ content with **Import FAQs**
## When to use this workflow
- When merchandisers are already working inside Shopify admin
- When you want to confirm whether a product already has FAQs
- When you need a fast link from a product page to its FAQ management screen
- When reviewing product content before publishing changes
The Shopify product page is best for quickly viewing attached FAQs. For full FAQ management, use the **Product FAQ** screen inside Product Pelican.
---
# Native App Co
Native App Co was born from a desire to build simple Shopify apps really well. We are building the next generation of tools for stores that want to be fast, nimble and high performing.
## Contact
### Privacy Policy
**URL:** https://apps.nativeappco.com/privacy-policy
We respect your privacy and are committed to protecting it through our compliance with this privacy policy (“Policy”). This Policy describes the types of information we may collect from you or that you or your customers may provide (“Personal Information”) in the "Fish Wishlist", "Omnibus Owl", "Stork Credit", and "Product Pelican" Shopify applications (collectively, “Shopify Applications” or “Services”) and any of their related products and services, and our practices for collecting, using, maintaining, protecting, and disclosing that Personal Information. It also describes the choices available to you regarding our use of your Personal Information and how you can access and update it.
This Policy is a legally binding agreement between you (“User”, “you” or “your”) and Native App Co (“Native App Co”, “we”, “us” or “our”). If you are entering into this agreement on behalf of a business or other legal entity, you represent that you have the authority to bind such entity to this agreement, in which case the terms “User”, “you” or “your” shall refer to such entity. If you do not have such authority, or if you do not agree with the terms of this agreement, you must not accept this agreement and may not access and use the Shopify Applications and Services. By accessing and using the Shopify Applications and Services, you acknowledge that you have read, understood, and agree to be bound by the terms of this Policy. This Policy does not apply to the practices of companies that we do not own or control, or to individuals that we do not employ or manage.
**Collection of Personal Information**
You can access and use the Shopify Applications and Services without telling us who you are or revealing any information by which someone could identify you as a specific, identifiable individual. If, however, you wish to use some of the features offered in the Shopify Applications, you may be asked to provide certain Personal Information (for example, your store name and e-mail address).
We receive and store any information you knowingly provide to us when you install the Services. When required, this information may include the following:
Online store details (such as myShopify domain, store currency, store domain, etc.)
**Contact information (such as store email address)**
You can choose not to provide us with your Personal Information, but then you may not be able to take advantage of some of the features in the Shopify Applications. Users who are uncertain about what information is mandatory are welcome to contact us.
The apps do not collect any personal information from your online store customers.
**Privacy of Children**
We do not knowingly collect any Personal Information from children under the age of 18. If you are under the age of 18, please do not submit any Personal Information through the Shopify Applications and Services. If you have reason to believe that a child under the age of 18 has provided Personal Information to us through the Shopify Applications and Services, please contact us to request that we delete that child’s Personal Information from our Services.
We encourage parents and legal guardians to monitor their children’s Internet usage and to help enforce this Policy by instructing their children never to provide Personal Information through the Shopify Applications and Services without their permission. We also ask that all parents and legal guardians overseeing the care of children take the necessary precautions to ensure that their children are instructed to never give out Personal Information when online without their permission.
**Use and Processing of Collected Information**
We act as a data controller and a data processor in terms of the GDPR when handling Personal Information, unless we have entered into a data processing agreement with you in which case you would be the data controller and we would be the data processor.
Our role may also differ depending on the specific situation involving Personal Information. We act in the capacity of a data controller when we ask you to submit your Personal Information that is necessary to ensure your access and use of the Shopify Applications and Services. In such instances, we are a data controller because we determine the purposes and means of the processing of Personal Information and we comply with data controllers’ obligations set forth in the GDPR.
We act in the capacity of a data processor in situations when you submit Personal Information through the Shopify Applications and Services. We do not own, control, or make decisions about the submitted Personal Information, and such Personal Information is processed only in accordance with your instructions. In such instances, the User providing Personal Information acts as a data controller in terms of the GDPR.
In order to make the Shopify Applications and Services available to you, or to meet a legal obligation, we may need to collect and use certain Personal Information. If you do not provide the information that we request, we may not be able to provide you with the requested products or services. Any of the information we collect from you may be used for the following purposes:
- Create and manage your store’s account
- Deliver products or services
- Run and operate the Shopify Applications and Services
Processing your Personal Information depends on how you interact with the Shopify Applications and Services, where you are located in the world and if one of the following applies:
(i) you have given your consent for one or more specific purposes; this, however, does not apply, whenever the processing of Personal Information is subject to California Consumer Privacy Act or European data protection law;
(ii) provision of information is necessary for the performance of an agreement with you and/or for any pre-contractual obligations thereof;
(iii) processing is necessary for compliance with a legal obligation to which you are subject;
(iv) processing is related to a task that is carried out in the public interest or in the exercise of official authority vested in us;
(v) processing is necessary for the purposes of the legitimate interests pursued by us or by a third party.
We rely on user’s consent as a legal base as defined in the GDPR upon which we collect and process your Personal Information.
Note that under some legislations we may be allowed to process information until you object to such processing by opting out, without having to rely on consent or any other of the legal bases above. In any case, we will be happy to clarify the specific legal basis that applies to the processing, and in particular whether the provision of Personal Information is a statutory or contractual requirement, or a requirement necessary to enter into a contract.
**Payment Processing**
In case of Services requiring payment, we rely on Shopify Payment API. We use third-party payment processors (“Payment Processors”) to assist us in processing your payment information securely.
Payment Processors adhere to the latest security standards as managed by the PCI Security Standards Council, which is a joint effort of brands like Visa, MasterCard, American Express and Discover. Sensitive and private data exchange happens over a SSL secured communication channel and is encrypted and protected with digital signatures, and the Shopify Applications and Services are also in compliance with strict vulnerability standards in order to create as secure of an environment as possible for Users. We will share payment data with the Payment Processors only to the extent necessary for the purposes of processing your payments, refunding such payments, and dealing with complaints and queries related to such payments and refunds.
Please note that the Payment Processors may collect some Personal Information from you, which allows them to process your payments (e.g., your email address, address, credit card details, and bank account number) and handle all the steps in the payment process through their systems, including data collection and data processing. The Payment Processors’ use of your Personal Information is governed by their respective privacy policies which may or may not contain privacy protections as protective as this Policy. We suggest that you review their respective privacy policies.
**Disclosure of Information**
To maintain the highest level of privacy and to protect your Personal Information to the full extent, we do not share your Personal Information with anyone and for any reason.
**Retention of Information**
We will retain and use your Personal Information for the period necessary to enforce our agreements, resolve disputes, and unless a longer retention period is required or permitted by law up to a maximum of 24 months.
We may use any aggregated data derived from or incorporating your Personal Information after you update or delete it, but not in a manner that would identify you personally. Once the retention period expires, Personal Information shall be deleted. Therefore, the right to access, the right to erasure, the right to rectification, and the right to data portability cannot be enforced after the expiration of the retention period.
**Transfer of Information**
Depending on your location, data transfers may involve transferring and storing your information in a country other than your own. However, this will not include countries outside the European Union and European Economic Area. If any such transfer takes place, you can find out more by checking the relevant sections of this Policy or inquire with us using the information provided in the contact section.
**Data Protection Rights Under the GDPR**
If you are a resident of the European Economic Area (“EEA”), you have certain data protection rights and we aim to take reasonable steps to allow you to correct, amend, delete, or limit the use of your Personal Information. If you wish to be informed what Personal Information we hold about you or about your store customers and if you want it to be removed from our systems, please contact us. In certain circumstances, you have the following data protection rights:
(i) You have the right to withdraw consent where you have previously given your consent to the processing of your Personal Information or Personal Information of your customers. To the extent that the legal basis for our processing of your Personal Information is consent, you have the right to withdraw that consent at any time. Withdrawal will not affect the lawfulness of processing before the withdrawal.
(ii) You have the right to learn if your Personal Information or Personal Information of your customers is being processed by us, obtain disclosure regarding certain aspects of the processing, and obtain a copy of your Personal Information undergoing processing.
(iii) You have the right to verify the accuracy of your information and ask for it to be updated or corrected. You also have the right to request us to complete the Personal Information you believe is incomplete.
(iv) You have the right to object to the processing of your information if the processing is carried out on a legal basis other than consent. Where Personal Information is processed for the public interest, in the exercise of an official authority vested in us, or for the purposes of the legitimate interests pursued by us, you may object to such processing by providing a ground related to your particular situation to justify the objection.
(v) You have the right, under certain circumstances, to restrict the processing of your Personal Information. These circumstances include: the accuracy of your Personal Information is contested by you and we must verify its accuracy; the processing is unlawful, but you oppose the erasure of your Personal Information and request the restriction of its use instead; we no longer need your Personal Information for the purposes of processing, but you require it to establish, exercise or defend your legal claims; you have objected to processing pending the verification of whether our legitimate grounds override your legitimate grounds. Where processing has been restricted, such Personal Information will be marked accordingly and, with the exception of storage, will be processed only with your consent or for the establishment, to exercise or defense of legal claims, for the protection of the rights of another natural, or legal person or for reasons of important public interest.
(vi) You have the right, under certain circumstances, to obtain the erasure of your Personal Information from us. These circumstances include: the Personal Information is no longer necessary in relation to the purposes for which it was collected or otherwise processed; you withdraw consent to consent-based processing; you object to the processing under certain rules of applicable data protection law; the processing is for direct marketing purposes; and the personal data have been unlawfully processed. However, there are exclusions of the right to erasure such as where processing is necessary: for exercising the right of freedom of expression and information; for compliance with a legal obligation; or for the establishment, to exercise or defense of legal claims.
(vii) You have the right to receive your Personal Information that you have provided to us in a structured, commonly used, and machine-readable format and, if technically feasible, to have it transmitted to another controller without any hindrance from us, provided that such transmission does not adversely affect the rights and freedoms of others.
(viii) You have the right to complain to a data protection authority about our collection and use of your Personal Information. If you are not satisfied with the outcome of your complaint directly with us, you have the right to lodge a complaint with your local data protection authority. For more information, please contact your local data protection authority in the EEA. This provision is applicable provided that your Personal Information is processed by automated means and that the processing is based on your consent, on a contract which you are part of, or on pre-contractual obligations thereof.
**California Privacy Rights**
Consumers residing in California are afforded certain additional rights with respect to their Personal Information under the California Consumer Privacy Act (“CCPA”). If you are a California resident, this section applies to you.
In addition to the rights as explained in this Policy, California residents who provide Personal Information as defined in the statute to obtain Services for personal, family, or household use are entitled to request and obtain from us, once a calendar year, information about the categories and specific pieces of Personal Information we have collected and disclosed.
Furthermore, California residents have the right to request deletion of their Personal Information or opt-out of the sale of their Personal Information which may include selling, disclosing, or transferring Personal Information to another business or a third party for monetary or other valuable consideration. To do so, simply contact us. We will not discriminate against you if you exercise your rights under the CCPA.
**How to Exercise Your Rights**
Any requests to exercise your rights can be directed to us through the contact details provided in this document. Please note that we may ask you to verify your identity before responding to such requests. Your request must provide sufficient information that allows us to verify that you are the person you are claiming to be or that you are the authorized representative of such person. If we receive your request from an authorized representative, we may request evidence that you have provided such an authorized representative with power of attorney or that the authorized representative otherwise has valid written authority to submit requests on your behalf.
You must include sufficient details to allow us to properly understand the request and respond to it. We cannot respond to your request or provide you with Personal Information unless we first verify your identity or authority to make such a request and confirm that the Personal Information relates to you.
**Links to Other Resources**
The Shopify Applications and Services contain links to other resources that are not owned or controlled by us. Please be aware that we are not responsible for the privacy practices of such other resources or third parties. We encourage you to be aware when you leave the Shopify Applications and Services and to read the privacy statements of each and every resource that may collect Personal Information.
**Information Security**
We secure information you provide on computer servers in a controlled, secure environment, protected from unauthorized access, use, or disclosure. We maintain reasonable administrative, technical, and physical safeguards in an effort to protect against unauthorized access, use, modification, and disclosure of Personal Information in our control and custody. However, no data transmission over the Internet or wireless network can be guaranteed.
Therefore, while we strive to protect your Personal Information, you acknowledge that (i) there are security and privacy limitations of the Internet which are beyond our control; (ii) the security, integrity, and privacy of any and all information and data exchanged between you and the Shopify Applications and Services cannot be guaranteed; and (iii) any such information and data may be viewed or tampered with in transit by a third party, despite best efforts.
As the security of Personal Information depends in part on the security of the device you use to communicate with us and the security you use to protect your credentials, please take appropriate measures to protect this information.
**Data Breach**
In the event we become aware that the security of the Shopify Applications and Services has been compromised or Users’ Personal Information has been disclosed to unrelated third parties as a result of external activity, including, but not limited to, security attacks or fraud, we reserve the right to take reasonably appropriate measures, including, but not limited to, investigation and reporting, as well as notification to and cooperation with law enforcement authorities. In the event of a data breach, we will make reasonable efforts to notify affected individuals if we believe that there is a reasonable risk of harm to the User as a result of the breach or if notice is otherwise required by law. When we do, we will post a notice in the applicable Shopify Application, send you an email.
**Changes and Amendments**
We reserve the right to modify this Policy or its terms related to the Shopify Applications and Services at any time at our discretion. When we do, we will revise the updated date at the bottom of this page. We may also provide notice to you in other ways at our discretion, such as through the contact information you have provided.
An updated version of this Policy will be effective immediately upon the posting of the revised Policy unless otherwise specified. Your continued use of the Shopify Applications and Services after the effective date of the revised Policy (or such other act specified at that time) will constitute your consent to those changes. However, we will not, without your consent, use your Personal Information in a manner materially different than what was stated at the time your Personal Information was collected.
**Acceptance of this Policy**
You acknowledge that you have read this Policy and agree to all its terms and conditions. By accessing and using the Shopify Applications and Services and submitting your information you agree to be bound by this Policy. If you do not agree to abide by the terms of this Policy, you are not authorized to access or use the Shopify Applications and Services.
**Contacting Us**
If you have any questions regarding the information we may hold about you or if you wish to exercise your rights, you may use the following data subject request form to submit your request:
**Submit a data access request**
If you have any other questions, concerns, or complaints regarding this Policy, we encourage you to contact us using the details below:
Email: [support@nativeappco.com](mailto:support@nativeappco.com)
We will attempt to resolve complaints and disputes and make every reasonable effort to honor your wish to exercise your rights as quickly as possible and in any event, within the timescales provided by applicable data protection laws.
This document was last updated on March 30, 2026.
---
# Stork Credit Docs
## How To Guides
### Issue Multi Currency Gift Cards using Store Credit
**URL:** https://apps.nativeappco.com/issue-multi-currency-gift-cards-using-store-credit
Shopify gift cards have an important limitation with Shopify Markets: when a gift card is sold, its value ultimately ties back to your store's master currency. That means the value a customer receives can shift between the time the gift card is purchased and the time it is redeemed.
Stork Credit solves this by issuing **store credit in the currency of the order**. If a customer buys the gift card product in AUD, you can issue AUD store credit. If they buy the same product in USD through a market with local pricing, you can issue USD store credit instead.
## Best use case for this workflow
This setup is a strong fit if you:
- Sell internationally with **Shopify Markets**
- Want customers to receive gift cards in their purchase currency
This walkthrough demonstrates replacing a traditional gift card code with store credit, so the customer redeems the correct value in their own currency at checkout.
## What this walkthrough shows
In the demo, the same gift card product is purchased twice:
- Once in the store currency
- Once in a Shopify Markets currency with local pricing
Each purchase creates store credit entries in the matching currency, and those balances appear on the customer's Shopify profile under **Store credit**.
## Walkthrough
Start in **Shopify admin > Orders**. The walkthrough shows two recent orders on the Orders list, each containing three gift card line items. This confirms the setup can handle multiple gift card values in a single purchase.
In the example, one order is placed in the store currency and another is placed in USD.
Open the first order from the **Orders** screen. On the order details page, the **Unfulfilled** section shows three separate **Gift Card** line items for **$25**, **$50**, and **$100**.
This part of the walkthrough confirms that the automation can issue store credit for each qualifying line item in the order.
Open the second order and review the same gift card product purchased in **USD**. On the order details page, Shopify shows the line item values in USD and the payment section shows the converted amount paid in the store currency.
This is the key difference: instead of converting a gift card back to the master currency later, Stork Credit can issue the balance directly in USD.
From the order, open the customer record in **Shopify admin > Customers**. On the right side of the customer profile, the **Store credit** card shows separate balances for each currency.
In the demo, the customer has both **AUD** and **USD** balances available.
Scroll to the customer's **Timeline**. You can see Stork Credit entries such as **Stork Credit credited this customer $100.00 USD in store credit** and equivalent entries in AUD.
These timeline events are useful for checking that your Shopify Flow automation credited the correct amounts in the correct currency.
When the customer reaches checkout, they can redeem store credit in the currency of the order they are placing.
- If they check out in AUD, they can use their AUD balance.
- If they check out in USD, they can use their USD balance.
The customer cannot combine AUD and USD balances on the same order, which is usually acceptable because most customers shop in one market at a time.
## What you need in your setup
- **Stork Credit** installed
- **Shopify Flow** automation that issues store credit when the gift card product is purchased. Note: the Gift Card product you set up should just be a digital product, not an actual Gift Card.
- **Shopify Markets** pricing configured if you want the same product to sell in different local currencies. You can manually set different prices for each currency within Shopify Markets.
The walkthrough is based on a setup where the same product has local market pricing, and the Flow issues store credit based on the order currency.
If you are already using the gift card product as the purchase trigger, you can keep that product experience for shoppers in your primary market, and use store credit instead of a gift card code for secondary markets.
## Important behavior to understand
Store credit balances are currency-specific. A customer can hold multiple balances, but they redeem only the balance that matches the currency of their current checkout.
- This avoids exchange-rate changes affecting the stored value.
- It also gives customers a more predictable redemption experience in Shopify Markets.
## Sending credit to a friend
If you want customers to buy this as a gift for someone else, you will need an extra step in your storefront and automation.
1. Capture the recipient's email address as a **line item property** on the gift card product.
2. Update your Shopify Flow so the credit is issued to that recipient instead of the purchaser.
This lets you keep the same multi-currency store credit approach while supporting gifting workflows.
## Emailing the recipient
By default, you can rely on Shopify's store credit notification template, but many stores prefer a more polished gift experience.
You can connect an email platform such as **Klaviyo** to send a more customer-friendly email after the credit is issued.
This is especially useful if you want branded gifting emails, scheduled sends, or custom messaging for the sender and recipient.
##
## Need help?
If you need help setting this up, contact [support@nativeappco.com](mailto:support@nativeappco.com).
---
## Stork Credit Docs
### About Stork Credit
**URL:** https://apps.nativeappco.com/stork-credit
Need help from a real person? Email [storkcredit@nativeappco.com](mailto:storkcredit@nativeappco.com)
## Introduction to Stork Credit
Stork Credit is the simplest, most powerful way to incentivize your customers on a Shopify store. It uses Shopify's native store credit features to make it easy to automate promotions, incentives, and rewards.
- Access automated store credit
- Bulk store credit import
- Shopify Flow automation for advanced workflows
## Key Features
- **Native Integration:** Uses Shopify's native store credit features, eliminating the need for discount codes or gift card codes that customers might lose.
- **Currency Flexibility:** Store credit can be issued in any currency that your store offers, solving limitations often found with discounts in Shopify Markets and B2B.
- **Three Core Tools:**
- **User Friendly:** You don't need to create loyalty points or custom redemption workflows that make it harder for customers.
## Installation
Stork Credit requires no code installation. To install:
1. From your Shopify admin, go to **Apps**.
2. Click **Shopify App Store**.
3. Search for **Stork Credit** and open the app listing.
4. Click **Install** and follow the Shopify prompts to approve permissions.
If you can’t find the listing via search, install directly from: [https://apps.shopify.com/stork-credit](https://apps.shopify.com/)
---
### Automatic Store Credit
**URL:** https://apps.nativeappco.com/automatic-store-credit
This Stork Credit feature allows you to set up rules—similar to native Shopify discounts—that automatically issue store credit based on customer spending behaviour.
## 1. Start a Promotion
From the app dashboard, click to add automatic store credit from scratch, or browse templates such as "Cash back on orders," "Spend and get credit," or "Buy 3 get credit."
## 2. Define Rewards
Set the reward rules using fixed amounts or percentages (e.g., Spend $20, get $10 store credit). There are also a list of pre-configured templates to help you get started.
## 3. Set Requirements
- **Products:** Apply the rule to all products or specific collections/products.
- **Minimums:** Set a minimum purchase amount (e.g., $20).
- **Eligibility:** Choose specific customer segments or individual customers if desired.
## 4. Schedule
Set a start date and an optional end date for the promotion.
### 5. Activate
Once created, the promotion may default to "Inactive." Click the **Activate** button to push it live.
## Other options
- **Prevent Stacking:** In the app settings, you can toggle **"Best Value Only"** on. This ensures that if multiple promotions run simultaneously, the customer only receives the single best offer per order rather than stacking them.
- **Activity Logs:** You can view logs for any activity to see exactly when and how credit was created.
---
### Create Store Credit Automation Using Shopify Flow
**URL:** https://apps.nativeappco.com/create-store-credit-automation-using-shopify-flow
## Overview
Stork Credit includes a Shopify Flow action that lets you issue store credit automatically from any Shopify Flow workflow.
You can use Shopify Flow’s native triggers (like **Customer created** or **Order paid**) or triggers from other apps, then add the Stork Credit action **Add Store Credit** to issue credit.
All setup happens in **Shopify Flow**. Stork Credit provides the **Add Store Credit** action that you add to your workflow.
## Before you start
- Install **Stork Credit** on your Shopify store.
- Install **Shopify Flow** (Shopify Flow is available on supported Shopify plans).
- Make sure your workflow has access to a customer email (for example, via `{{customer.email}}`).
## Create a workflow that issues store credit
In your Shopify admin, open **Apps** → **Shopify Flow**, then create a new workflow (or open an existing one you want to edit).
Select a trigger that matches the behavior you want to reward (for example, **Customer created**, **Order paid**, or a trigger from another installed app).
If you only want to issue credit for certain cases, add a **Condition** step (for example, check whether the customer accepts marketing).
Click **+ Add action**, then select **Stork Credit** and choose **Add Store Credit**.
In the action panel, you’ll configure these fields:
- **Email** — the customer’s email address (for example `{{customer.email}}`).
- **Amount** — the store credit amount to add.
- **Currency** — the currency of the store credit. If left blank, it defaults to your store’s main currency.
- **Expires on** — optional expiry date in `YYYY-MM-DD` format. Leave blank if the store credit should never expire.
When you’re done, click **Apply changes** in Shopify Flow. Then switch the workflow from **Draft** to **On** (depending on your Flow UI) so it starts running.
## Common automation examples
Use the **Customer created** trigger, then add **Add Store Credit** with:
- **Email**: `{{customer.email}}`
- **Amount**: a fixed welcome credit (for example `10`)
- **Expires on**: optionally set an expiry date to encourage a first purchase
Add a **Condition** step before **Add Store Credit** (for example, a condition that checks whether the customer accepts marketing). Connect the **True** branch to **Add Store Credit** so only qualifying customers receive credit.
Use multiple **Condition** steps (or branches) in Flow, and add separate **Add Store Credit** actions on each branch with different **Amount** values.
## Troubleshooting
- **No credit issued:** Confirm the workflow is turned on (not in **Draft**) and that you clicked **Apply changes**.
- **Wrong customer credited:** Double-check the **Email** field uses the correct variable for your trigger (for example, `{{customer.email}}` for customer-based triggers).
- **Unexpected currency:** Set the **Currency** field explicitly if you don’t want to rely on your store’s default currency.
Shopify Flow workflows can run many times. If your trigger can fire repeatedly for the same customer, add conditions (or other safeguards) to avoid issuing credit more than intended.
---
### Bulk Import Store Credit
**URL:** https://apps.nativeappco.com/bulk-import-store-credit
The bulk import tool enables you to upload a CSV file to issue store credit to many customers at once.
## Instructions
## 1. Download Template
In the app dashboard, navigate to the import section and click **Download CSV template** to get the correct format.
## 2. Prepare Data
Fill in the columns:
Field
Description
Email
The customer's email address. If the customer does not exist, a new customer account is created automatically.
Amount
The numerical value of credit to issue.
Currency
The currency code (e.g., USD, AUD).
Expiry Date
Set an expiration date using the specific date format provided.
Send Email
Set to TRUE to send a notification via Shopify, or FALSE to skip it.
## 3. Upload
Drag and drop your prepared CSV file into the upload area and click to start the import.
## 4. Monitor
Watch the "Jobs" list to track progress. It will show "Success" counts or flag errors.
## Tips & Troubleshooting
**Error Handling:** If an import fails (e.g., due to negative values, which are not currently supported), click on the job to view the logs. The logs will identify the specific error so you can fix the file and re-upload.
---
### Promotion Stacking
**URL:** https://apps.nativeappco.com/promotion-stacking
When a customer qualifies for more than one **automatic store credit** promotion at the same time, Stork Credit uses your **Promotion Stacking** setting to decide how much credit to issue.
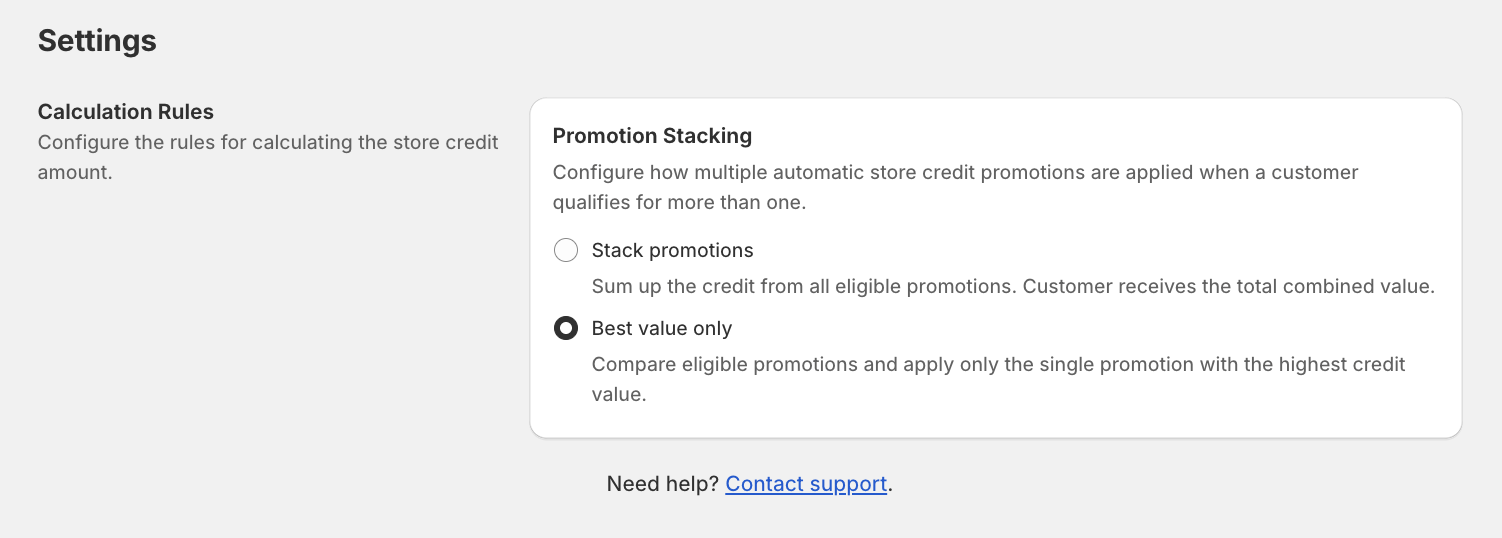
## Where to find Promotion Stacking
From the **Stork Credit App Dashboard**, open **Settings**. On the Settings page, find the **Promotion Stacking** section (next to **Calculation Rules**).
## Choose how promotions apply
In **Promotion Stacking**, select one of these options:
### Stack promotions
**What it does:** Sums up the credit from *all eligible* promotions. The customer receives the **total combined value**.
- Use this when you want multiple promotions to “add up” (for example, a seasonal offer plus a VIP offer).
### Best value only
**What it does:** Compares eligible promotions and applies only the **single promotion with the highest credit value**.
- Use this when you want to avoid over-rewarding customers when multiple promotions overlap.
Changing **Promotion Stacking** affects how credit is calculated when multiple promotions overlap going forward. Review any overlapping active promotions before switching this setting.
## What counts as “eligible”
A promotion is eligible when the customer’s order matches that promotion’s requirements (for example: products/collections, minimum purchase, customer eligibility, and schedule).
If you run many overlapping promotions, **Best value only** is the simplest way to prevent unexpected combined payouts while still ensuring customers get the strongest offer available.
---
### Stork Credit Checkout Widget
**URL:** https://apps.nativeappco.com/stork-credit-checkout-widget
## What this checkout block does
The Stork Credit checkout block (labeled **Automatic Store Credit** in the editor) displays a message during checkout showing customers how much **store credit they’ll earn** from the current order.
This is an informational widget only. It **does not change** Shopify’s built-in store credit redemption experience in checkout.
## Before you start
- Install the **Stork Credit** app on your Shopify store.
- Ensure you have at least one **earning rule** enabled in Stork Credit so the checkout message can show a non-zero earned amount.
## Step 1: Open the Shopify checkout editor
In your Shopify admin, open the **Checkout editor** (the visual editor where you can add blocks to checkout).
If you have multiple checkout profiles or markets, make sure you’re editing the right one before you add the block.
## Step 2: Find the Stork Credit block in the sidebar
In the left sidebar, open the **Apps** section and look for the **Stork Credit** entry. You should see the block named **Automatic Store Credit** available to add.
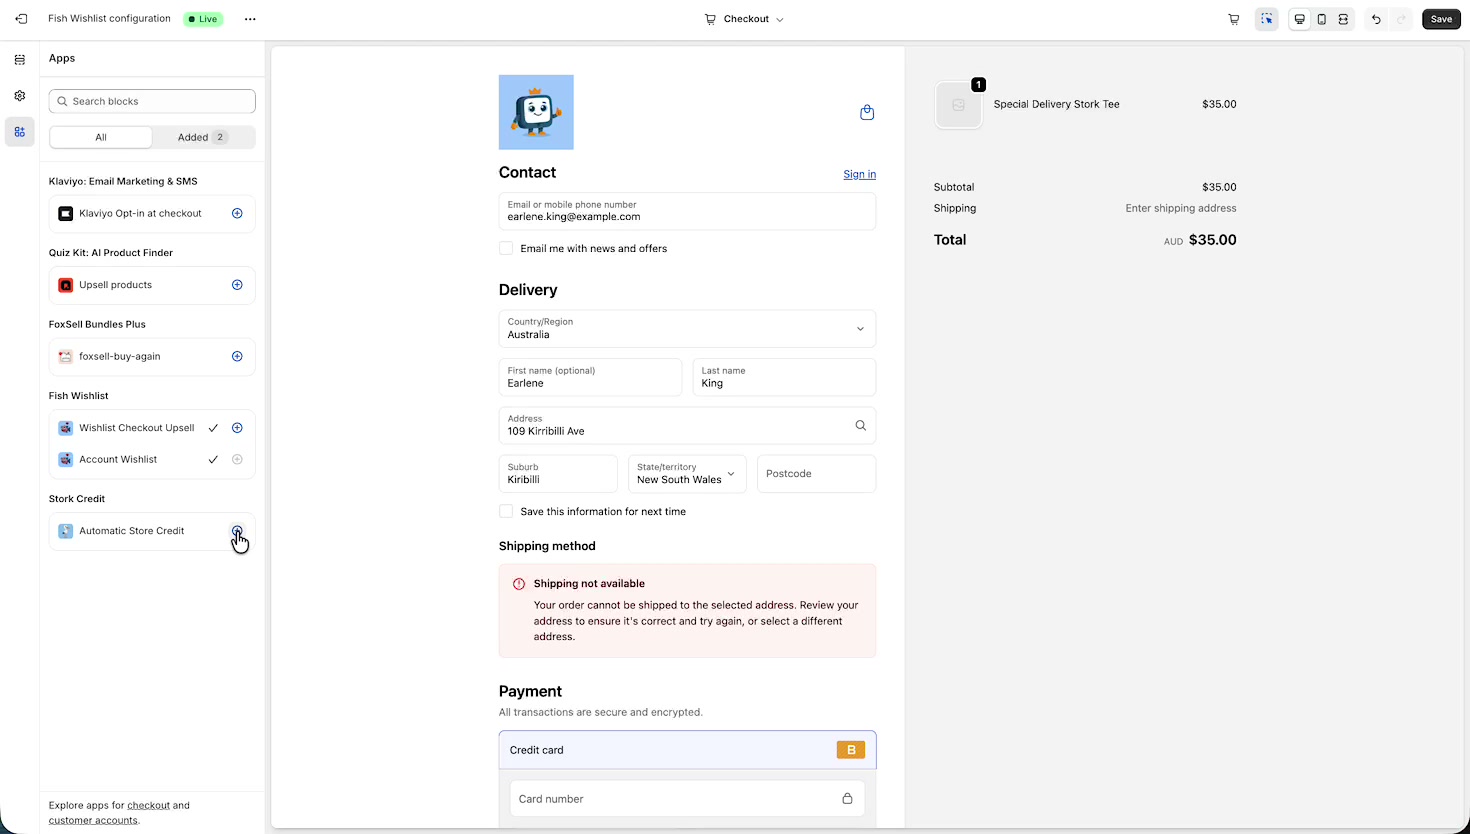
## Step 3: Add the block to checkout
Click the **+** (add) button next to **Automatic Store Credit** under the **Stork Credit** app section.
The block appears in the checkout preview with an “earned store credit” message (for example: **Earn Store Credit!** and **Complete this order to earn $X.XX in store credit!**).
The earned store credit amount shown in the preview can change based on the order total and your Stork Credit earning rules.
## Step 4: Configure the block settings
Click the block in the left sidebar (under **Main**) to open its settings. When selected, the settings panel shows **Checkout behavior** options.
### Checkout behavior options
- **Include block in Shop Pay**: Toggle this on if you want the message to appear in Shop Pay checkout.
- **Preview Shop Pay**: Use this to preview how the block looks in the Shop Pay experience.
- **Manage app**: Opens Stork Credit management from the editor so you can adjust app-level settings (outside of this block’s placement).
## Step 5: Save your checkout changes
Click **Save** in the checkout editor to publish your changes.
If you navigate away without saving, Shopify won’t publish the block placement and your customers won’t see the earned store credit message.
##
## Troubleshooting
- **You don’t see “Automatic Store Credit” under Apps:** Confirm the **Stork Credit** app is installed for this store, then reload the Checkout editor.
- **The preview shows $0.00 (or doesn’t change):** Verify you have an active **earning rule** in Stork Credit and that the preview order total meets the rule conditions.
- **The message doesn’t appear in Shop Pay:** In the block settings, enable **Include block in Shop Pay**, then use **Preview Shop Pay** to confirm.
During checkout, customers will see a Stork Credit message telling them how much store credit they’ll earn by completing the order. This helps motivate checkout completion without changing how store credit redemption works in Shopify checkout.
---
## How To Guides
### Tiered Loyalty Program with Store Credit
**URL:** https://apps.nativeappco.com/tiered-loyalty-program
Build a tiered cash-back loyalty program using native Shopify customer segments, native store credit, and Stork Credit — no points, no databases, no third-party redemption portals.
Shopify's built-in store credit is real monetary value that lives on the customer's account, redeemable natively at checkout, with a full transaction log and automatic notification emails included. Stork Credit handles the automation — issuing credit based on rules that you create.
## Step 1: Create customer segments
In Shopify admin go to **Customers → Segments** and create three segments. Sidekick can generate the queries for you. Make each segment mutually exclusive so a customer only qualifies for one tier at a time.
| Example Tier | Segment name | Lifetime spend |
| --- | --- | --- |
| Bronze | Bronze Loyalty | $100 – $499 |
| Silver | Silver Loyalty | $500 – $999 |
| Gold | Gold Loyalty | $1,000+ |
Optional: Add a marketing opt-in condition to each segment, then save.
## Step 2: Set up Automatic Store Credit
In [Stork Credit](http://admin.shopify.com/apps/stork-credit) go to **Automatic Store Credit → Browse Templates** and select the *3% store credit rewards* template.
- Set your reward rate per tier (e.g. Bronze 3%, Silver 5%, Gold 7%)
- Under **Eligibility**, choose *Specific customer segment* and select the matching segment
- Save and activate
Repeat for each tier. Stork Credit will apply the best-value promotion if a customer somehow qualifies for more than one (unless you change this in app settings).
## Step 3: Add the checkout widget
In your Shopify checkout editor, add the Stork Credit app block to checkout. This shows customers how much credit they'll earn before they pay — a simple but effective conversion nudge.
## How it works for customers
- Credit is issued automatically after each qualifying order
- Shopify sends a native store credit email notification
- Customers redeem by ticking the store credit option in the checkout payment section
## Advanced options
### Delay issuance with Shopify Flow
By default, credit is issued immediately after an order is placed. If you want to hold it until after a refund window has passed, build a Shopify Flow using the **Order fulfilled** trigger, a **Wait** action for your desired delay period, then the **Issue store credit** Stork Credit action. No code required.
You can also use Flow to layer in more complex logic — for example, only issue credit if the order contains products from a specific collection, or issue a bonus credit amount when a customer first reaches a new tier.
### Run promotions like "double credit weekends"
Because promotions in Stork Credit are just rules you can turn on and off, running a time-limited promotion is straightforward. Create a separate automatic store credit rule with a higher reward rate (e.g. 6% instead of 3%), activate it at the start of the promotion period, and deactivate it when it ends. The best-value logic means eligible customers automatically get the higher rate while the promo is live — no changes needed to your base tier rules.
### Trigger Klaviyo campaigns when credit is earned
Use Shopify Flow to fire a webhook to Klaviyo when store credit is issued. This lets you send a branded "You've earned store credit!" email or SMS through Klaviyo rather than the default Shopify notification — giving you full control over design, copy, and timing. You can also use the trigger to add customers to a Klaviyo segment, enabling follow-up flows like reminding customers they have unspent credit if they haven't purchased in 30 days.
---
## Stork Credit Docs
### Set Up a Tiered Loyalty Program with Store Credit
**URL:** https://apps.nativeappco.com/tiered-loyalty-program-setup
This guide walks you through setting up a multi-tiered loyalty program in Shopify that rewards customers with store credit based on their lifetime spend. It uses native Shopify customer segments, native Shopify store credit, and Stork Credit's automatic store credit feature.
No points. No third-party databases. No clunky redemption portals.
## Step 1: Create your customer segments in Shopify
In your Shopify admin, go to **Customers → Segments** and create three segments. You can use Sidekick to generate the queries, or create them manually.
Each segment should be mutually exclusive — a customer should only qualify for one tier at a time.
| Tier | Segment name | Lifetime spend range |
| --- | --- | --- |
| Bronze | Bronze Loyalty | $100 – $499 |
| Silver | Silver Loyalty | $500 – $999 |
| Gold | Gold Loyalty | $1,000+ |
Add a condition to only include customers who have opted into marketing. Save each segment with a clear name (e.g. Bronze Loyalty).
> **Tip:** Shopify provides a library of segment templates — browse these for additional ideas, such as segments based on order frequency or product category purchases.
## Step 2: Set up automatic store credit in Stork Credit
In the Stork Credit app, go to **Automatic Store Credit** and click **Browse Templates**. Select the *3% store credit rewards* template as your starting point.
Configure the promotion:
- Set the reward rate (e.g. 3% cash back on every order)
- Optionally restrict to specific collections or products
- Optionally set a minimum purchase requirement
- Under **Eligibility**, select *Specific customer segment* and choose **Bronze Loyalty**
Save the promotion, then activate it. Repeat this process to create separate promotions for Silver Loyalty and Gold Loyalty — you can vary the reward rate per tier (e.g. Bronze 3%, Silver 5%, Gold 7%).
> **Tip:** Stork Credit will automatically apply the best-value promotion when a customer qualifies for multiple segments. To keep things clean, use mutually exclusive segments so only one promotion applies per order.
## Step 3: Enable the store credit widget at checkout
In your Shopify theme editor, add the Stork Credit **app block** to your checkout. This displays a message showing how much store credit the customer will earn from the current order — visible before they complete their purchase.
> **Tip:** This "earn" message is a great conversion nudge — customers can see the reward before they pay.
## Step 4: How it works at checkout for customers
Once set up, the experience is fully native. When a customer places an order:
- Stork Credit issues the store credit automatically based on the order total
- Shopify sends the customer a native store credit notification email
- The customer's store credit balance is updated in their account
- At future checkouts, customers can apply their store credit in the payment section
## Step 5: Advanced — delay issuance with Shopify Flow
If you want to delay store credit issuance — for example, to wait until the refund window has passed — you can build a Shopify Flow using the **Customer added to segment** trigger and the **Issue store credit** action from Stork Credit. This gives you full control over timing and conditional logic without any custom code.
---
### Build a Loyalty Program with Native Store Credit
**URL:** https://apps.nativeappco.com/loyalty-program-with-native-store-credit
{% youtube " [https://youtu.be/jGITvRNEg8I](https://youtu.be/jGITvRNEg8I) " %}
Most Shopify loyalty programs are a mess. Points databases, third-party redemption portals, clunky customer experiences — and a monthly app bill to keep it all limping along. There's a better way, and it's already built into Shopify.
**The setup: Shopify customer segments + Stork Credit + native store credit. That's it.**
## What is Shopify native store credit?
Shopify's built-in store credit is genuinely powerful and massively underused. It's real monetary value that lives on the customer's account, redeemable natively at checkout, and it comes with a full transaction log out of the box — no database table required. Shopify even sends the customer a notification email when they receive credit. All native, all free.
The missing piece has always been automation — how do you actually issue credit based on customer behaviour? That's where Stork Credit comes in.
## Tiered loyalty in under an hour
The setup is straightforward. First, you create three customer segments in Shopify — Bronze, Silver, and Gold — based on lifetime spend. Shopify's Sidekick can generate the segment queries for you in seconds, and you can layer on conditions like marketing opt-in to keep your list clean.
Then you head into Stork Credit, use a pre-built rewards template, and tie each promotion to its matching segment. Bronze members might earn 3% cash back on every order, Silver 5%, Gold 7%. The app handles the rest — every time an eligible customer places an order, the credit is calculated and issued automatically.
At checkout, a Stork Credit app block shows customers exactly how much they're about to earn before they pay. That's not just good UX — it's a genuine conversion lever. And when customers return to redeem, they tick a box in the native Shopify payment section. No portal, no code, no friction.
## Why this approach wins
No points inflation, no redemption friction, no third-party database to worry about. Store credit is real money — customers understand it immediately. The credit log is built into every customer profile in Shopify admin, so your team can see exactly what's been issued and redeemed without digging through app dashboards.
Because everything runs on native Shopify infrastructure — segments, store credit, email notifications — you're not dependent on a platform that could change its pricing or shut down. The core of this program lives in Shopify itself.
## Want to go further?
Shopify Flow lets you add logic on top: delay credit issuance until after the return window, trigger bonus credit for specific product categories, or reward customers the moment they level up to a new tier. All without writing a line of code.
This is what native-first commerce looks like. Simple to set up, easy to understand, and built to last.
Ready to set it up? Follow the [step-by-step guide](/stork-credit-docs/stork-credit-docs/tiered-loyalty-program-setup).
---
# Omnibus Owl Docs
Learn how to set up price tracking and more using the Omnibus Owl app.
## Omnibus Owl Docs
### Dashboard Screen
**URL:** https://apps.nativeappco.com/dashboard-screen
The Dashboard is your command center for Omnibus Owl, giving you a top-down view of your store's price tracking status.
### What You Can Do on the Dashboard:
- **Tracked Metrics:** Instantly see how many products and total variants are currently being monitored by the app.
- **Toggle Price Monitoring:** You have the ability to turn price monitoring off at any time.
- **Theme Settings:** Quickly jump to the settings of your installation on other themes (helpful if you are working on a draft theme or launching a new storefront).
- **Customer Support:** Access our dedicated Customer Service button, prominently displayed so you can send us a message whenever you need help. We will always respond to you as quickly as we can.
### Individual Product Search
If you need to audit a specific item, you can use the search bar on the Dashboard to find any individual product (e.g., searching for "Sneakers"). Clicking on a product will reveal its exact price history timeline, showing you the exact dates when the product was edited and what the price was changed to.
---
### Theme Installation
**URL:** https://apps.nativeappco.com/theme-installation
## Theme Installation
Installing the Omnibus Owl price block on your storefront is quick and requires no coding.
## Step 1: Enable the App Embed
1. After installing the app from the Shopify App Store, you will be greeted by the **Quick Theme Setup** screen.
2. Select the theme you want to install the app onto (e.g., your live theme).
3. Click the button to enable the app. This will open the **Shopify Theme Editor**.
4. In the Theme Editor, ensure the Omnibus app embed toggle is turned **ON**.
5. Click **Save** in the top right corner.
6. Return to the app and click the **Verify** button to ensure the embed was activated successfully.
## Step 2: Add the Price Block to Your Product Page
The Price Block is the visual element that displays the updated price history to your customers.
1. Open the **Shopify Theme Editor** and navigate to your **Default Product** page template.
2. Add the block to your Product Information section.
3. Drag and drop the block to your desired location (we recommend placing it just below the product price or the "Buy It Now" buttons).
4. Click **Save**. By default, the price history will only appear on products that are actively on sale.
## Alternative: Manual Installation (CSS Selector)
If your theme doesn't support app blocks or you are having trouble placing it automatically, you can use the Manual CSS Selector method:
1. In the app setup screen, choose **Manual CSS Selector**.
2. Find the CSS class of the element you want to attach the widget to (e.g., `product-form`).
3. Enter the class name and choose whether you want to insert the widget **Before**, **After**, or **Inside** that specific element.
4. Click **Save**.
---
### Language Settings
**URL:** https://apps.nativeappco.com/language-settings
Omnibus Owl integrates with **Shopify Markets**, allowing you to translate the price widget into any language you have set up on your store.
## Managing Translations
1. Navigate to the **Languages** page in the app.
2. You will see a list of your active languages (e.g., English, Japanese).
3. While some languages feature automatic translations, you can manually edit any text string to fit your brand's voice.
## Customizing Widget Messages
- **Main Label:** You can change the default text (e.g., *"Lowest price in the last 30 days"*). You can also add HTML here—for example, to make the label bold.
- **EU Directive Tooltip:** If you have the info tooltip enabled, you can customize the explanatory text regarding the EU Omnibus Directive that appears when a customer hovers over the info icon. Make sure this aligns with what you want to say before turning the app on for your store.
- **Date Format:** Set your date format to whatever you want.
---
### Shopify Flow Triggers
**URL:** https://apps.nativeappco.com/shopify-flow-triggers
Omnibus Owl integrates seamlessly with **Shopify Flow**, allowing you to build automated backend workflows based on your catalog's price history.
Shopify Flow does not have a trigger for product price update, so this feature is very useful for both your marketing and back of house teams.
Here is an example of a Shopify Flow that automatically adds tags to a product after its price drops.
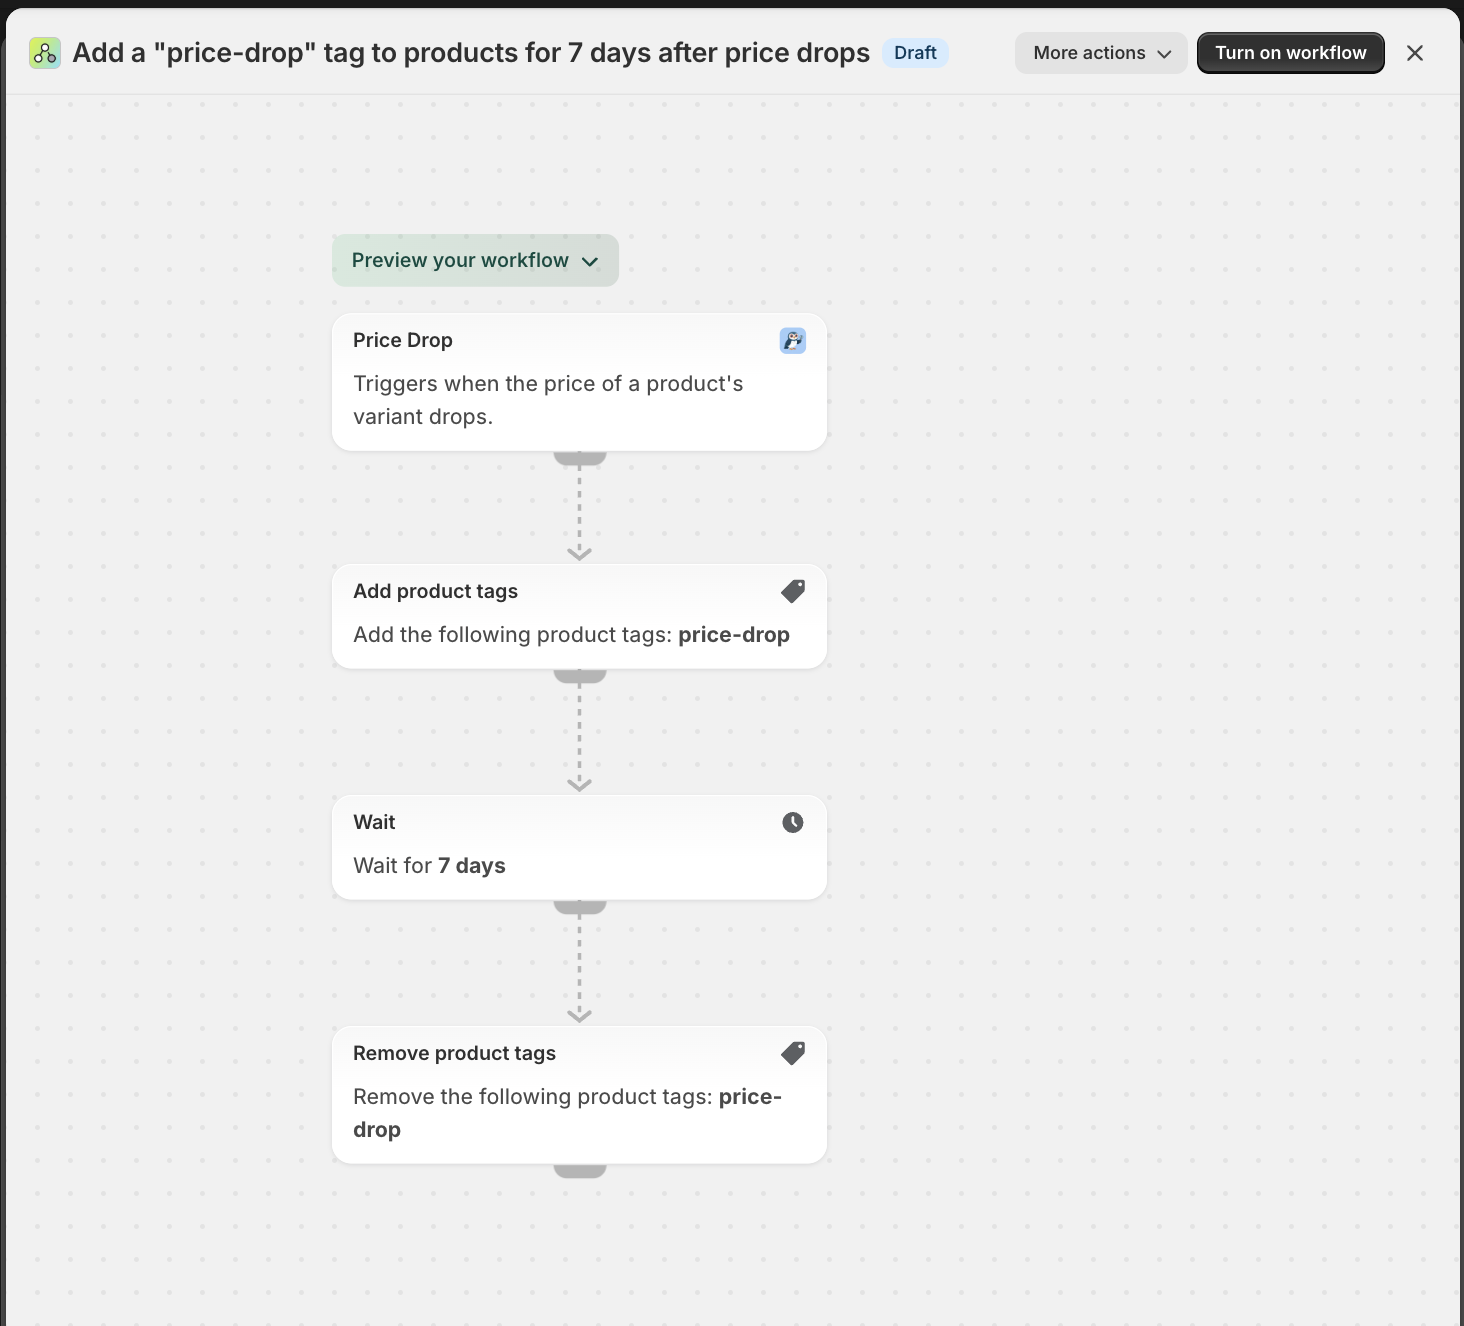
Whenever a price change is detected, Omnibus Owl can trigger specific actions in your store.
We provide two distinct Shopify Flow triggers:
- **Price Drop:** Triggers whenever the price of a product's variant decreases.
- **Price Increase:** Triggers whenever the price of a product's variant increases.
Find these two triggers in Shopify Flow
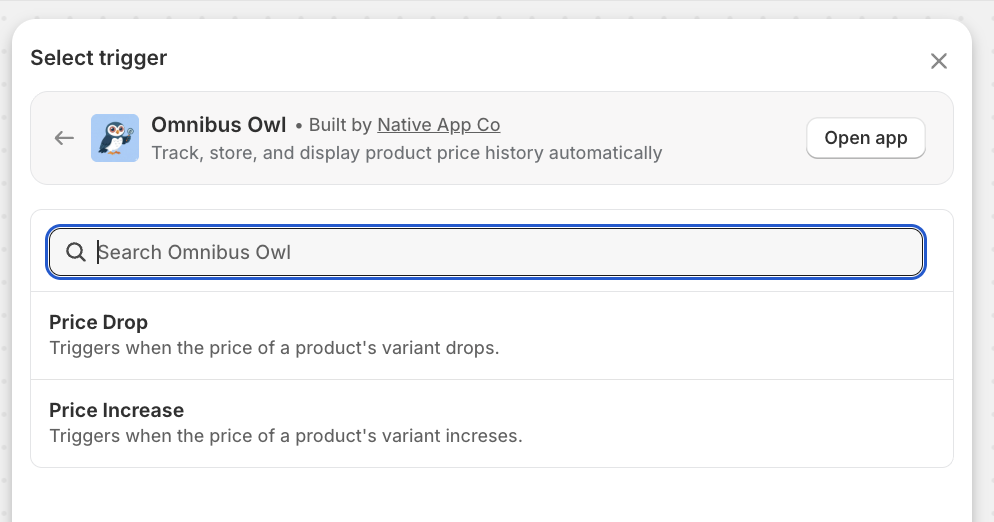
You can use these triggers to automatically notify your marketing team, update accounting sheets, or manage sales channel availability the moment a price fluctuation occurs.
---
### FAQ
**URL:** https://apps.nativeappco.com/faq
# Frequently Asked Questions
**Q: Do I need to know how to code to install the price widget?**
A: Not at all! You can easily install the widget using Shopify's App Blocks and App Embeds directly from your Theme Editor. If your theme doesn't support app blocks, we also offer a simple Manual CSS Selector option to place the widget exactly where you want it without touching the code.
**Q: Can I track price history from before I installed the app?**
A: No. Due to Shopify's limitations, we can only start tracking your price history the moment you install the app. We cannot go back and check historical prices from before your installation date.
**Q: How many days of price history does the app display?**
A: By default, the app tracks and displays the lowest price over the last 30 days to comply with EU laws. However, you can increase this tracking window up to 365 days in your settings.
**Q: Will the price history show on products that aren't currently on sale?**
A: By default, the price history only appears on products that are actively on sale. However, you can easily change this in your settings if you'd prefer to display the widget on all of your products.
**Q: Can I translate the price widget into other languages?**
A: Yes! Omnibus Owl integrates perfectly with Shopify Markets, allowing you to translate the widget into any language you have set up on your store. You can use automatic translations or manually edit the text to fit your brand.
**Q: Does the app track price changes I make on Draft or Archived products?**
A: It can, but you have the option to turn off tracking for draft and archived products in your settings. This is highly recommended so that temporary price adjustments made before publishing a product aren't tracked as your official lowest price.
**Q: What is the "Auto-Compare At Price" feature?**
A: By default, Shopify doesn't automatically move your original price into the "Compare at price" field when you put an item on sale. Our Auto-Compare At Price feature automates this for you, moving the original price into the compare at field the moment you drop the price.
**Q: Do you delete metafield data after I uninstall Omnibus Owl**
A: No, we do not delete your price history data when you uninstall the app. This is to prevent situations where you could accidentally delete all of your price history data. If you would like to delete this data, please contact us.
---
### Omnibus Owl
**URL:** https://apps.nativeappco.com/omnibus-owl
## Welcome to Omnibus Owl
Omnibus Owl (also known as Omnibus Price Radar) is your complete solution for complying with the EU Omnibus Directive and building customer trust through transparent pricing.
By automatically tracking your product price history, Omnibus Owl ensures you display the lowest previous price on your storefront whenever you advertise a discount.
Our app is designed to work seamlessly in the background, syncing your catalog instantly upon installation and monitoring price changes in real-time across multiple markets and currencies—with zero manual work required.
### Key Features
- **Automated Price Tracking:**
Automatically tracks price changes for every product and variant in real-time, starting the moment you install the app.
- **EU Omnibus/California Price Transparency Law Compliance:**
Automatically displays the lowest price of a product over the last 30 days (or up to 365 days) to comply with European consumer protection laws and California Price Transparency Law.
- **Smart Frontend Widget:**
A highly customizable widget that displays price history. You can choose to show it only on discounted products or all products, customize text with HTML, and add helpful tooltips.
- **Multi-Language & Multi-Market Support:**
Fully integrated with Shopify Markets to support multiple languages and currencies.
- **Smart Pricing Tools:**
Automate your merchandising with features like *Auto-Compare at Price* and *Fresh Drop Dynamic Tagging*.
- **Shopify Flow Integration:**
Automate your store's backend workflows with built-in Flow triggers for price drops and price increases.
---
### Every Omnibus Owl Feature
**URL:** https://apps.nativeappco.com/every-omnibus-owl-feature
## Omnibus Owl at a glance
Omnibus Owl is not just a compliance tool. Yes, it helps you meet Omnibus pricing requirements and show the right lowest-price message on your storefront, but it also gives you genuinely useful merchandising tools that can save time and make your sale strategy sharper.
This walkthrough follows the natural flow of the app, starting from the main dashboard and moving through **Languages**, **Settings**, and **Price Insights**. Along the way, you will see where Omnibus Owl handles the essentials quietly in the background, and where it goes further with smart automation like **Auto Compare At Price** and **Fresh Drop Dynamic Tagging**.
Omnibus Owl may also appear in older references as **Omnibus Price Radar**. In the app, you will work inside the **Omnibus Owl** navigation.
## 1. Dashboard
The **Dashboard** is your control center. It gives you an immediate read on whether price tracking is active, how many products are being monitored, and whether your theme setup is in good shape.
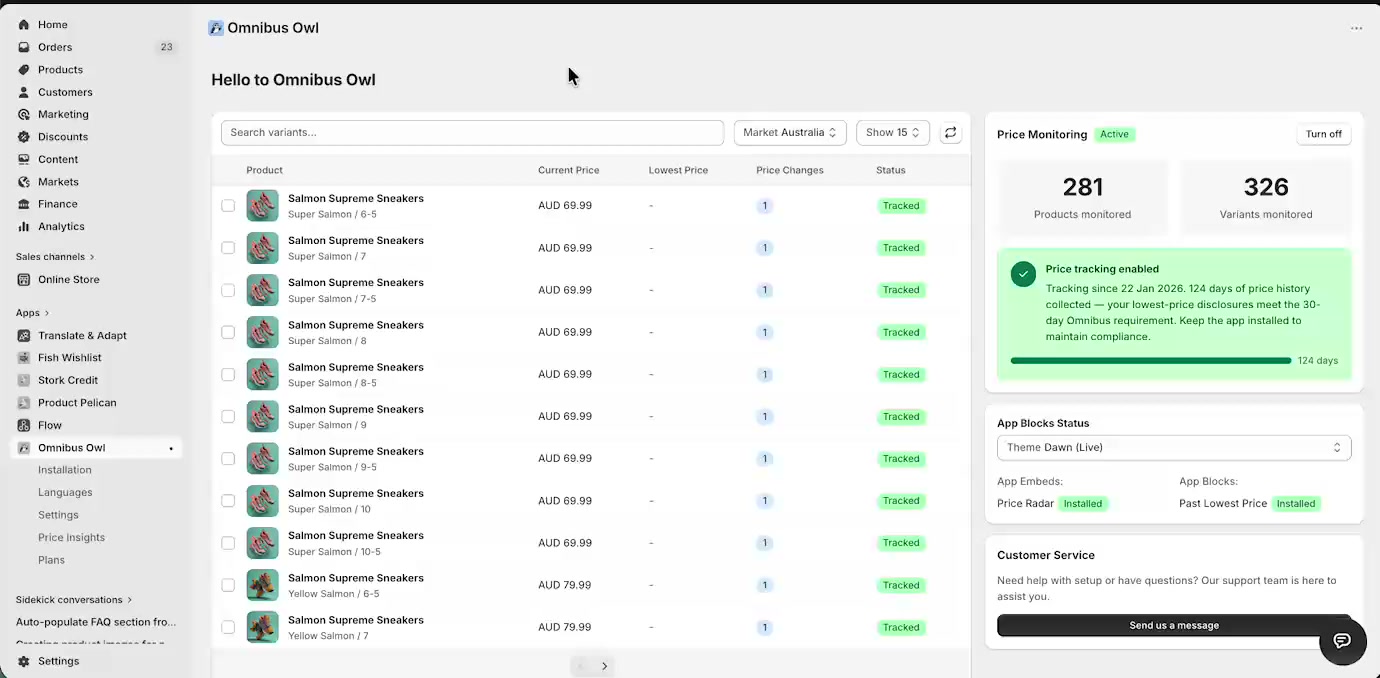
### What you can see here
- **Tracked products list:** Search variants using the **Search variants...** field, then review columns such as **Product**, **Current Price**, **Lowest Price**, **Price Changes**, and **Status**.
- **Price Monitoring:** The **Price Monitoring** panel shows whether tracking is active and how many **Products monitored** and **Variants monitored** are currently covered.
- **Tracking age:** The status card confirms how long the app has been collecting price history. This matters because Omnibus Owl starts tracking from installation onward.
- **App Blocks Status:** This panel helps you confirm the storefront pieces are installed. In the walkthrough, the theme shows **App Embeds: Price Radar** and **App Blocks: Past Lowest Price** as installed.
- **Customer Service:** The **Send us a message** button is available right from the dashboard if you need help.
### Why the dashboard matters
This screen is where you quickly confirm that the app is doing its job. If you want a fast answer to “Are we tracking correctly?” or “Is the widget actually installed on this theme?”, this is where to look first.
Use the product search on the dashboard when you want to audit a specific item before a campaign goes live. It is a simple way to sanity-check what the app has recorded.
## 2. Languages and widget translations
Next in the walkthrough is **Languages**. This page controls the customer-facing text for the lowest-price widget, and it is one of the easiest ways to make the app feel native to your storefront instead of looking like a generic compliance add-on.
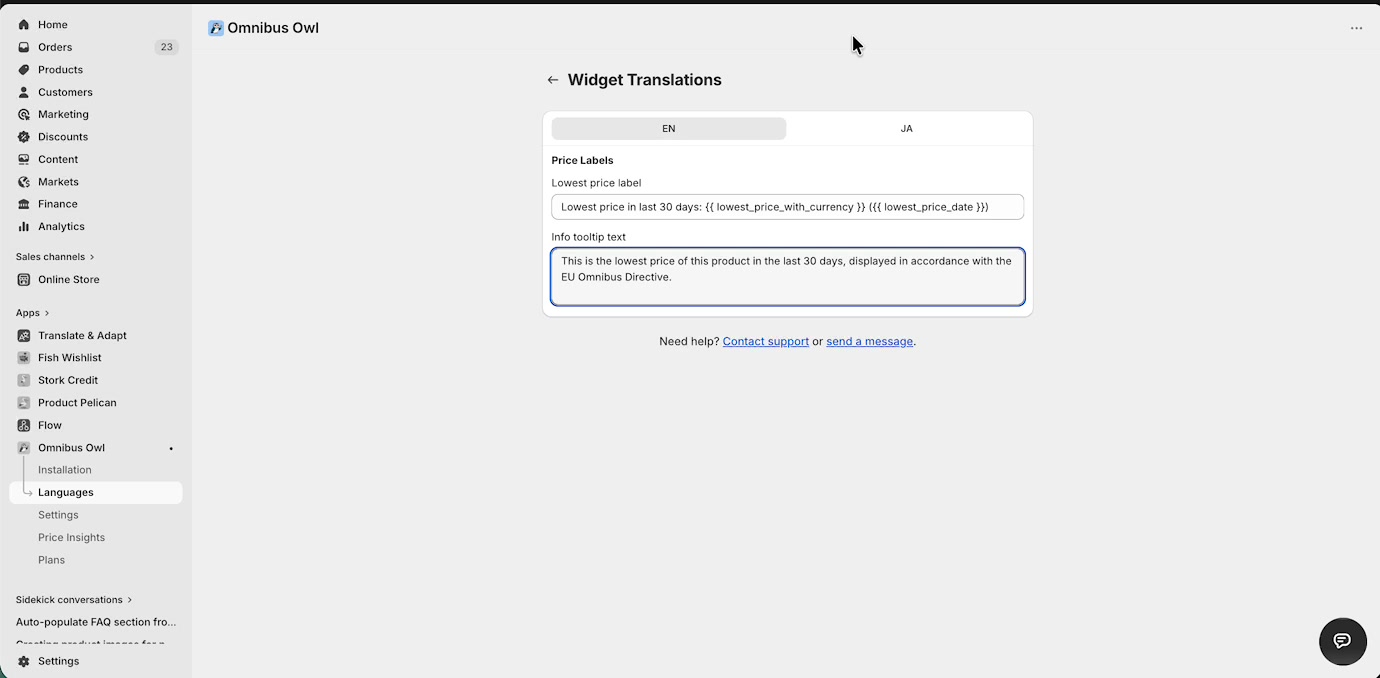
### What you can edit on the Widget Translations page
- **Lowest price label:** This is the storefront line that appears next to the price history information. In the walkthrough, it uses variables such as the lowest price and date.
- **Info tooltip text:** If you enable the tooltip in settings, this is the explanatory text customers will see when they hover over or tap the info icon.
- **Multiple languages:** The screen shows language tabs such as **EN** and **JA**, so you can tailor the widget copy by market and language.
### Why this feature is better than a basic legal label
This is where Omnibus Owl starts to feel polished. Instead of forcing one rigid compliance message, it lets you keep the wording clear, branded, and market-specific. That means your store can stay compliant without sounding robotic.
You can customize the tooltip copy to match your tone of voice, as long as the message still clearly explains the lowest-price disclosure to shoppers.
## 3. Settings overview
The **Settings** page is where the app opens up. It includes core configuration for the app interface, storefront display rules, price history collection, native discount tracking, and the Smart Pricing Tools that turn Omnibus Owl into more than just a disclosure widget.
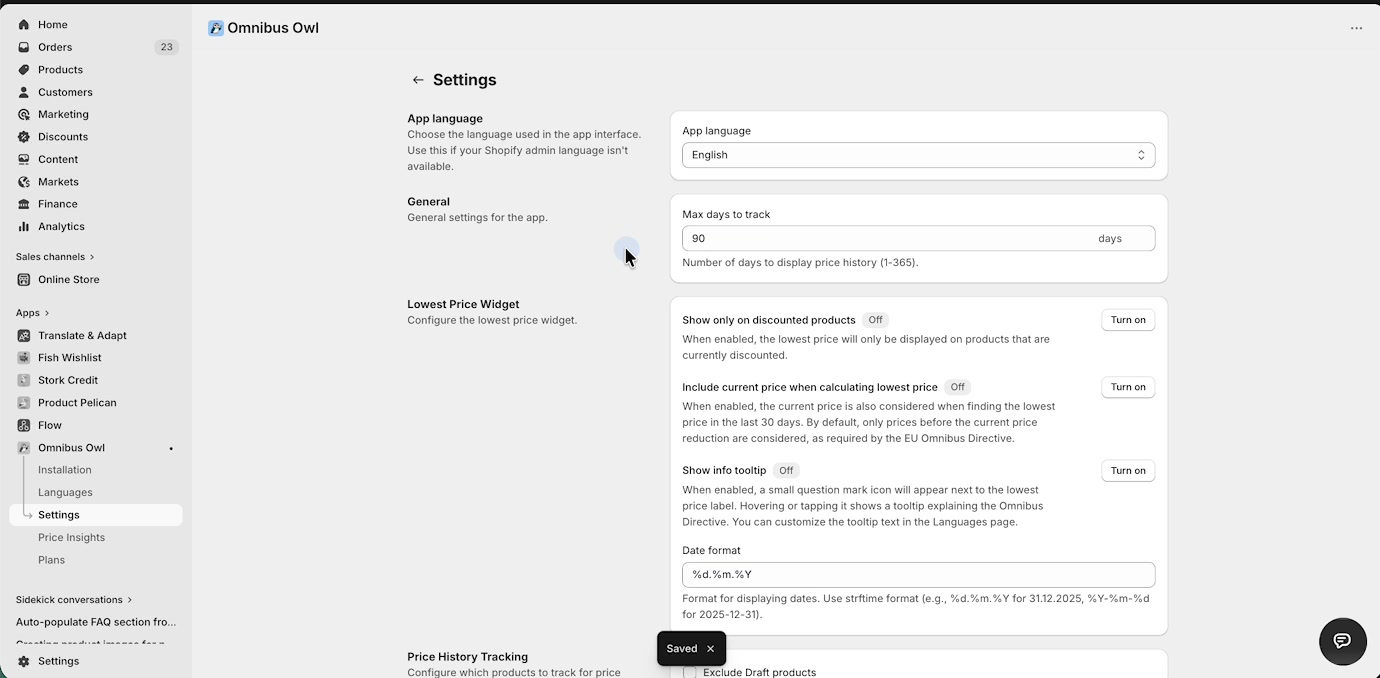
### Main sections you will see
- **App language**
- **General**
- **Lowest Price Widget**
- **Price History Tracking**
- **Native Discount Tracking** **Beta**
- **Smart Pricing Tools**
The rest of this guide breaks each of these down in the same order you see them in the walkthrough.
## 4. General settings
### App language
The **App language** dropdown controls the language used in the app interface itself. This is especially useful if your Shopify admin language does not match the language you want for the Omnibus Owl admin experience.
### Max days to track
The **Max days to track** field controls how many days of price history the app keeps available for display and analysis.
- The walkthrough shows this set to **90** days.
- The field description says the supported range is **1-365** days.
- This lets you go beyond the standard 30-day requirement if your store wants a longer internal history window.
Omnibus Owl starts collecting price history from the date the app is installed. It cannot recreate price changes from before installation.
## 5. Lowest Price Widget settings
This section controls exactly how the storefront disclosure behaves. These settings are practical, flexible, and important because they affect what shoppers actually see.
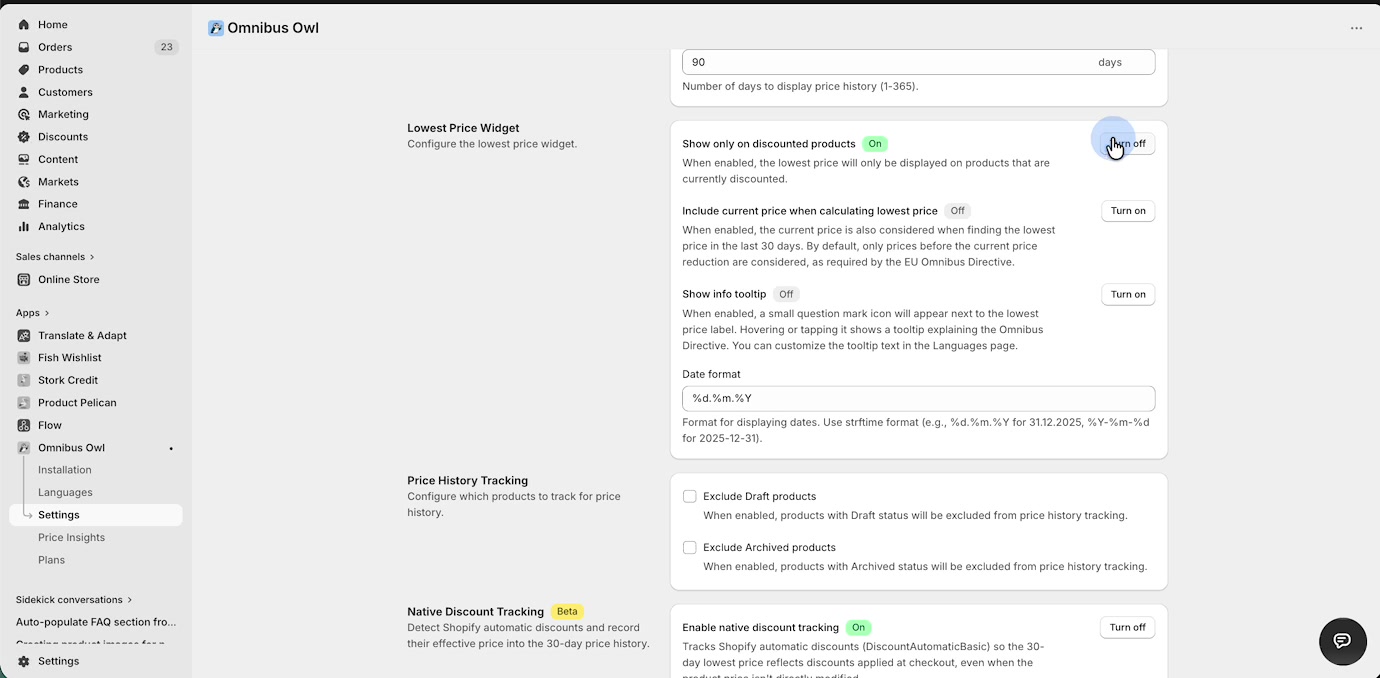
### Show only on discounted products
**Show only on discounted products** controls whether the widget appears only when a product is actively discounted.
- Turn it **on** if you want the lowest-price message to appear only on products currently on sale.
- Turn it **off** if you want to show price history more broadly.
For most stores, this is the cleanest setting because it keeps the storefront focused and relevant.
### Include current price when calculating lowest price
**Include current price when calculating lowest price** changes how the app determines the displayed lowest price.
- When **off**, Omnibus Owl follows the default approach of looking at prices before the current reduction.
- When **on**, the current price is also considered in the calculation.
This gives you useful control over how conservative or inclusive your lowest-price display should be.
### Show info tooltip
**Show info tooltip** adds a small question-mark style helper next to the label. This is a small feature, but it does a great job of making compliance feel customer-friendly instead of abrupt.
When enabled, the tooltip text comes from the **Languages** page.
### Date format
The **Date format** field controls how dates appear in the widget. In the walkthrough, the field uses a format like `%d.%m.%Y`.
This is a nice detail because it lets the widget match local expectations instead of forcing a one-size-fits-all date display.
The field accepts strftime-style formatting, which gives you flexibility for local date conventions across markets.
## 6. Price History Tracking settings
This section lets you decide which products should be tracked for price history in the first place.
### Exclude Draft products
Enable **Exclude Draft products** to stop draft items from being tracked before they are published.
This is a smart cleanup setting, especially if your team experiments with pricing before launch.
### Exclude Archived products
Enable **Exclude Archived products** to avoid tracking products that are no longer active in your storefront.
Together, these exclusions help keep your price history cleaner and more meaningful.
If your merchandising team creates products early and tests prices before launch, turning on both exclusions is a very good default.
## 7. Native Discount Tracking
**Native Discount Tracking** is marked **Beta** in the walkthrough, and it is one of the most useful advanced compliance features in the app.
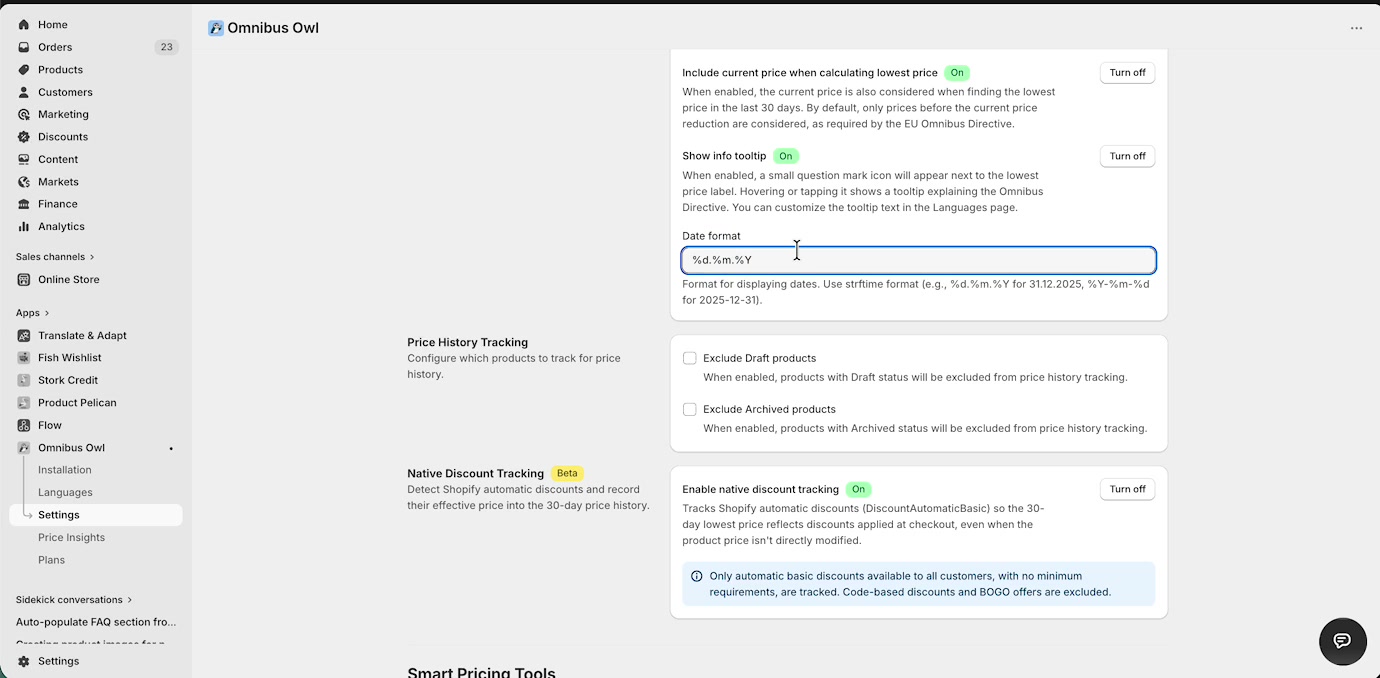
### Enable native discount tracking
When **Enable native discount tracking** is on, Omnibus Owl tracks Shopify automatic discounts and records their effective price into the 30-day history, even when the product price itself is not directly changed.
That is a big deal. It means the app can reflect real storefront discount behavior more accurately, not just manual edits to the product price.
### What it includes
The note in the walkthrough explains that only **automatic basic discounts** available to all customers, with no minimum requirements, are tracked.
### What it excludes
**Code-based discounts** and **BOGO offers** are excluded.
This feature helps close an important gap for stores that rely on Shopify automatic discounts at checkout. It makes Omnibus Owl much more practical in real-world sale setups.
## 8. Smart Pricing Tools
This is the part that really proves Omnibus Owl is more than a compliance app. The **Smart Pricing Tools** section adds automation that can improve how your sale prices look and how your products are merchandised after a drop.
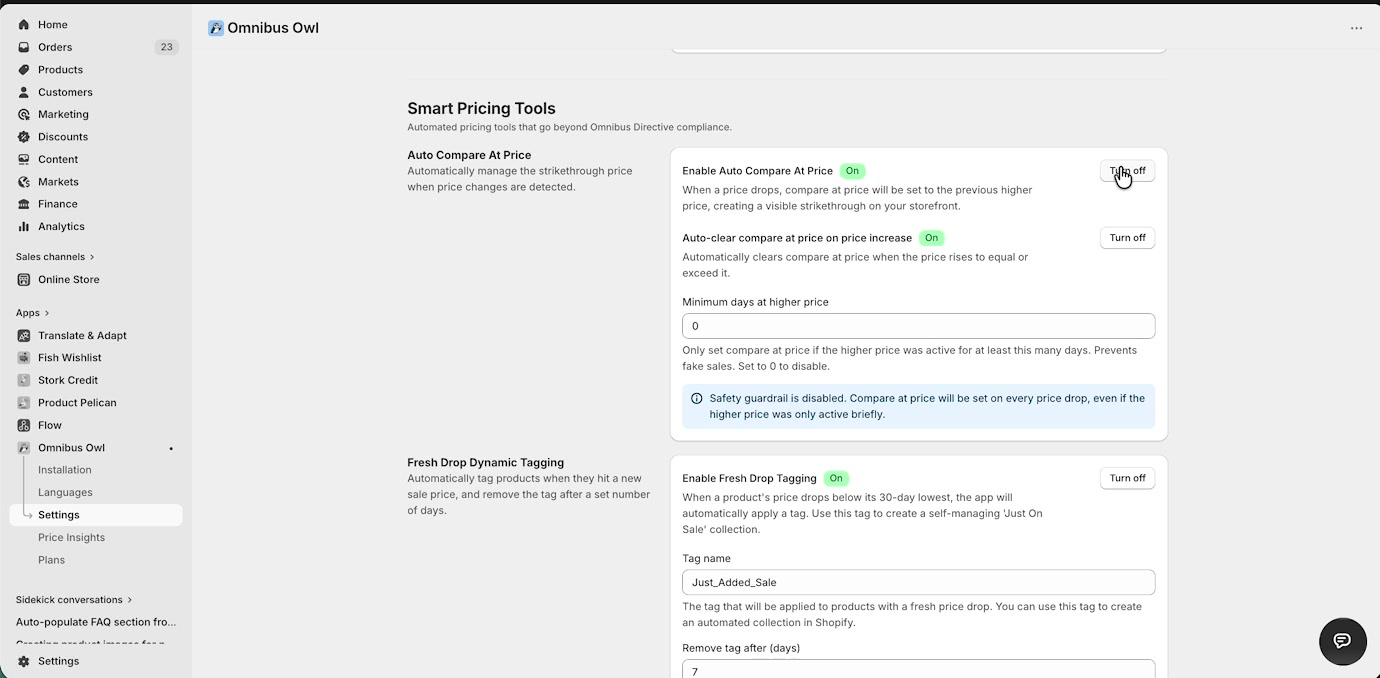
### Why these tools matter
A lot of compliance apps stop at “show the legal message.” Omnibus Owl keeps going. These features help your storefront look better, your collections stay fresher, and your sale operations require less manual admin work.
## 9. Auto Compare At Price
**Auto Compare At Price** is one of the standout features in Omnibus Owl.
### Enable Auto Compare At Price
When **Enable Auto Compare At Price** is on, the app automatically sets the **Compare at price** to the previous higher price when it detects a price drop.
That means your storefront can instantly show a visible strikethrough price without your team having to update the compare-at field by hand. It is simple, powerful, and honestly one of the most useful quality-of-life features in the app.
### Auto-clear compare at price on price increase
**Auto-clear compare at price on price increase** removes the compare-at price when the product price rises back to equal or exceed it.
This is excellent for keeping your storefront honest and tidy. You do not end up with stale compare-at prices hanging around after a sale ends.
### Minimum days at higher price
The **Minimum days at higher price** field acts as a safety guardrail.
- If you set it to **0**, the safety guardrail is effectively disabled.
- If you set a higher number, Omnibus Owl will only set a compare-at price if the earlier higher price was active for at least that many days.
This is a genuinely smart feature because it helps prevent weak or misleading strike-through pricing based on very short-lived price changes.
If **Minimum days at higher price** is set to **0**, the walkthrough note warns that compare-at price will be set on every price drop, even if the higher price was only active briefly. In short: if you want effortless sale presentation, this feature is fantastic. If you want extra caution, use the guardrail.
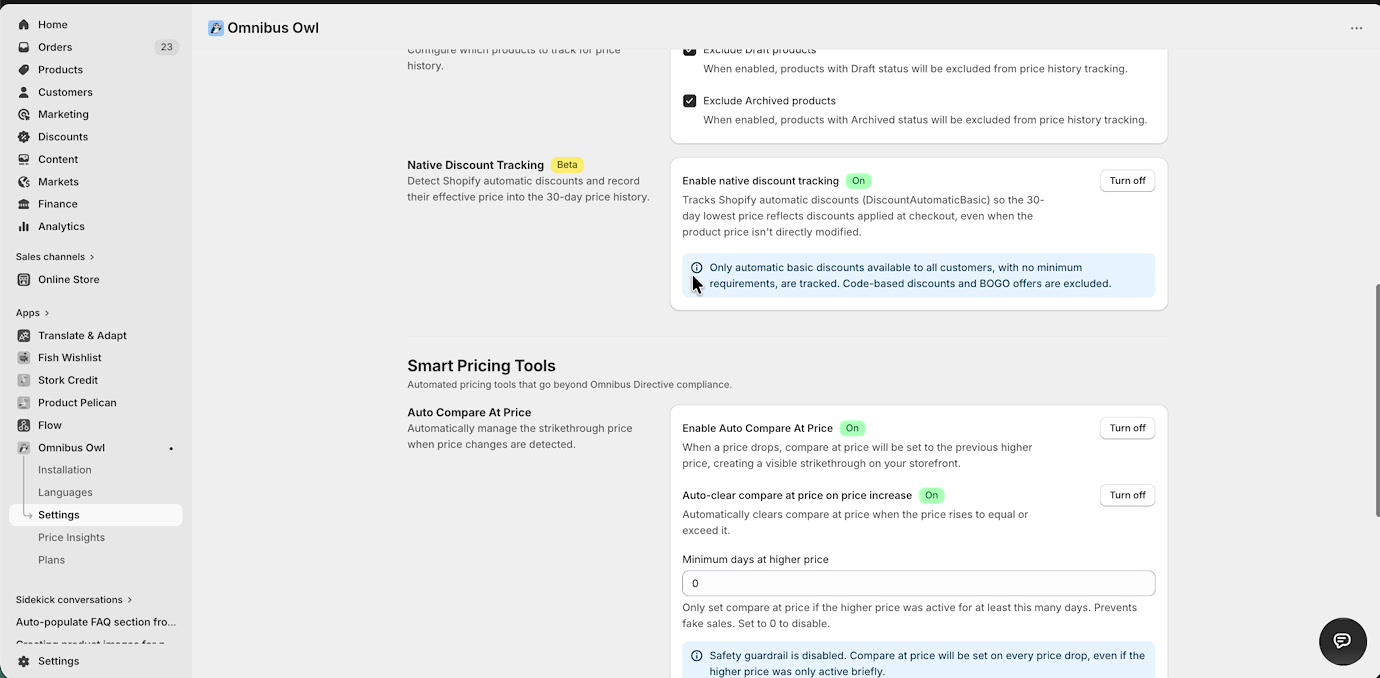
## 10. Fresh Drop Dynamic Tagging
**Fresh Drop Dynamic Tagging** is another standout. It turns price drops into an automatic tagging workflow you can actually build storefront experiences around.
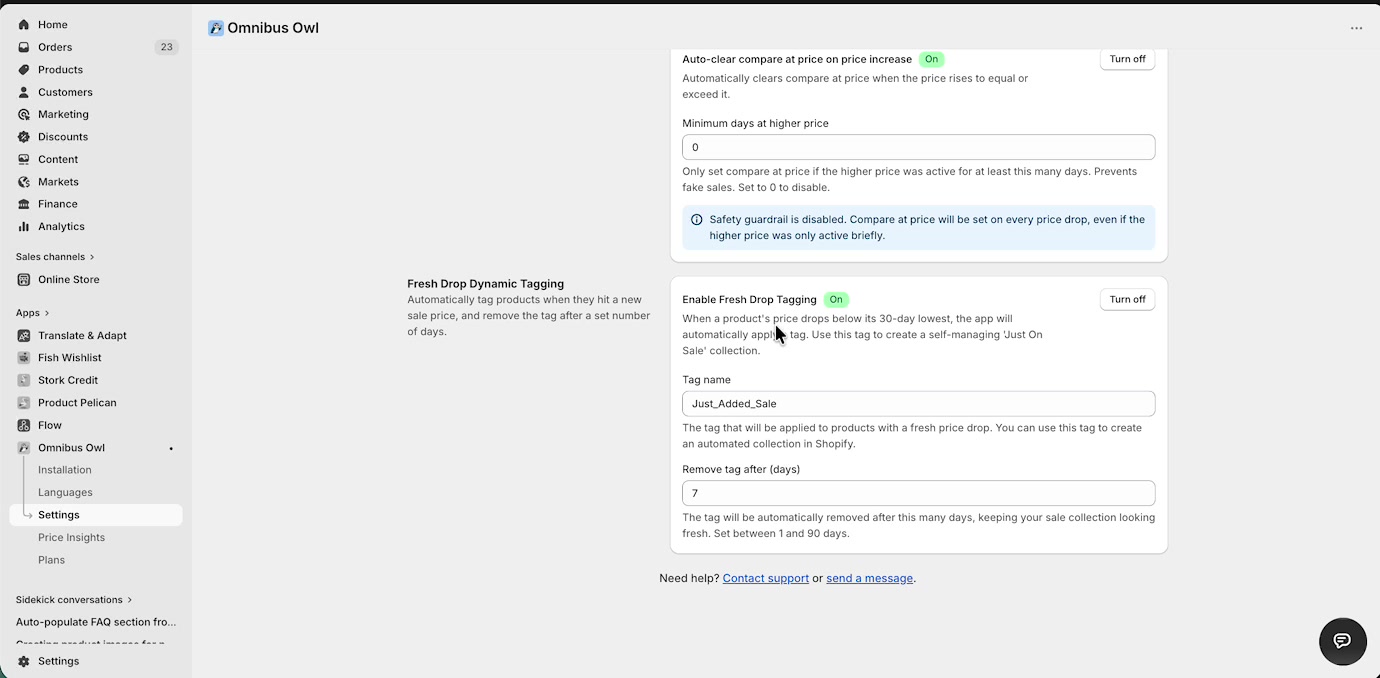
### Enable Fresh Drop Tagging
When **Enable Fresh Drop Tagging** is on, Omnibus Owl automatically tags a product when its price drops below its 30-day lowest.
This is brilliant because it turns a pricing event into something your store can use operationally.
### Tag name
The **Tag name** field controls which Shopify product tag gets applied. In the walkthrough, the example tag is `Just_Added_Sale`.
You can use that tag to power a self-updating collection, such as a **Just On Sale** collection, without manually tagging products one by one.
### Remove tag after (days)
The **Remove tag after (days)** field controls when the tag is automatically removed. The walkthrough shows a value of **7** days and notes that the accepted range is **1 to 90** days.
This is what makes the feature especially strong. It is not just auto-tagging. It is self-cleaning auto-tagging. Your “fresh sale” collection can stay truly fresh without manual maintenance.
If you run frequent promotions, this feature can quietly save your team a lot of repetitive merchandising work.
### Why merchants love this feature
- It creates instant sale merchandising opportunities.
- It reduces manual tagging work.
- It keeps time-sensitive collections accurate automatically.
- It makes Omnibus Owl useful even beyond legal compliance.
## 11. Price Insights
The walkthrough finishes on **Price Insights**, which is the reporting side of the app. This page helps you look back at what happened to a product over time and compare price changes against revenue patterns.
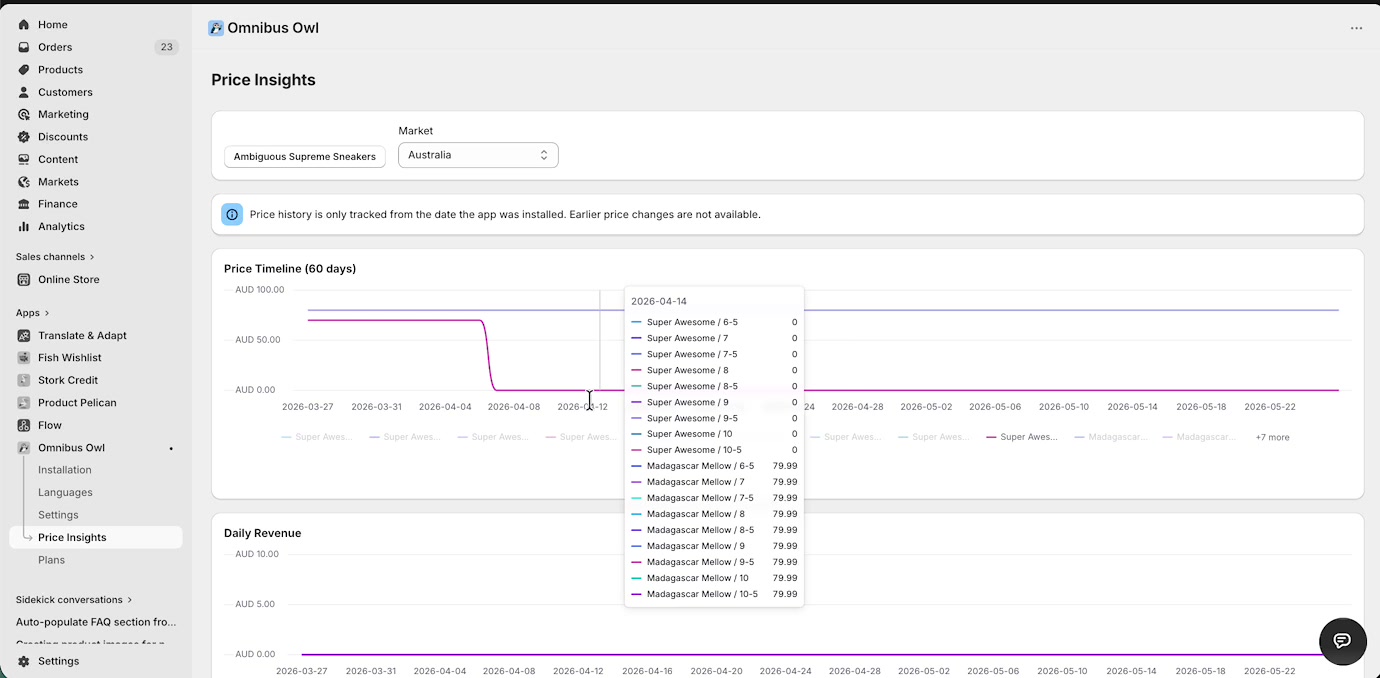
### How the screen works
- **Pick a Product:** Select the product you want to inspect.
- **Market:** Choose the relevant market, such as **Australia**.
- **Price Timeline:** Review how the product’s price changed over time.
- **Daily Revenue:** See revenue data underneath the pricing chart.
### Why Price Insights is useful
This screen helps you answer practical questions like:
- When did this price drop happen?
- Did the product stay at that price for long?
- What happened to revenue around the change?
- How did pricing look in a specific market?
That makes Price Insights more than a compliance record. It gives you a lightweight pricing review tool inside the same app.
The page notes that price history is only tracked from the date Omnibus Owl was installed, so earlier price changes are not available.
## Recommended setup order
If you are configuring Omnibus Owl for the first time, this is the cleanest order to follow:
Confirm **Price Monitoring** is active, your products are being monitored, and your theme components are installed under **App Blocks Status**.
Update the **Lowest price label** and **Info tooltip text** for each language you support.
Choose your **Max days to track**, decide whether to **Show only on discounted products**, and configure the **Date format**.
Enable **Exclude Draft products** and **Exclude Archived products** if you do not want inactive catalog states affecting your price history.
Use it if you rely on Shopify automatic discounts and want Omnibus Owl to reflect them in the recorded price history.
Turn on **Auto Compare At Price** and **Fresh Drop Dynamic Tagging** if you want Omnibus Owl to actively improve your storefront and collection workflows.
Use **Price Insights** to validate how pricing changes look over time and how they line up with revenue trends.
## Best-practice defaults
- Keep **Show only on discounted products** on for a clean storefront.
- Turn on **Show info tooltip** if you want a more shopper-friendly explanation.
- Exclude draft and archived products unless you have a specific reason not to.
- Use a non-zero value for **Minimum days at higher price** if you want safer compare-at behavior.
- Use **Fresh Drop Dynamic Tagging** with a dedicated collection to create a self-maintaining “Just On Sale” experience.
## Related pages
Understand what the dashboard shows and how to audit tracked products. Customize the widget label, tooltip text, and translations for each market. Install the storefront components if your widget is not showing yet. Place the lowest-price message manually in custom storefront locations.
## Final takeaway
Omnibus Owl absolutely covers the compliance basics, but the best part is that it does not stop there. Features like **Auto Compare At Price**, **Fresh Drop Dynamic Tagging**, and **Price Insights** make it a genuinely useful pricing operations tool as well.
That combination is what makes the app stand out: it helps you stay compliant, keep your storefront clean, and automate some of the most annoying sale-related admin work at the same time.
---
### Add Manual Price History Entries
**URL:** https://apps.nativeappco.com/manual-price-history-entries
## When to use manual price history entries
Omnibus Owl automatically tracks most product price changes, but some promotions do not create a standard tracked price change in Shopify. When that happens, you can add a manual entry so your storefront still reflects the correct lowest-price history for compliance and customer transparency.
This is especially useful for custom promotions that need to be represented in a product's price history even though they were not captured automatically.
Use manual entries only when you need to fill in a real pricing event that Omnibus Owl could not track automatically. They are designed to support accurate disclosures, not to replace normal price tracking.
## Where to add a manual price edit
Manual entries are added from the **Product Price History** block that appears alongside each product in your store.
In Omnibus Owl, you can first locate the product from the **Dashboard** using the **Search variants...** field. The dashboard also shows helpful columns like **Current Price**, **Lowest Price**, **Price Changes**, and **Status**, so you can confirm you are working on the correct item.
Omnibus Owl may also refer to this storefront disclosure as the **Price history** or lowest-price widget. The manual editing area shown in the product-side block is labeled **Price history** in the UI.
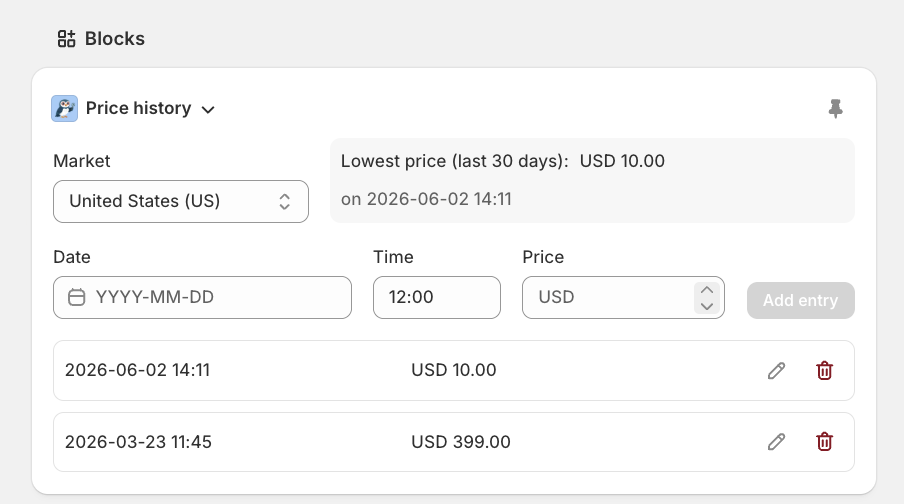
## Add entries from the admin Dashboard
You can also add a manual entry without leaving the app, straight from the **Dashboard**. Use the **Search variants...** field to find the variant, then click its row to open the **Price history** modal.
In the modal, choose the right **Market** at the top, then fill in the two fields and save:
- **Date & time** - the date and time the price took effect
- **Price** - the price for that moment, in the selected market currency
Click **Add entry** and the record appears in the list below, tagged **Manual** so it is easy to tell apart from automatically tracked changes. Each row has a trash icon if you need to remove it. To correct an entry, delete it and add a new one with the right values.
## Add a manual price history entry
Go to the product you want to update and find the **Price history** block shown alongside that product.
Use the **Market** dropdown to select the correct storefront market, such as **United States (US)**. Manual entries are market-specific, so make sure you are updating the same market customers will shop in.
At the top of the block, Omnibus Owl shows the current summary, such as **Lowest price (last 30 days)** and the date and time of that lowest price. Review this first so you understand how your manual entry may affect the displayed history.
Fill in the input fields:
- **Date & time** - the date and time the price took effect
- **Price** - the product price for that moment in the selected market currency
Select **Add entry** to save the manual price edit. The new row will appear in the list below the form with its timestamp and price.
## How the saved entry appears
After you click **Add entry**, the entry is listed in the history table underneath the form. Each row shows the recorded date and time on the left and the saved price on the right, and manually added rows carry a **Manual** tag.
If the new record becomes the lowest qualifying price in the last 30 days, your storefront lowest-price disclosure updates to reflect it.
If you are documenting a promotion that ran for a specific market only, always check the **Market** selector before saving. The same product can have different price histories across markets.
## Edit or remove an entry
To remove an entry that was added by mistake, find the row in the history list, click its trash icon, and confirm the removal so it no longer affects the product's displayed price history. To correct a wrong date, time, or price, delete the entry and add a new one with the right values.
Delete entries carefully. Removing a valid historical price record can change the **Lowest price (last 30 days)** shown to customers.
## Best practices for manual price edits
- Only add entries for real historical pricing events.
- Match the entry to the correct **Market**.
- Use the exact date and time the promotional price became active.
- Double-check the currency and amount before clicking **Add entry**.
- Review the updated lowest-price summary after saving.
## How this fits with automatic tracking
Manual entries are most useful for exceptions. Omnibus Owl still handles normal tracking in the background, and your main controls remain in the app navigation:
- **Dashboard** for auditing tracked products and using **Search variants...**
- **Settings** for rules like **Show only on discounted products**, **Include current price when calculating lowest price**, and **Show info tooltip**
- **Languages** for editing the storefront label and tooltip copy
- **Price Insights** for reviewing price timelines by product and **Market**
Omnibus Owl tracks price history from the date the app was installed. Manual entries help you maintain accurate records for cases the app could not capture automatically, but they do not reconstruct all historic data from before installation.
## Related pages
Use the dashboard to find products, review tracking status, and inspect recorded price changes. Control how the lowest-price widget behaves across your storefront. Customize the lowest-price label and info tooltip text shown to shoppers. Place the Omnibus Owl lowest-price message in custom storefront locations.
---
### Manual price history tag
**URL:** https://apps.nativeappco.com/manual-price-history-tag
## Manual price history tag
If you want to show the Omnibus Owl price history message somewhere other than the standard product block placement, you can manually add the tag to your Shopify theme.
This is useful when you want to show the lowest price message on collection pages, custom product cards, featured product sections, or anywhere else in your storefront layout.
You should already have Omnibus Owl installed and your theme setup completed. If you have not enabled the app yet, start with [Theme Installation](/theme-installation).
## What this tag does
Omnibus Owl provides a custom HTML element that loads the price history message for a specific product and variant:
```
```
When this tag is rendered on your storefront, Omnibus Owl replaces it with the correct lowest-price text and amount for that product variant.
## Before you start
- Make sure the **Omnibus App Embed** is turned on in the **Shopify Theme Editor**.
- Make sure you are editing the correct theme, especially if you have both a live theme and a draft theme.
- You need access to the product ID and variant ID for the item you want to show.
If the widget text needs to match your brand voice, update it in the app on the **Languages** page. You can change the **Main Label**, tooltip text, and date format there. See [Language Settings](/language-settings).
## Add the tag in your theme code
Use this method if you want to place the tag directly inside a Liquid template, snippet, or section.
In Shopify admin, go to **Online Store** > **Themes**. Find the theme you want to edit, click **...**, then click **Edit code**.
Open the file where you want the price history message to appear. On collection pages, this is usually the product card snippet or product grid item. On product pages, it may be the main product section or product information snippet.
Add the tag where you want the message to appear:
```
```
If you are inside a product card on a collection page, your theme may use a different product variable such as `card_product` or `item`. In that case, use that variable instead.
Click **Save**, then preview the theme. Visit a product page or collection page where you added the tag and confirm the price history message appears.
## Add the tag in a Custom Liquid block
Use this method if your theme supports a **Custom Liquid** block in the Shopify Theme Editor.
In Shopify admin, go to **Online Store** > **Themes**, then click **Customize** on the theme you want to edit.
Navigate to the template where you want the message to appear. This could be a product template, featured product section, or another area of your storefront that supports Liquid blocks.
Click **Add block** and choose **Custom Liquid**.
Paste this code into the block:
```
```
Click **Save**, then preview the storefront to make sure the widget appears in the right place.
## Collection page example
If you want to show the lowest price message inside each product card on a collection page, place the tag inside the snippet or section that renders each card.
A common pattern looks like this:
```
```
The exact Liquid variable depends on your theme. Some themes use `product`, others use names like `card_product`, `collection_product`, or `item`.
The tag must receive a real product ID and variant ID for the product being rendered. If the wrong variable is used, the price history message will not load correctly.
## How to find the right product and variant values
In most cases, you should use Liquid variables from the theme instead of hardcoded IDs. That keeps the tag dynamic so it works for every product on the page.
## When the widget appears
By default, Omnibus Owl only shows the price history on products that are actively on sale. If you do not see anything on the storefront, the app may be working as expected.
You can review your app behavior and tracked products from the **Dashboard**, including product search and price history timelines. See [Dashboard Screen](/dashboard-screen).
Omnibus Owl tracks price changes from the time the app is installed. It cannot show price history from before installation.
## Troubleshooting
### The tag shows nothing
- Check that the **Omnibus app embed** is enabled.
- Confirm the product is currently on sale if your store is using the default display behavior.
- Check that the product ID and variant ID are being passed correctly.
- Make sure you saved the theme and are previewing the same theme you edited.
### The message appears on the wrong product
- Your collection card may be using a different Liquid variable than `product`.
- Update the code to use the variable used by that snippet, such as `card_product`.
### The text needs to be changed
- Open the app and go to the **Languages** page.
- Edit the **Main Label** or tooltip text.
## Related pages
Enable the app embed and install the standard storefront widget.
Customize the widget label, tooltip text, and translations.
Review tracked products and inspect individual price history timelines.
---
# Fish Wishlist Docs
## Getting Started
### App Configuration
**URL:** https://apps.nativeappco.com/app-configuration
Open Fish Wishlist in Shopify Admin and go to **Settings**. You can change these settings at any time.
## Wishlist Icon
Choose how the wishlist button looks on your store:
- **Heart** — default
- **Bookmark**
- **Custom SVG** — upload separate icons for the empty state and added state (24 x 24px)
## Wishlist Display
- **Layout** — show the wishlist drawer as a vertical list or a two-column grid
- **Currency codes** — choose whether currency codes display next to prices
- **Wishlist name** — rename "Wishlist" to anything you like (e.g. "Saved Items", "Favourites", "Requisition List"). See [Copy & Translations](/copy-and-translations) for full language options.
## Guest Wishlists
Allow customers to add items to a wishlist without logging in first.
- **On** — customers can start saving immediately. When they log in, their wishlist data syncs to their Shopify customer account automatically.
- **Off** — forces account creation upfront. All wishlist data goes straight into the customer's Shopify profile.
## Multiple Wishlists
Let customers create and name up to 15 wishlists each. All lists are stored as individual metafields within the customer profile in Shopify.
- Admin teams can view and edit any customer's wishlist directly from the Shopify backend
- All data is stored at the **product variant level** — this means it syncs cleanly with other platforms and enables features like price drop alerts and back-in-stock notifications
## Recently Purchased Products
When enabled, Fish Wishlist automatically captures products from completed orders and stores them in a dedicated wishlist slot (`wishlist_11`) on the customer's profile.
Use this to:
- Surface a "Buy Again" section on your homepage or account page using the [Wishlist Page Section](/wishlist-section-on-any-page)
- Trigger re-purchase email campaigns via Shopify Flow
## Abandoned Cart
When a customer abandons their cart, Fish Wishlist uses a Shopify webhook to capture those products and store them in a dedicated wishlist slot — automatically.
Use this to:
- Show abandoned products in the wishlist drawer when the customer returns
- Surface them on a dedicated recovery page using the [Wishlist Page Section](/wishlist-section-on-any-page)
## Wishlist Sharing
Allow customers to generate a shareable link to their wishlist. Shared wishlists are stored as **Shopify Metaobjects**, meaning you can view and edit them directly from Shopify Admin under **Content > Metaobjects**.
- Customers must be signed in to share
- Use this for gift registries, or create curated influencer/celebrity wishlists by editing the metaobject in Shopify admin
See [Wishlist Sharing](/wishlist-sharing) for full setup details.
## Integrations
Enable one-click integrations directly from the settings page:
- **GA4** — wishlist events flow into Google Analytics 4 automatically
- **Meta** — wishlist add/remove events sent to Meta for retargeting and audience building
For Klaviyo and other email platforms, see [Email Marketing via Shopify Flow](/shopify-flow-email-marketing).
## Marketing Opt-ins
Display email and/or SMS marketing opt-in checkboxes on the wishlist. Useful if you're using the wishlist as part of an account creation or sign-up flow — you capture consent at exactly the right moment.
## Tag Actions
Tag Actions let you control how specific wishlist elements behave based on product tags — without touching your theme code.
See [Tag Actions](/tag-actions) for full documentation.
## CSS Selectors
Use CSS selectors to define where wishlist icons are automatically injected on your site. Most useful for header icon placement. See [Header Button](/header-button) for details.
## Button Classes
Tell Fish Wishlist to use your theme's existing button CSS classes instead of its own default styles — keeps everything on-brand without stylesheet conflicts.
## Custom CSS Editor
Add minor CSS overrides directly in the app. Useful for small tweaks specific to the wishlist without modifying your theme files.
---
### Add Wishlist Button to Product Page
**URL:** https://apps.nativeappco.com/add-wishlist-button-to-product-page
### Installation Options
#### **Option 1: Using App Blocks (Recommended for Compatible Themes)**
If your theme supports Shopify's app blocks, this is the most straightforward and recommended method. App blocks allow for easy integration and management of app-related functionalities directly within the theme customizer.
For detailed instructions on adding app blocks to your product page, please refer to our dedicated guide:
[Add App Blocks to Your Theme - Add Button to Product Page](https://wishlist.nativeappco.com/install-and-setup/theme-setup/add-app-blocks-to-your-theme#add-app-block-to-product-template-s)
#### **Option 2: Manual HTML Element Integration**
Consider manual setup for the following scenarios:
- **Adding to older themes that don't support app blocks:** For themes that predate or do not fully support Shopify's app block functionality.
- **You prefer to add the code to your theme yourself:** For developers or users who want direct control over their theme's code.
You can manually add the "Add to Wishlist" button anywhere on your site by inserting the following HTML element directly into your theme's Liquid files.
This method provides full flexibility in terms of button placement.
**HTML:**
```html
```
**Customizing the Text:**
Regardless of whether you are using App Blocks or manual setup, you can modify the text for your wishlist button in [Language Settings](https://admin.shopify.com/store/fish-wishlist/apps/fish-wishlist/app/languages). If you don't want to display any text, you can remove the text from this page.
.png)
---
### Add app blocks to your theme
**URL:** https://apps.nativeappco.com/add-app-blocks-to-your-theme
## **Instructions**
{% stepper %}
{% step %}
### Open theme editor
In Shopify Admin, navigate to Online Store -> [Themes](https://admin.shopify.com/themes) -> Customise Theme
{% endstep %}
{% step %}
### Add app block to header
- Within your theme editor, expand your ' **Header** ' section
- Click to 'Add block' in your ' **Header** ' section
- Select ' **Apps** ' -> **'Open wishlist button'** block

{% endstep %}
{% step %}
### Configure header app block settings
- Within the ' **Open wishlists button** ' app block you can configure settings to customise the styling as per your needs.
- *Learn more about the available settings* *here* *.*

{% endstep %}
{% step %}
### Add app block to product template/s
- Within your theme editor, navigate to your **Default Product** template
- Click to 'Add block' in your ' **Product Information** ' section
- *This section may have different name depending on your theme*
- Select ' **Apps** ' -> ' **Add To List Button PDP'** block **.**

- Drag and drop the block within your product section to position it as required.
{% endstep %}
{% step %}
### Configure product app block settings
- Within the ' **Add to list button PDP** ' app block you can configure settings to customise the styling as per your needs.
- *Learn more about the available settings* *here* *.*

{% endstep %}
{% step %}
### Repeat steps 4 & 5 for any other product templates
If your theme is running multiple product templates, you'll need to repeat steps 4 & 5 (above) for any other product templates you use.
{% endstep %}
{% endstepper %}
---
### Migrating from another Wishlist App
**URL:** https://apps.nativeappco.com/migrating-from-another-wishlist-app
#### Supported Apps
We can assist with migrations from most major Shopify wishlist apps, including:
- Swym
- Growave
- Smart Wishlist
- Wishlist Plus
#### How to Migrate
1. Export your data: From your previous app's dashboard, export your wishlist data as a CSV file. Depending on the app, you may need to contact their support team to get an export.
2. Ensure Customer Emails are included: For the best results, ensure your export includes the `Customer Email`, `Product Handle`, and `Variant ID`.
3. Send it to us: Email your CSV file to [support@nativeappco.com](mailto:support@nativeappco.com)
4. We handle the rest: Our team will format the data and import it directly into your Shopify Customer Metafields.
> Note: Because Fish Wishlist uses native Shopify Metafields, once your data is migrated, you "own" it forever—even if you decide to change wishlist apps later. You can export your wishlist data using an app such as Matrixify.
---
### Enable app embeds
**URL:** https://apps.nativeappco.com/enable-app-embeds
## **Instructions**
{% stepper %}
{% step %}
### Open theme editor
In Shopify Admin, navigate to Online Store -> [Themes](https://admin.shopify.com/themes) -> Customise Theme
{% endstep %}
{% step %}
### Enable our Fish Wishlist app embeds
- Within your theme editor, go to your **App Embeds**
- Then enable our three App Embeds:
- **Add to Wishlist Drawer**: This drawer is shown when adding a variable product to wishlist, and/or when selecting which wishlist to add to.
- **Wishlist:** This adds all the core Wishlist Functionality to your site.
- **Wishlist Drawer:** This drawer is shown when viewing your wishlist/s.
.png)
Theme Editor App Embeds
{% endstep %}
{% endstepper %}
---
### Add "Open Wishlist" Button to Your Site
**URL:** https://apps.nativeappco.com/add-open-wishlist-button-to-your-site
### When to Use Manual Setup
Consider manual setup for the following scenarios:
- **Adding a second button to your mobile menu:** If you need more than one wishlist button, for example, one in your header and another specifically for mobile navigation.
- **Adding to older themes that don't support app blocks:** For themes that predate or do not fully support Shopify's app block functionality.
- **You prefer to add the code to your theme yourself:** For developers or users who want direct control over their theme's code.
You can manually add the "Open Wishlist" button anywhere on your site by inserting the following HTML element directly into your theme's Liquid files (e.g., `header.liquid`, `footer.liquid`, or any relevant section files).
This method provides full flexibility in terms of button placement.
**HTML:**
```
```
**Customizing the Icon:**
In the snippet above, the `