
Add Manual Price History Entries
When to use manual price history entries
Omnibus Owl automatically tracks most product price changes, but some promotions do not create a standard tracked price change in Shopify. When that happens, you can add a manual entry so your storefront still reflects the correct lowest-price history for compliance and customer transparency.
This is especially useful for custom promotions that need to be represented in a product's price history even though they were not captured automatically.
Where to add a manual price edit
Manual entries are added from the Product Price History block that appears alongside each product in your store.
In Omnibus Owl, you can first locate the product from the Dashboard using the Search variants... field. The dashboard also shows helpful columns like Current Price, Lowest Price, Price Changes, and Status, so you can confirm you are working on the correct item.
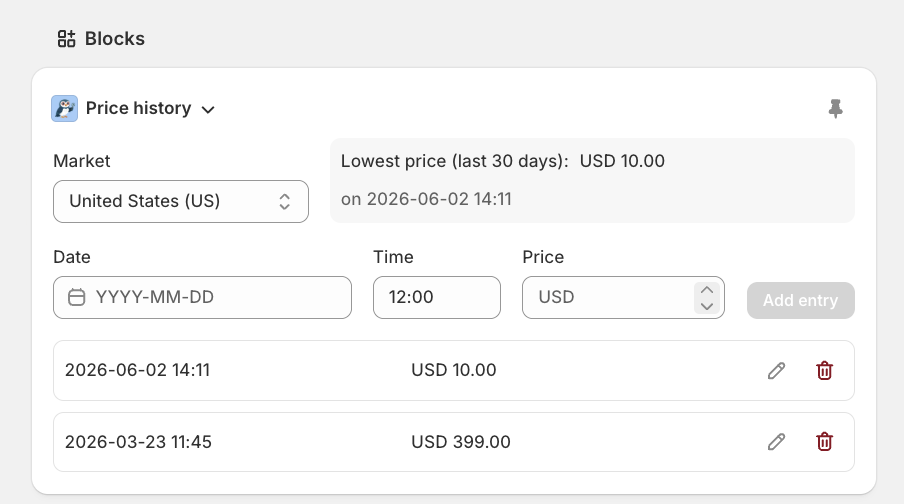
Add a manual price history entry
Go to the product you want to update and find the Price history block shown alongside that product.
Use the Market dropdown to select the correct storefront market, such as United States (US). Manual entries are market-specific, so make sure you are updating the same market customers will shop in.
At the top of the block, Omnibus Owl shows the current summary, such as Lowest price (last 30 days) and the date and time of that lowest price. Review this first so you understand how your manual entry may affect the displayed history.
Fill in the three input fields:
- Date — enter the date of the price event
- Time — enter the time the price took effect
- Price — enter the product price for that moment in the selected market currency
Select Add entry to save the manual price edit. The new row will appear in the list below the form with its timestamp and price.
How the saved entry appears
After you click Add entry, the entry is listed in the history table underneath the form. Each row shows the recorded date and time on the left and the saved price on the right.
If the new record becomes the lowest qualifying price in the last 30 days, the summary at the top of the block updates to reflect it.
Edit an existing manual entry
If you entered the wrong date, time, or price, you can update the record directly from the same block.
Locate the saved row you want to change in the history list.
Select the pencil icon on that row.
Correct the Date, Time, or Price values as needed.
Confirm the update in the block so the corrected value appears in the price history list.
Delete a manual entry
If a manual entry was added by mistake, you can remove it from the same list.
Locate the row you want to remove.
Select the trash icon on that row.
Remove the entry so it no longer affects the product's displayed price history.
Best practices for manual price edits
- Only add entries for real historical pricing events.
- Match the entry to the correct Market.
- Use the exact date and time the promotional price became active.
- Double-check the currency and amount before clicking Add entry.
- Review the updated lowest-price summary after saving.
How this fits with automatic tracking
Manual entries are most useful for exceptions. Omnibus Owl still handles normal tracking in the background, and your main controls remain in the app navigation:
- Dashboard for auditing tracked products and using Search variants...
- Settings for rules like Show only on discounted products, Include current price when calculating lowest price, and Show info tooltip
- Languages for editing the storefront label and tooltip copy
- Price Insights for reviewing price timelines by product and Market