
Product Stitching
Automate related product links with Product Stitching
Product Stitching lets you automatically group related products and write those relationships into a product metafield. You can use it for alternate colour options, complementary products, and merchandising experiences like Pair it With or Complete the set.
In Product Pelican, stitching rules match products using either SKU or Title. Matching is driven by a Regex pattern, which extracts a shared value from each product so matching items can be grouped together.
Product Stitching sits in the left navigation under Product Pelican as Stitching, alongside Dashboard, Product FAQ, AI Prompts, Settings, and Plans.
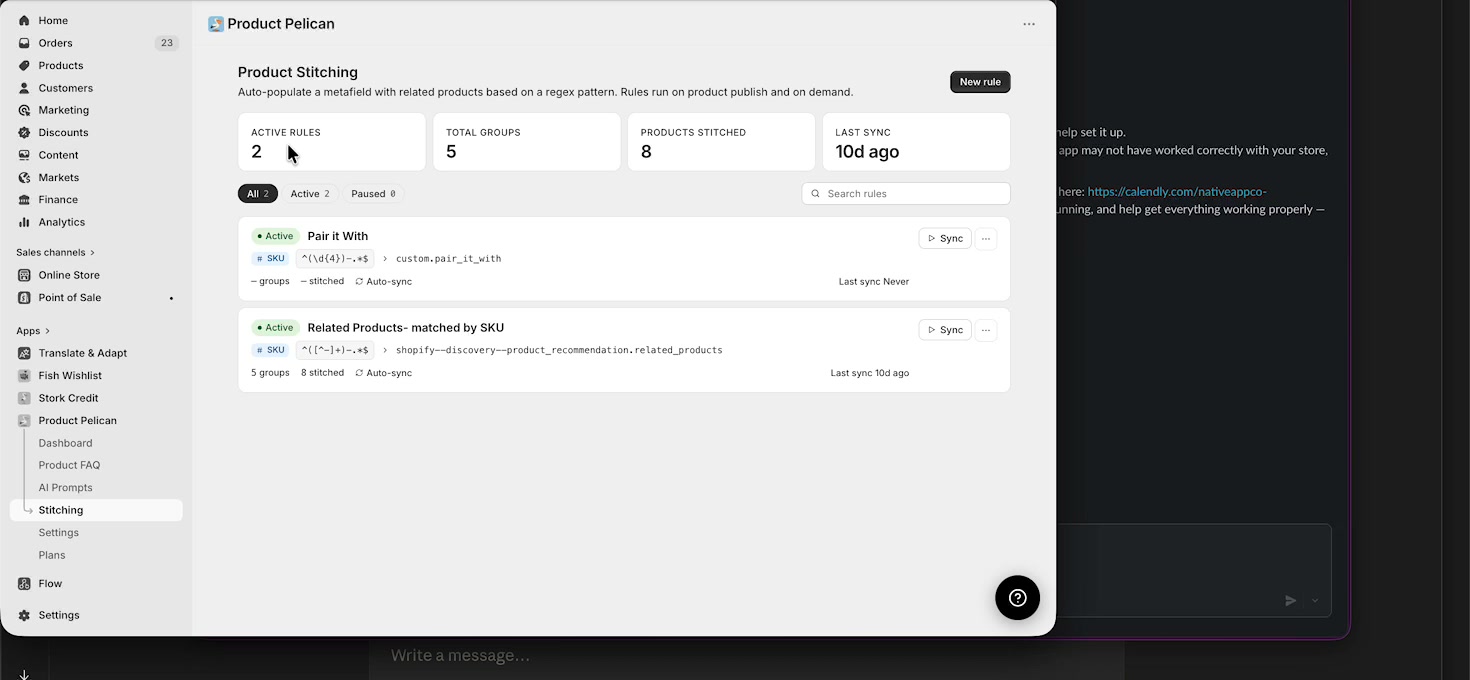
Start on the Product Stitching dashboard
The main Product Stitching page gives you a quick view of how your rules are performing. At the top of the screen, the dashboard shows:
Active Rules
Total Groups
Products Stitched
Last Sync
Below the totals, you can filter the list using All, Active, and Paused, and narrow the list with Search rules.
Each rule card shows the rule name, its status such as Active, the match source such as SKU, the regex pattern, the target metafield, the group and stitched counts, whether Auto-sync is enabled, and a Sync action for running the rule.
If you plan to build several stitching rules, start by deciding which product relationship each target metafield should power. For example, keep alternate colours, complementary products, and set-building rules separate so each one writes to the right metafield. You can't create multiple stitching rules that right to the same metafield.
Open a rule to review how it works
Select a rule to open its detail page. The walkthrough opens Pair it With, which shows the full setup and sync tools for that rule.
The rule page is split into clear sections:
RULE for the current setup
STATS for stitched counts and sync timing
GROUPS for the matched product groups
DRY RUN for testing the rule before writing metafields
RECENT ACTIVITY for the latest events
At the top-right of the page, the available actions are Delete, Pause, Edit rule, and Bulk sync.
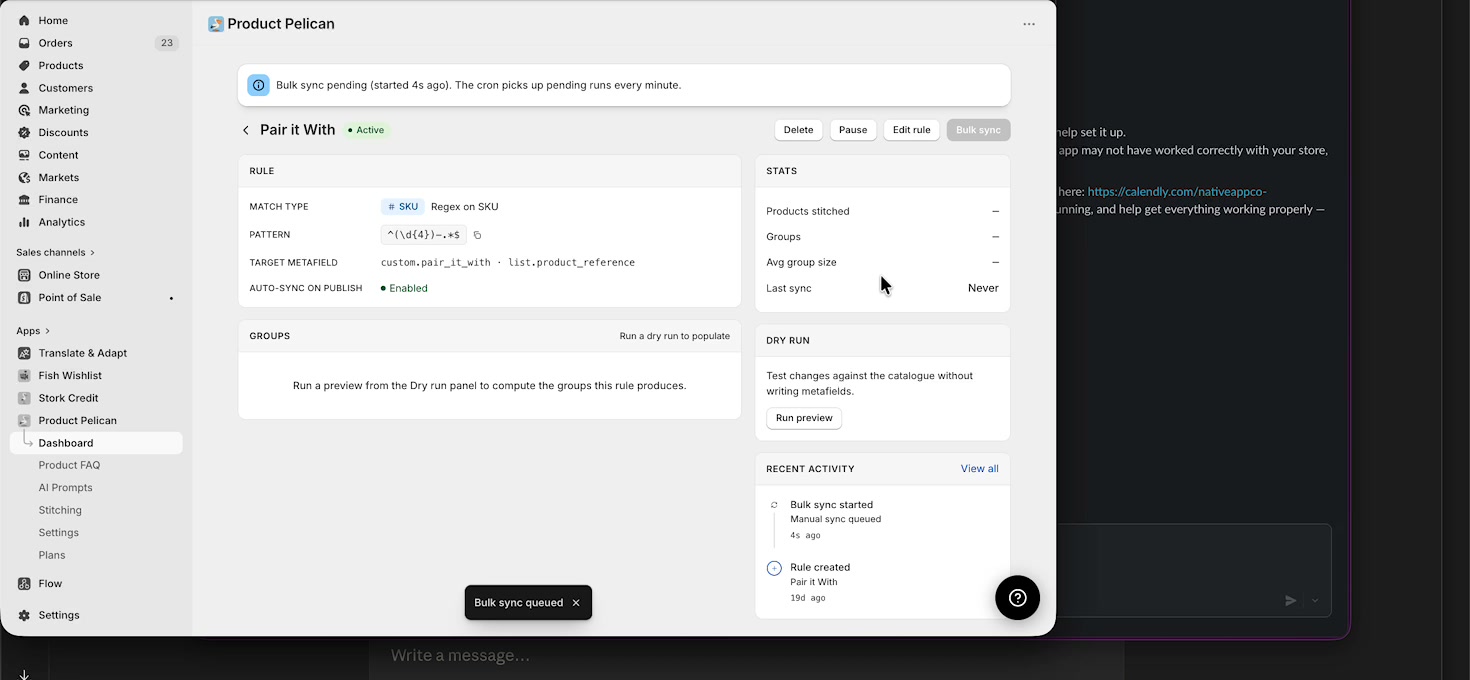
What the rule page shows
In the RULE section, Product Pelican displays:
Match type, such as SKU or Regex on SKU
Pattern
Target metafield
Auto-sync on publish
The STATS panel shows values such as:
Products stitched
Groups
Avg group size
Last sync
The DRY RUN panel includes Run preview, which lets you test changes against the catalogue without writing metafields yet.
Use Run preview before a live sync whenever you change the regex pattern or swap the target metafield. It is the safest way to confirm which products will be grouped.
Edit the rule settings
From the rule detail page, click Edit rule to update how the rule matches products and where it writes the result.
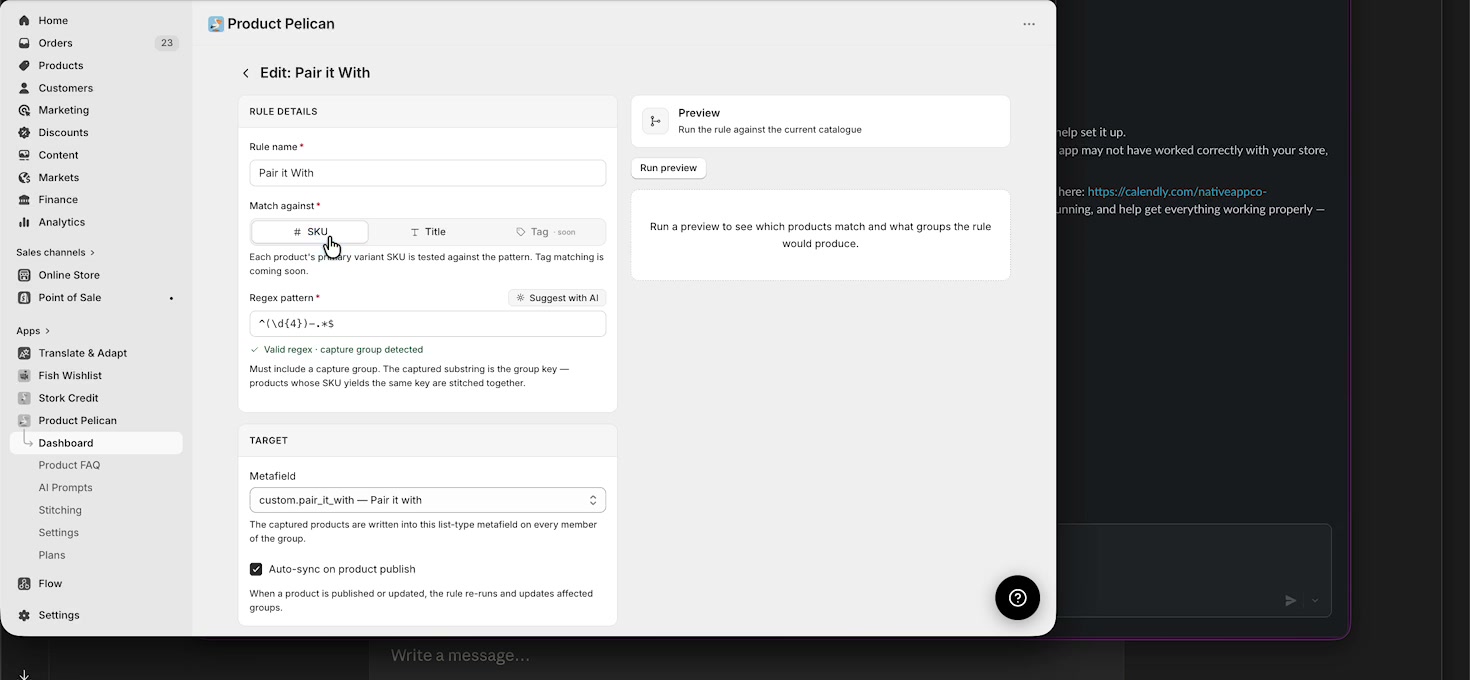
The edit screen includes two main sections: RULE DETAILS and TARGET.
Rule Details
In RULE DETAILS, you can set:
Rule name
Match against
Regex pattern
For Match against, the walkthrough shows these options:
SKU
Title
Tag soon
When matching by SKU, Product Pelican tests each product's primary variant SKU against your regex. When matching by title, it uses the product title instead.
Next to Regex pattern, there is a Suggest with AI button. The screen also validates the pattern and shows confirmation such as Valid regex - capture group detected.
Your regex must include a capture group. Product Pelican uses the captured value as the group key, and products with the same key are stitched together.
Target
In the TARGET section, use the Metafield dropdown to choose where the stitched product list should be written. The walkthrough shows targets including custom metafields and Shopify product recommendation metafields.
You can also enable Auto-sync on product publish so the rule reruns when a product is published or updated.
Choosing a regex pattern
The right regex depends on how your catalogue is structured. A good pattern removes the part of the SKU or title that changes between related products and keeps the part they share.
Common examples include:
Removing a colour name from product titles so different colour variants group together
Matching products using the number that appears before the first hyphen in the SKU
Extracting a shared style code from the start of the SKU
If you need help writing a regex, use an AI tool such as Gemini or ChatGPT and describe exactly what you want. For example: remove the colour name from my product titles using regex or match products using the number that appears before the first hyphen in the SKU.
Save the updated rule
After choosing the correct target metafield and confirming the regex, click Save changes.
The walkthrough shows the rule being updated from a custom target to a Shopify recommendations target, then saved using Save changes at the bottom of the page.
If you do not want to keep the edits, use Cancel.
Preview and sync the rule
Once the rule is saved, return to the rule detail page and test it. Product Pelican supports both a preview and a live sync:
Run preview in the DRY RUN panel to see what the rule would produce
Bulk sync to write the stitched relationships to the selected metafield
When a sync is queued, the page can show a status banner such as Bulk sync pending, explaining that the cron picks up pending runs every minute.
Review the sync results
After the sync completes, the rule page updates with live stats and the generated groups.
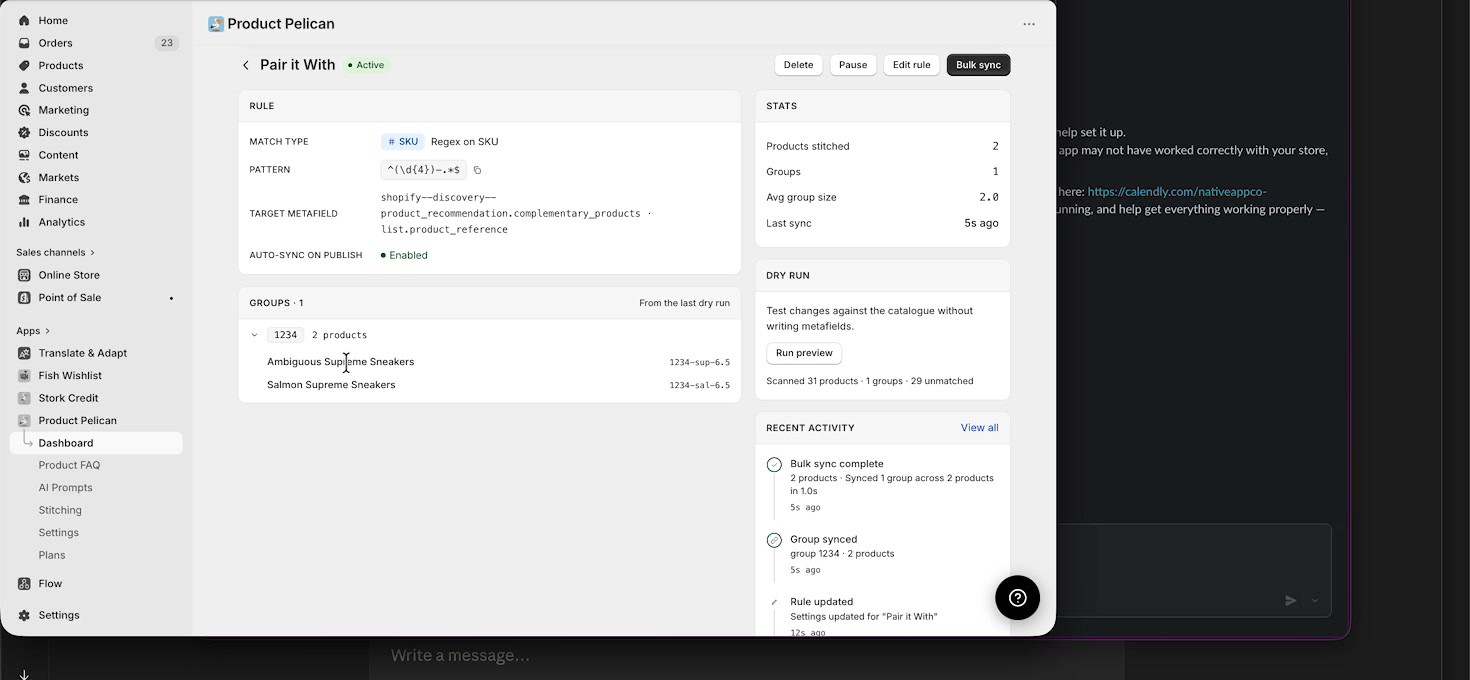
If the group looks too broad or too narrow, go back to Edit rule, adjust the Regex pattern, run another preview, and sync again.
Check the rule logs
For a fuller event history, open the logs view for the rule. In the walkthrough, the page title is Logs: Pair it With.
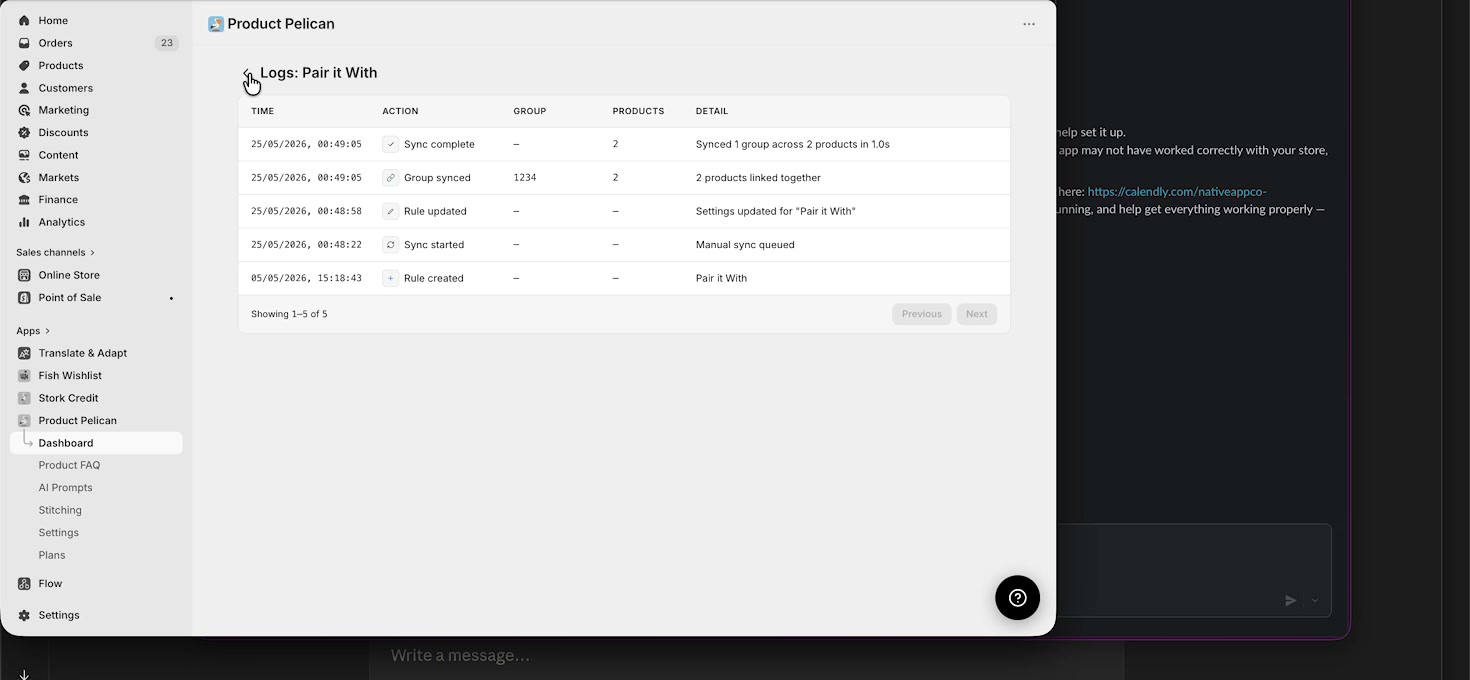
The logs table includes these columns:
TIME
ACTION
GROUP
PRODUCTS
DETAIL
Typical events include:
Sync complete
Group synced
Rule updated
Sync started
Rule created
Use this screen to confirm what happened during a run, when it happened, and how many products were affected.
Typical Product Stitching workflow
In the Shopify admin, go to Product Pelican and select Stitching.
Use the Product Stitching dashboard to check Active Rules, Total Groups, Products Stitched, and Last Sync.
Select an existing rule such as Pair it With, or click New rule to create a new one.
Set Match against to SKU or Title, then enter a Regex pattern with a capture group.
In TARGET, pick the Metafield that should store the stitched product list.
Use Run preview in DRY RUN to confirm the groups the rule will create.
Click Save changes, then run Bulk sync or Sync to write the relationships.
Check STATS, inspect the GROUPS section, and review the Logs page for the full event history.
Best practices for cleaner matches
Use SKU matching when your catalogue has consistent SKU structure.
Use Title matching when titles are more reliable than SKUs.
Keep one rule focused on one relationship type, such as alternate colours or complementary products.
Always test with Run preview before a live sync after changing the pattern.
Review unmatched product counts after a dry run to spot gaps in your regex.
If you point a rule at the wrong target metafield, the stitched relationships may show in the wrong storefront feature. Double-check the Metafield before saving.