
Every Omnibus Owl Feature
Omnibus Owl at a glance
Omnibus Owl is not just a compliance tool. Yes, it helps you meet Omnibus pricing requirements and show the right lowest-price message on your storefront, but it also gives you genuinely useful merchandising tools that can save time and make your sale strategy sharper.
This walkthrough follows the natural flow of the app, starting from the main dashboard and moving through Languages, Settings, and Price Insights. Along the way, you will see where Omnibus Owl handles the essentials quietly in the background, and where it goes further with smart automation like Auto Compare At Price and Fresh Drop Dynamic Tagging.
1. Dashboard
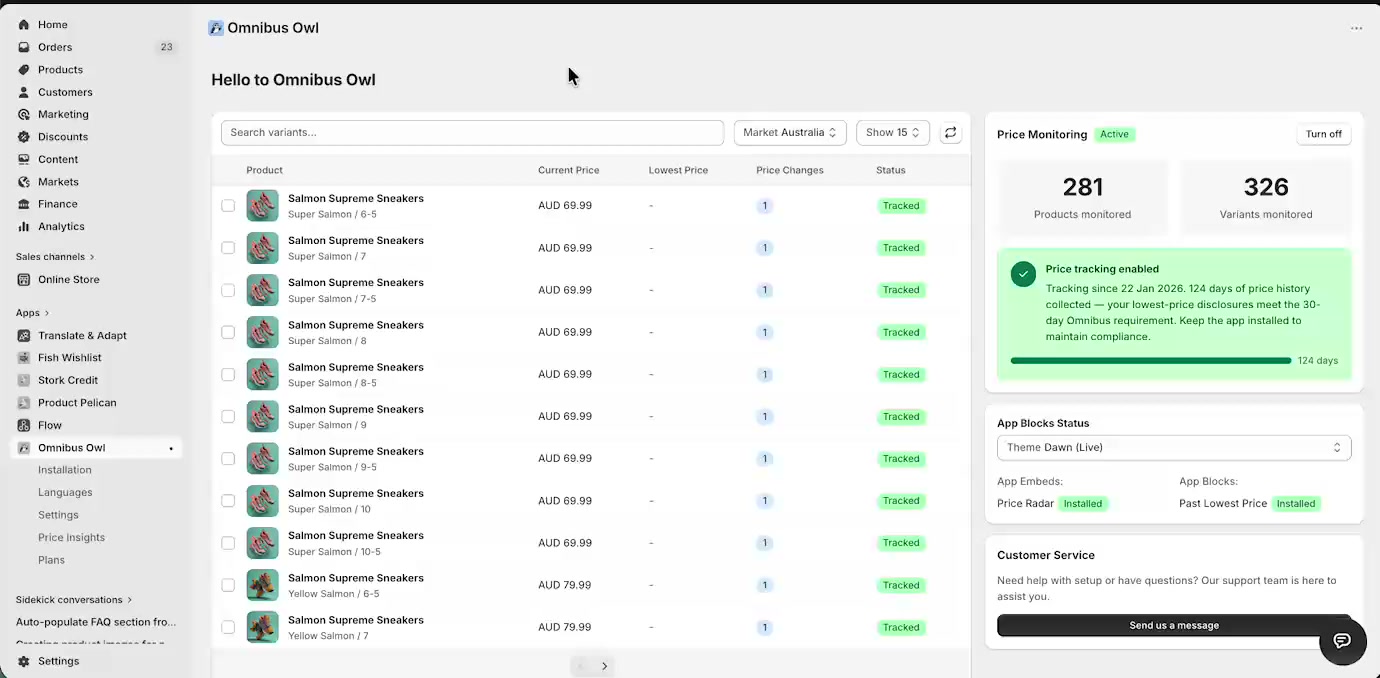
The Dashboard is your control center. It gives you an immediate read on whether price tracking is active, how many products are being monitored, and whether your theme setup is in good shape.
What you can see here
Tracked products list: Search variants using the Search variants... field, then review columns such as Product, Current Price, Lowest Price, Price Changes, and Status.
Price Monitoring: The Price Monitoring panel shows whether tracking is active and how many Products monitored and Variants monitored are currently covered.
Tracking age: The status card confirms how long the app has been collecting price history. This matters because Omnibus Owl starts tracking from installation onward.
App Blocks Status: This panel helps you confirm the storefront pieces are installed. In the walkthrough, the theme shows App Embeds: Price Radar and App Blocks: Past Lowest Price as installed.
Customer Service: The Send us a message button is available right from the dashboard if you need help.
Why the dashboard matters
This screen is where you quickly confirm that the app is doing its job. If you want a fast answer to “Are we tracking correctly?” or “Is the widget actually installed on this theme?”, this is where to look first.
2. Languages and widget translations
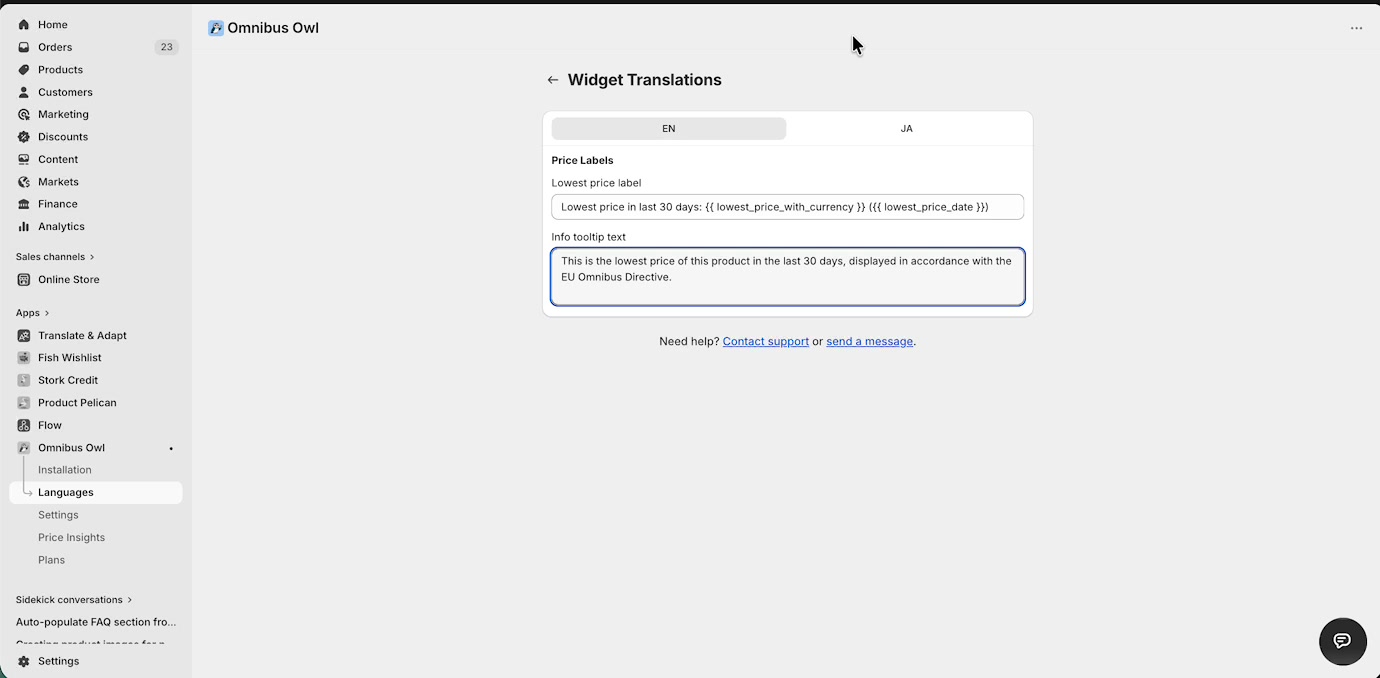
Next in the walkthrough is Languages. This page controls the customer-facing text for the lowest-price widget, and it is one of the easiest ways to make the app feel native to your storefront instead of looking like a generic compliance add-on.
What you can edit on the Widget Translations page
Lowest price label: This is the storefront line that appears next to the price history information. In the walkthrough, it uses variables such as the lowest price and date.
Info tooltip text: If you enable the tooltip in settings, this is the explanatory text customers will see when they hover over or tap the info icon.
Multiple languages: The screen shows language tabs such as EN and JA, so you can tailor the widget copy by market and language.
Why this feature is better than a basic legal label
This is where Omnibus Owl starts to feel polished. Instead of forcing one rigid compliance message, it lets you keep the wording clear, branded, and market-specific. That means your store can stay compliant without sounding robotic.
3. Settings overview
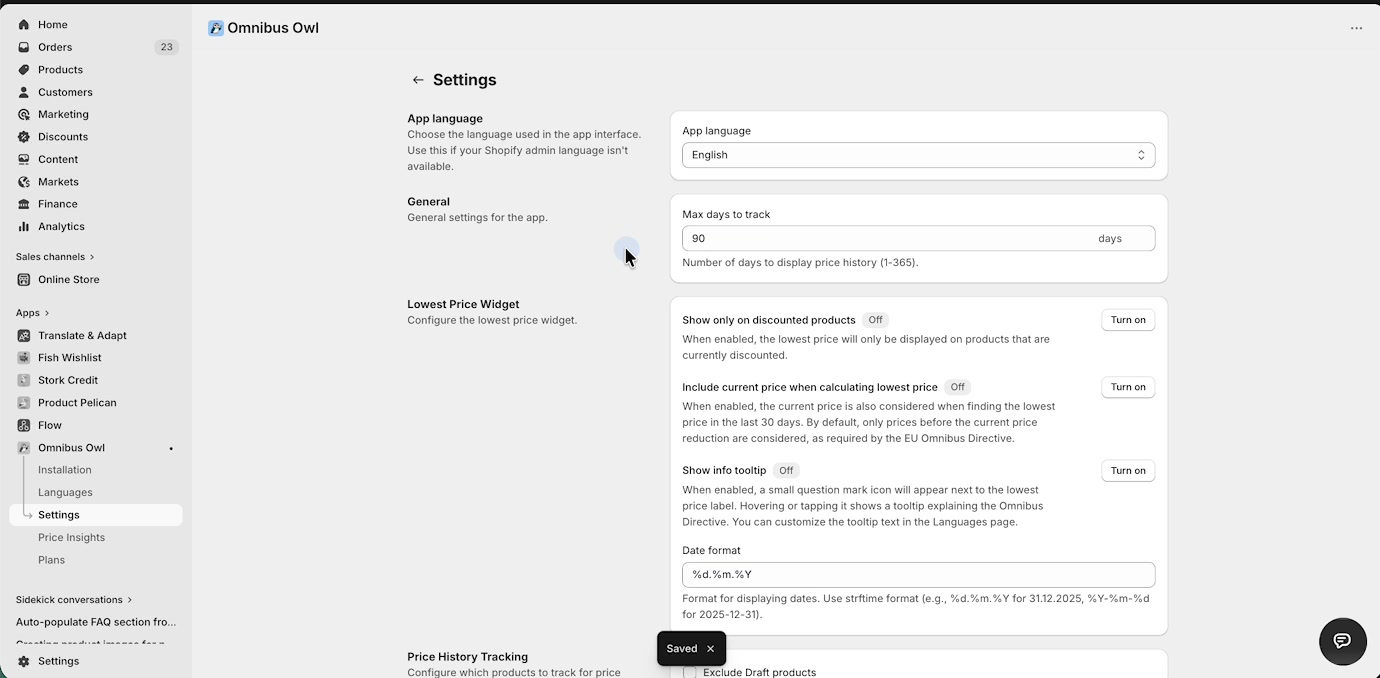
The Settings page is where the app opens up. It includes core configuration for the app interface, storefront display rules, price history collection, native discount tracking, and the Smart Pricing Tools that turn Omnibus Owl into more than just a disclosure widget.
Main sections you will see
App language
General
Lowest Price Widget
Price History Tracking
Native Discount Tracking Beta
Smart Pricing Tools
The rest of this guide breaks each of these down in the same order you see them in the walkthrough.
4. General settings
App language
The App language dropdown controls the language used in the app interface itself. This is especially useful if your Shopify admin language does not match the language you want for the Omnibus Owl admin experience.
Max days to track
The Max days to track field controls how many days of price history the app keeps available for display and analysis.
The walkthrough shows this set to 90 days.
The field description says the supported range is 1-365 days.
This lets you go beyond the standard 30-day requirement if your store wants a longer internal history window.
5. Lowest Price Widget settings
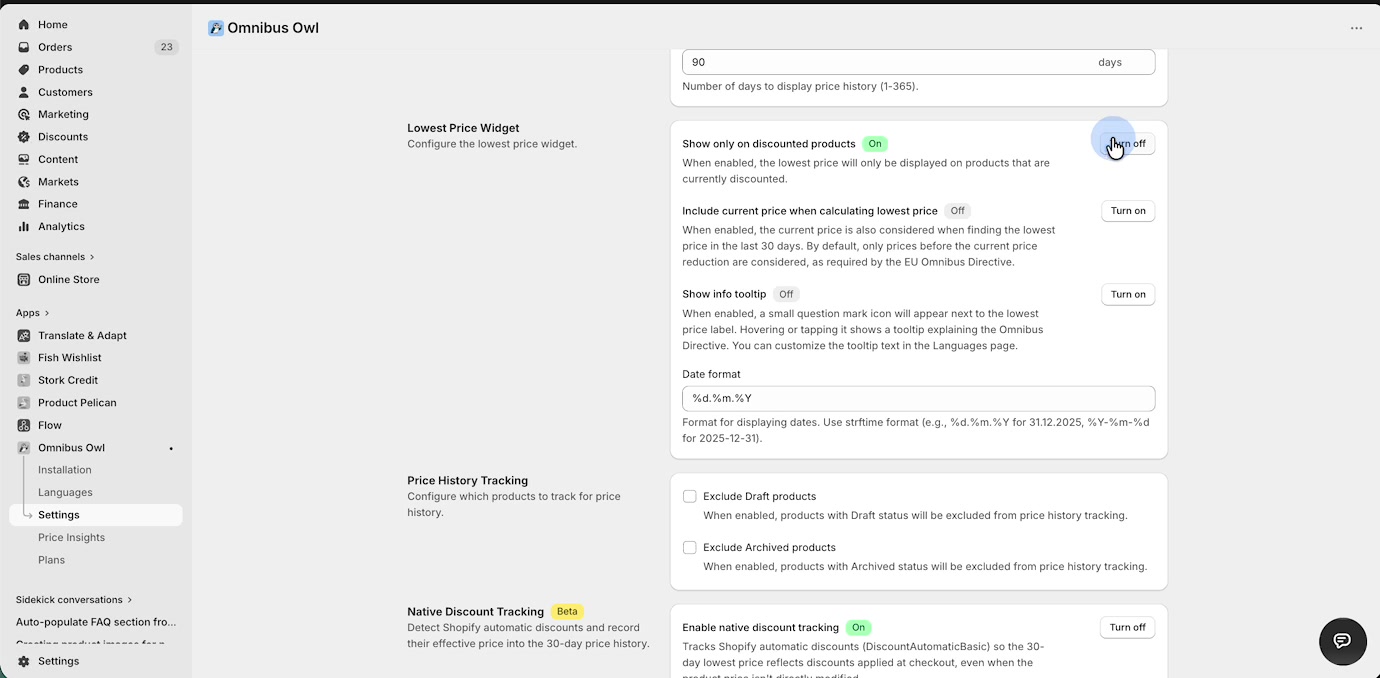
This section controls exactly how the storefront disclosure behaves. These settings are practical, flexible, and important because they affect what shoppers actually see.
Show only on discounted products
Show only on discounted products controls whether the widget appears only when a product is actively discounted.
Turn it on if you want the lowest-price message to appear only on products currently on sale.
Turn it off if you want to show price history more broadly.
For most stores, this is the cleanest setting because it keeps the storefront focused and relevant.
Include current price when calculating lowest price
Include current price when calculating lowest price changes how the app determines the displayed lowest price.
When off, Omnibus Owl follows the default approach of looking at prices before the current reduction.
When on, the current price is also considered in the calculation.
This gives you useful control over how conservative or inclusive your lowest-price display should be.
Show info tooltip
Show info tooltip adds a small question-mark style helper next to the label. This is a small feature, but it does a great job of making compliance feel customer-friendly instead of abrupt.
When enabled, the tooltip text comes from the Languages page.
Date format
The Date format field controls how dates appear in the widget. In the walkthrough, the field uses a format like %d.%m.%Y.
This is a nice detail because it lets the widget match local expectations instead of forcing a one-size-fits-all date display.
6. Price History Tracking settings
This section lets you decide which products should be tracked for price history in the first place.
Exclude Draft products
Enable Exclude Draft products to stop draft items from being tracked before they are published.
This is a smart cleanup setting, especially if your team experiments with pricing before launch.
Exclude Archived products
Enable Exclude Archived products to avoid tracking products that are no longer active in your storefront.
Together, these exclusions help keep your price history cleaner and more meaningful.
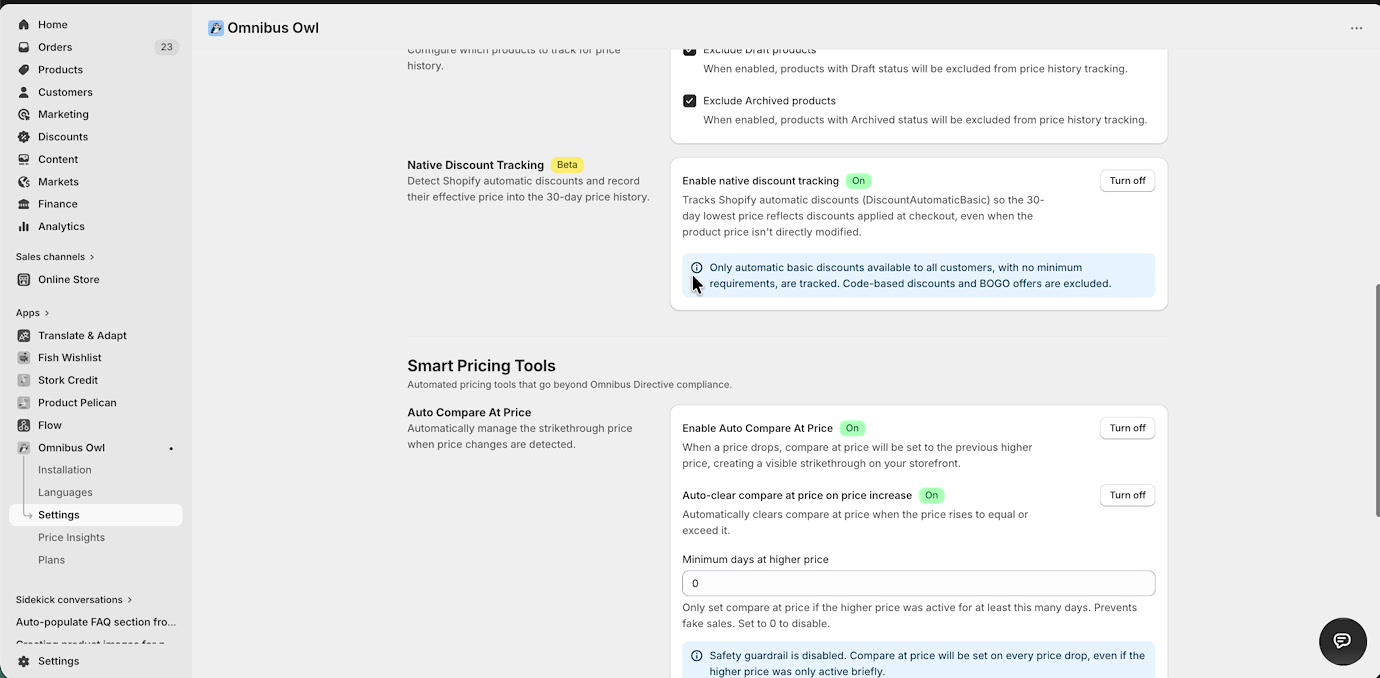
7. Native Discount Tracking
Native Discount Tracking is marked Beta in the walkthrough, and it is one of the most useful advanced compliance features in the app.
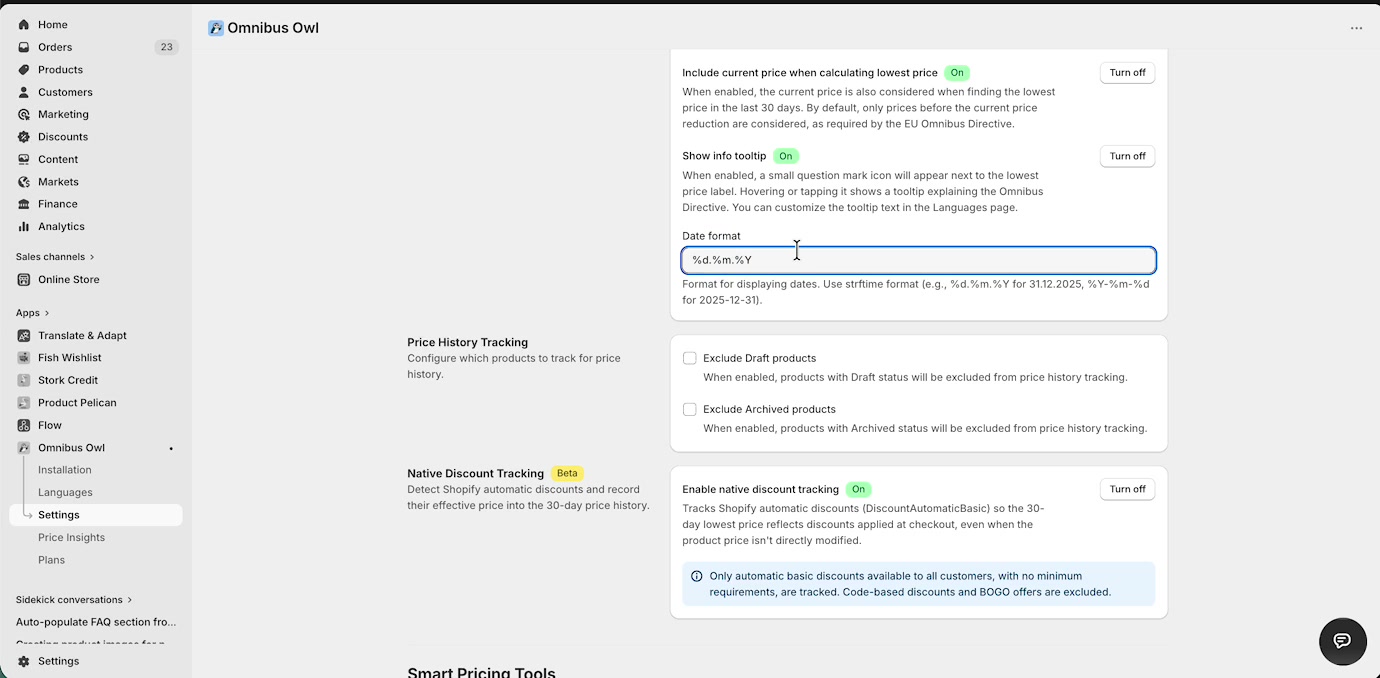
Enable native discount tracking
When Enable native discount tracking is on, Omnibus Owl tracks Shopify automatic discounts and records their effective price into the 30-day history, even when the product price itself is not directly changed.
That is a big deal. It means the app can reflect real storefront discount behavior more accurately, not just manual edits to the product price.
What it includes
The note in the walkthrough explains that only automatic basic discounts available to all customers, with no minimum requirements, are tracked.
What it excludes
Code-based discounts and BOGO offers are excluded.
8. Smart Pricing Tools
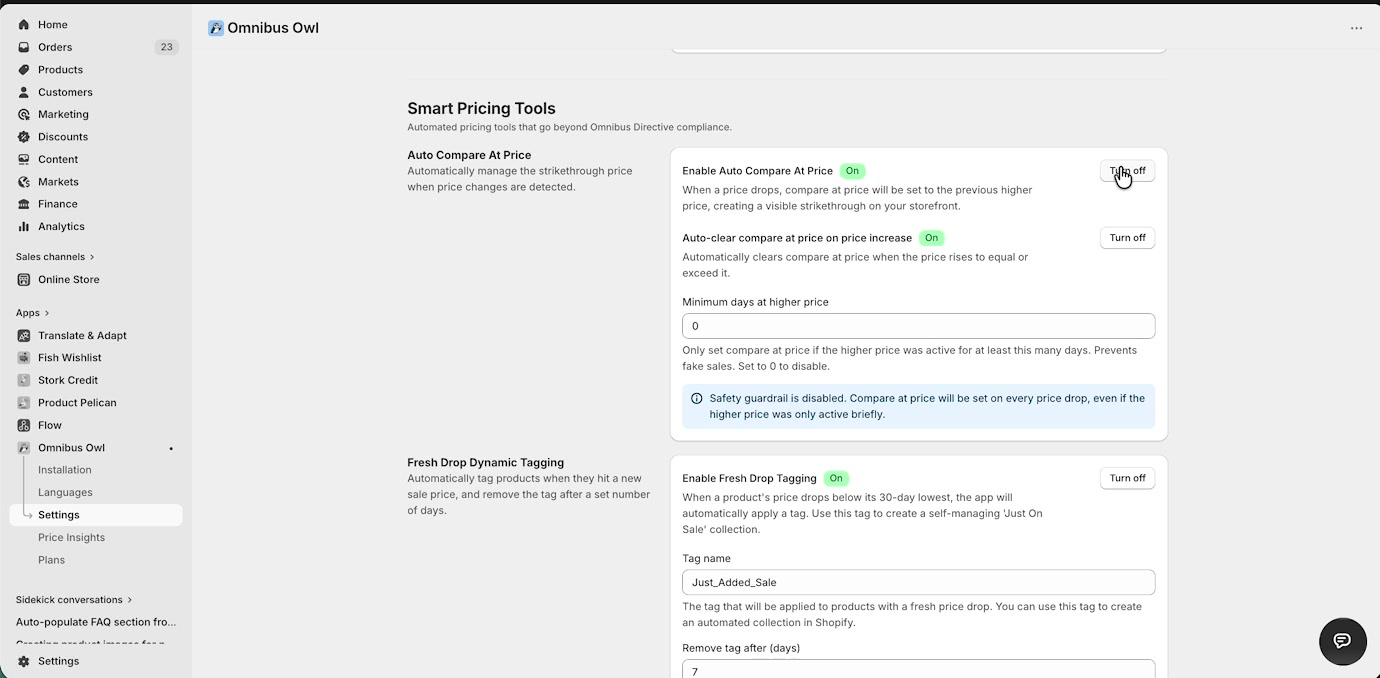
This is the part that really proves Omnibus Owl is more than a compliance app. The Smart Pricing Tools section adds automation that can improve how your sale prices look and how your products are merchandised after a drop.
Why these tools matter
A lot of compliance apps stop at “show the legal message.” Omnibus Owl keeps going. These features help your storefront look better, your collections stay fresher, and your sale operations require less manual admin work.
9. Auto Compare At Price
Auto Compare At Price is one of the standout features in Omnibus Owl.
Enable Auto Compare At Price
When Enable Auto Compare At Price is on, the app automatically sets the Compare at price to the previous higher price when it detects a price drop.
That means your storefront can instantly show a visible strikethrough price without your team having to update the compare-at field by hand. It is simple, powerful, and honestly one of the most useful quality-of-life features in the app.
Auto-clear compare at price on price increase
Auto-clear compare at price on price increase removes the compare-at price when the product price rises back to equal or exceed it.
This is excellent for keeping your storefront honest and tidy. You do not end up with stale compare-at prices hanging around after a sale ends.
Minimum days at higher price
The Minimum days at higher price field acts as a safety guardrail.
If you set it to 0, the safety guardrail is effectively disabled.
If you set a higher number, Omnibus Owl will only set a compare-at price if the earlier higher price was active for at least that many days.
This is a genuinely smart feature because it helps prevent weak or misleading strike-through pricing based on very short-lived price changes.
In short: if you want effortless sale presentation, this feature is fantastic. If you want extra caution, use the guardrail.
10. Fresh Drop Dynamic Tagging
Fresh Drop Dynamic Tagging is another standout. It turns price drops into an automatic tagging workflow you can actually build storefront experiences around.
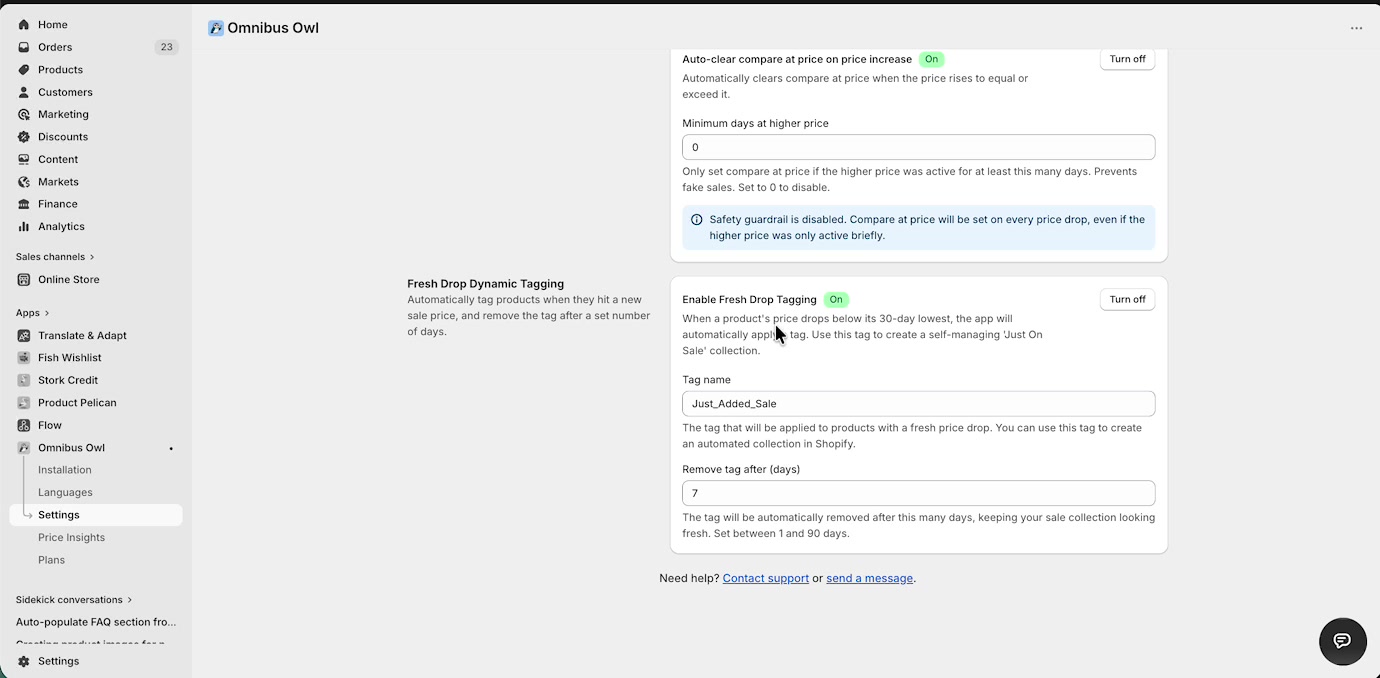
Enable Fresh Drop Tagging
When Enable Fresh Drop Tagging is on, Omnibus Owl automatically tags a product when its price drops below its 30-day lowest.
This is brilliant because it turns a pricing event into something your store can use operationally.
Tag name
The Tag name field controls which Shopify product tag gets applied. In the walkthrough, the example tag is Just_Added_Sale.
You can use that tag to power a self-updating collection, such as a Just On Sale collection, without manually tagging products one by one.
Remove tag after (days)
The Remove tag after (days) field controls when the tag is automatically removed. The walkthrough shows a value of 7 days and notes that the accepted range is 1 to 90 days.
This is what makes the feature especially strong. It is not just auto-tagging. It is self-cleaning auto-tagging. Your “fresh sale” collection can stay truly fresh without manual maintenance.
Why merchants love this feature
It creates instant sale merchandising opportunities.
It reduces manual tagging work.
It keeps time-sensitive collections accurate automatically.
It makes Omnibus Owl useful even beyond legal compliance.
11. Price Insights
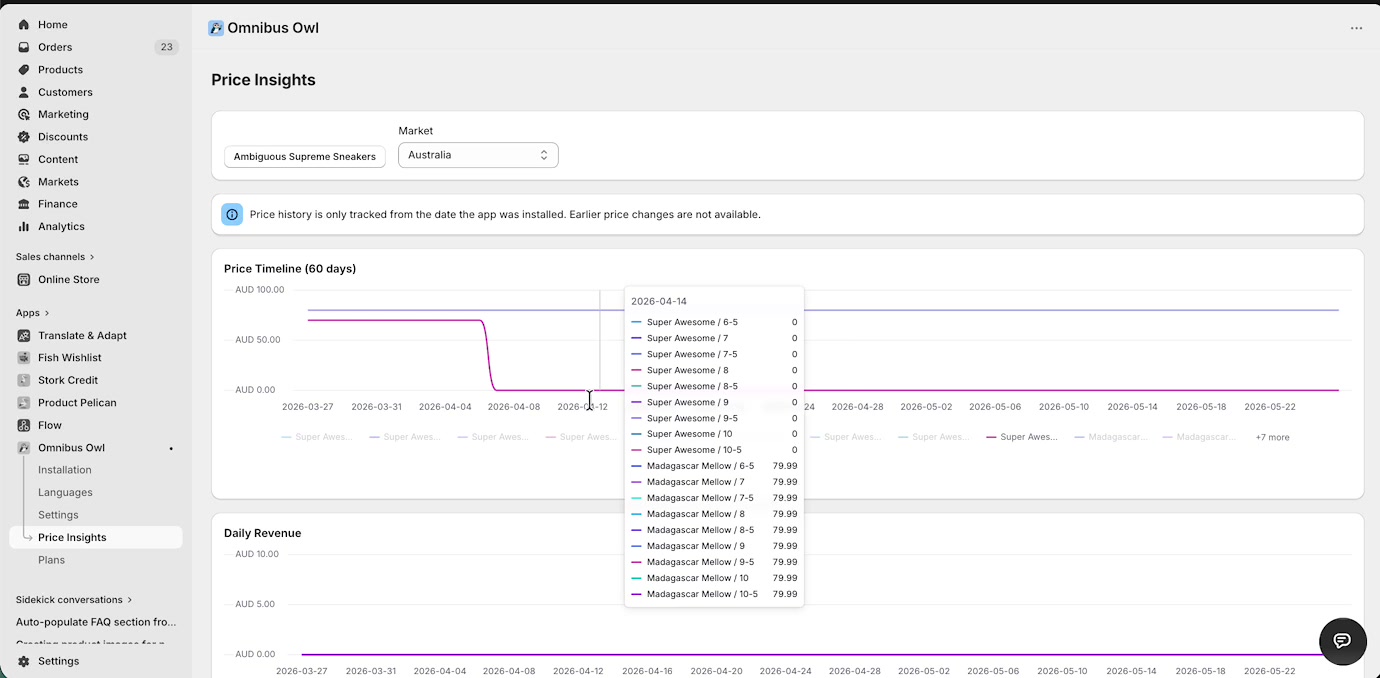
The walkthrough finishes on Price Insights, which is the reporting side of the app. This page helps you look back at what happened to a product over time and compare price changes against revenue patterns.
How the screen works
Pick a Product: Select the product you want to inspect.
Market: Choose the relevant market, such as Australia.
Price Timeline: Review how the product’s price changed over time.
Daily Revenue: See revenue data underneath the pricing chart.
Why Price Insights is useful
This screen helps you answer practical questions like:
When did this price drop happen?
Did the product stay at that price for long?
What happened to revenue around the change?
How did pricing look in a specific market?
That makes Price Insights more than a compliance record. It gives you a lightweight pricing review tool inside the same app.
Recommended setup order
If you are configuring Omnibus Owl for the first time, this is the cleanest order to follow:
Confirm Price Monitoring is active, your products are being monitored, and your theme components are installed under App Blocks Status.
Update the Lowest price label and Info tooltip text for each language you support.
Choose your Max days to track, decide whether to Show only on discounted products, and configure the Date format.
Enable Exclude Draft products and Exclude Archived products if you do not want inactive catalog states affecting your price history.
Use it if you rely on Shopify automatic discounts and want Omnibus Owl to reflect them in the recorded price history.
Turn on Auto Compare At Price and Fresh Drop Dynamic Tagging if you want Omnibus Owl to actively improve your storefront and collection workflows.
Use Price Insights to validate how pricing changes look over time and how they line up with revenue trends.
Best-practice defaults
Keep Show only on discounted products on for a clean storefront.
Turn on Show info tooltip if you want a more shopper-friendly explanation.
Exclude draft and archived products unless you have a specific reason not to.
Use a non-zero value for Minimum days at higher price if you want safer compare-at behavior.
Use Fresh Drop Dynamic Tagging with a dedicated collection to create a self-maintaining “Just On Sale” experience.
Related pages
Final takeaway
Omnibus Owl absolutely covers the compliance basics, but the best part is that it does not stop there. Features like Auto Compare At Price, Fresh Drop Dynamic Tagging, and Price Insights make it a genuinely useful pricing operations tool as well.
That combination is what makes the app stand out: it helps you stay compliant, keep your storefront clean, and automate some of the most annoying sale-related admin work at the same time.